Subaru Outback (BR): Entertainment General Description
A: CAUTION
- Before disassembling or reassembling parts, always disconnect the battery ground cable from battery.
When replacing the audio, control module and other parts provided with memory functions, record the memory contents before disconnecting the battery ground cable. Otherwise, the memory is cleared.
- Reassemble the parts in the reverse order of disassembly procedure unless otherwise indicated.
- Adjust parts to the given specifications.
- Connect the connectors securely during reassembly.
- After reassembly, make sure functional parts operate smoothly.
B: PREPARATION TOOL
1. GENERAL TOOL

Audio System
A: WIRING DIAGRAM
1. AUDIO
Refer to "Audio System" in the wiring diagram. <Ref. to WI-69, WIRING DIAGRAM, Audio System.>
B: INSPECTION
1. CHECK EACH VEHICLE SIGNAL
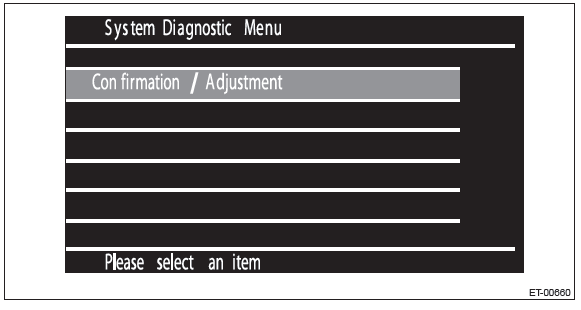
1) With the ignition switch ON and audio OFF, turn the VOLUME dial by 40 clicks while pressing the preset 1 key.
2) When "System Diagnostic Menu" is displayed, select {Confirmation/Adjustment} by SCROLL/TUNE dial, then press ENTER/SETTING key (SCROLL/TUNE dial).
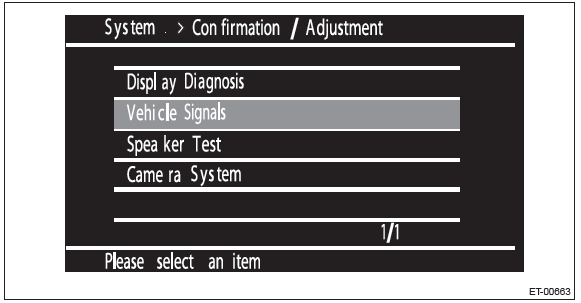
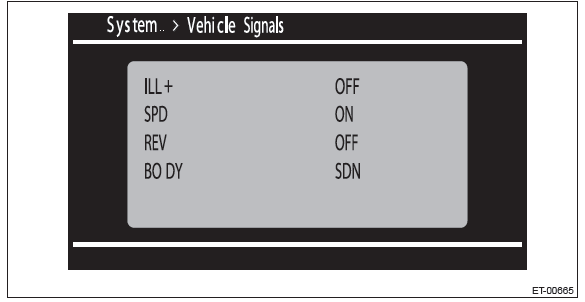
3) When "System.. > Confirmation/Adjustment" is displayed, select {Vehicle Signals} by SCROLL/TUNE dial, then press ENTER/SETTING key (SCROLL/TUNE dial).
- CHECK ILLUMINATION
When the light switch is turned ON, make sure that "ON" lights in ILL+ and then the screen becomes dim.
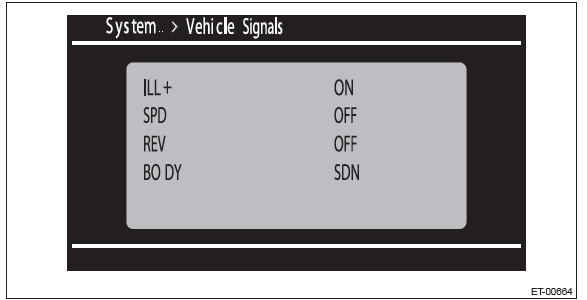
ON: Normal.
OFF: Abnormal. Check the signal line connector. If there are no problems, the unit could be faulty.
CHECK SPEED SENSOR
NOTE:
- Before starting inspections, check the safety around the vehicle.
- Lift up the vehicle as necessary.
- When the diagnostic trouble code is input in the VDCCM, perform the Clear Memory operation.
1) Move the vehicle slowly 2 to 3 meters (6.6 to 9.8 ft).
2) Check that "ON" is displayed in SPD.
ON: Normal.
OFF: Abnormal. Check the signal line connector. If there are no problems, the unit could be faulty.
- CHECK BACK SENSOR
1) Turn the parking brake switch to ON and depress the brake pedal, then put the gear in reverse.
2) Make sure that "ON" is displayed in REV.
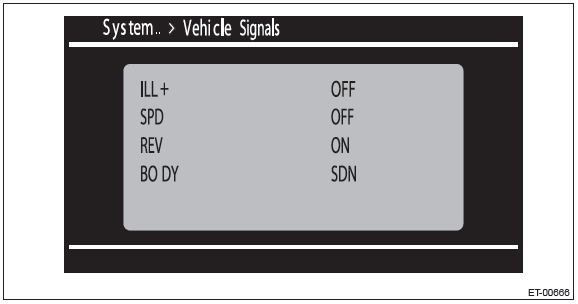
ON: Normal.
OFF: Abnormal. Check the signal line connector. If there are no problems, the unit could be faulty.
- CHECK VEHICLE SETTING
1) Check that "SDN" or "WGN" is displayed in BODY.
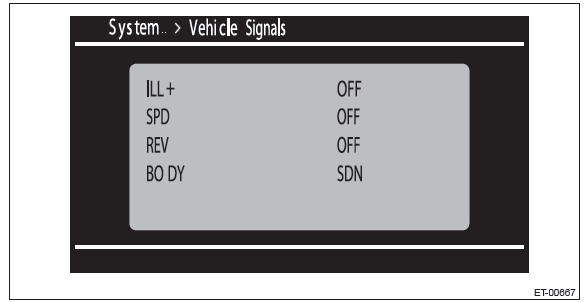
SDN: sedan model
WGN: OUTBACK model
2. CHECK MICROPHONE CONNECTION
Perform the inspection mode of the microphone connection.
1) When "HOOK OFF" button of the satellite switch is pressed with telephone unregistered, the screen switches to "BT" and "Welcome" is displayed.
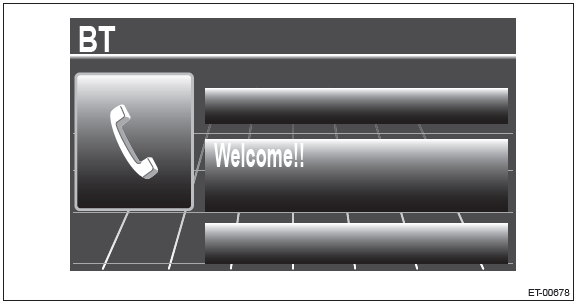
2) While "Welcome" is displayed, press "+" → "HOOK OFF" → "+" → "HOOK OFF" → "+" continuously in 5 seconds.
3) After "Speak loudly" is displayed, the inspection mode of the microphone connection is started.
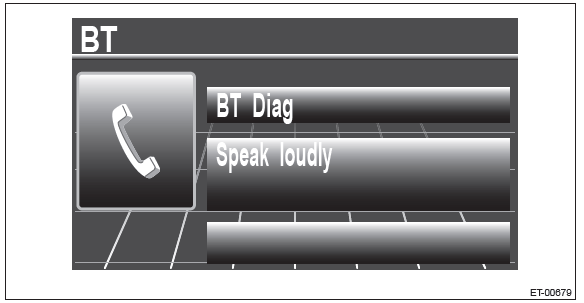
4) When the inspection mode of the microphone connection is completed, the inspection result is displayed.
MIC: good: normal
MIC: CHECK: There is something wrong with the connection status of the microphone. Check the following items.
- Connection status of the microphone
- Change the microphone or audio unit and check the microphone connection again then replace the faulty part.
C: NOTE
For procedure of each component in the audio system, refer to the respective sections.
- Audio unit: <Ref. to ET-12, Audio.>
- Power amplifier: <Ref. to ET-21, Power Amplifier.>
- Front side speaker: <Ref. to ET-14, FRONT SIDE SPEAKER, REMOVAL, Front Speaker.>
- Front door speaker: <Ref. to ET-15, FRONT DOOR SPEAKER, REMOVAL, Front Speaker.>
- Rear door speaker: <Ref. to ET-17, Rear Speaker.>
- Woofer: <Ref. to ET-19, Woofer.>
- Antenna: <Ref. to ET-22, Antenna.>
- Steering satellite switch: <Ref. to ET-32, Steering Satellite Switch.>
- Noise suppressor: <Ref. to ET-30, Noise Suppressor.>
- XM satellite radio antenna: <Ref. to ET-23, XM SATELLITE RADIO ANTENNA, REMOVAL, Antenna.>
Navigation System
A: WIRING DIAGRAM
Refer to "Navigation System" in the wiring diagram. <Ref. to WI-185, WIRING DIAGRAM, Navigation System.>
B: INSPECTION
NOTE: If no problems are found in "CHECK NAVIGATION OPERATION", "CHECK EACH CONNECTION" and "CHECK EACH VEHICLE SIGNAL" as described below, check the navigation system circuit. <Ref. to WI- 185, WIRING DIAGRAM, Navigation System.>
1. CHECK NAVIGATION OPERATION
Start the engine and check that the opening screen is displayed.
Standard: Opening screen is displayed.
OK: Normal.
NG: If the screen is not displayed, check the following items.
- The map disk (DVD-ROM) is set in the navigation system unit
- Check the connection of the power supply connector at the backside of the navigation unit. If wire connection is correct or has got repaired, check again that the opening screen is displayed.
If it is not displayed at this time, it indicates the navigation unit trouble.
2. CHECK EACH CONNECTION
1) Press the "Audio" key to display the AUDIO OFF screen.
2) Touch the screen in the order of (1) to (6) shown in the figure.
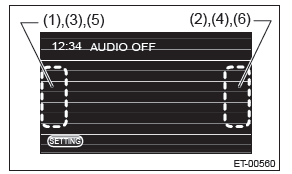
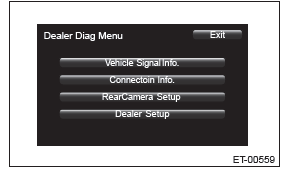
3) The display will switch to the Dealer Diag Menu screen.
- CHECK MICROPHONE, AUX AND REARVIEW CAMERA
NOTE: Before starting inspections, check the safety around the rear end of the vehicle and then turn the ignition switch to ON.
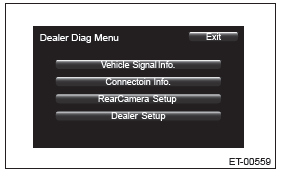
1) Touch {Connection Info.} on the "Dealer Diag Menu" screen.
2) Check that "Connect" is displayed in all the MIC, AUX and Camera items.
NOTE: {AUX} item is not displayed, if the suitable mini jack is not inserted in the AUX terminal in the console box.
Connect: Normal.
NC: Abnormal. Check the signal line connection. If there are no problems, the unit could be faulty.
- CHECK GPS ANTENNA
NOTE: When checking the GPS antenna, perform the check operation outdoors to improve the receiver sensitivity.
1) Touch {Vehicle Signal Info.} on the "Dealer Diag Menu" screen.
2) Check that "Connect" is displayed in the GPS Antenna item.
Connect: Normal.
NC: Abnormal. Check the GPS antenna connection.
- CHECK UART COMMUNICATION
NOTE: When checking the GPS antenna, perform the check operation outdoors to improve the receiver sensitivity.
1) Touch {Vehicle Signal Info.} on the "Dealer Diag Menu" screen.
2) Check that "ON" is displayed in the UART signal item.
OK: Normal.
NG: Abnormal. Check the signal line connection. If there are no problems, the unit could be faulty.
NOTE: If the UART signal line connector is not connected, the marker line is not displayed when the rearview camera image is displayed.
3. CHECK EACH VEHICLE SIGNAL
1) Press "Audio" key to display the Audio OFF screen.
2) Touch the screen in the order of (1) to (6) shown in the figure.
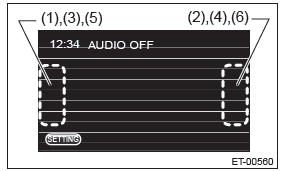
3) The display will switch to the Dealer Diag Menu screen.
- CHECK BACK SENSOR
1) Touch {Vehicle Signal Info.} on the "Dealer Diag Menu" screen.
2) Turn the parking brake switch to ON and depress the brake pedal, then put the gear in reverse.
3) Make sure that "ON" is displayed in the Reverse item.
ON: Normal.
OFF: Abnormal. Check the signal line connector. If there are no problems, the unit could be faulty.
- CHECK IGNITION SWITCH.
1) Touch {Vehicle Signal Info.} on the "Dealer Diag Menu" screen.
2) Make sure that "ON" lights in the IGN item and then the screen becomes dim.
ON: Normal.
OFF: Abnormal. Check the signal line connector. If there are no problems, the unit could be faulty.
- CHECK SPEED SENSOR
NOTE:
- Before starting inspections, check the safety around the vehicle.
- Lift up the vehicle as necessary.
- When the diagnostic trouble code is input in the VDCCM, perform the Clear Memory operation.
1) Touch {Vehicle Signal Info.} on the "Dealer Diag Menu" screen.
2) Move the vehicle slowly 2 to 3 meters (6.6 to 9.8 ft).
3) Check that "ON" is displayed in the Speed item.
ON: Normal.
OFF: Abnormal. Check the signal line connector. If there are no problems, the unit could be faulty.
- CHECK PARKING BRAKE
Touch {Vehicle Signal Info.} on the "Dealer Diag Menu" screen.
NOTE: Because the navigation unit does not read the parking brake signal, OFF is displayed constantly.
4. CHECK DVD-ROM
Insert a DVD-ROM (region code 1) into the navigation unit and play it, and the screen switches to the image from DVD.
NOTE: Region code 1 is the code for DVD-ROM designated for United States of America and Territories of the United States, Canada, Bermuda islands. DVD-ROMs of different region code cannot be played.
Standard: DVD images are displayed.
OK: Normal.
NG: If DVD images are not displayed, check the following points. If no problems are found, the navigation unit is faulty.
- Is a DVD-ROM set in the navigation unit?
- Is the DVD-ROM set in the unit properly?
- Is a correct type of DVD (DVD-VIDEO only) used?
- Is the playing side dirty or damaged?
NOTE:
- DVD images cannot be displayed while driving or the parking brake is not applied.
- The rear entertainment system cannot play MP3 files and DVD-Audio.
5. MESSAGE LIST

C: NOTE
For procedure of each component in the navigation system, refer to the respective section.
- Navigation unit: <Ref. to ET-38, Navigation Body.>
- GPS antenna: <Ref. to ET-40, GPS Antenna.>
Audio
A: REMOVAL
1) Disconnect the ground cable from battery.
2) Remove the center panel assembly.
CAUTION: Do not put your finger on the fin of the air vent grille. Doing so may damage the fin.
- Attach the protective tape (a) to the meter visor.
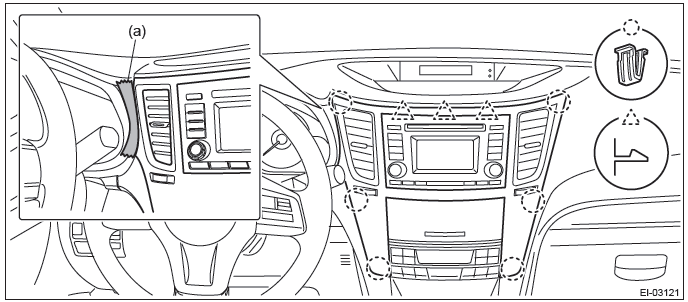
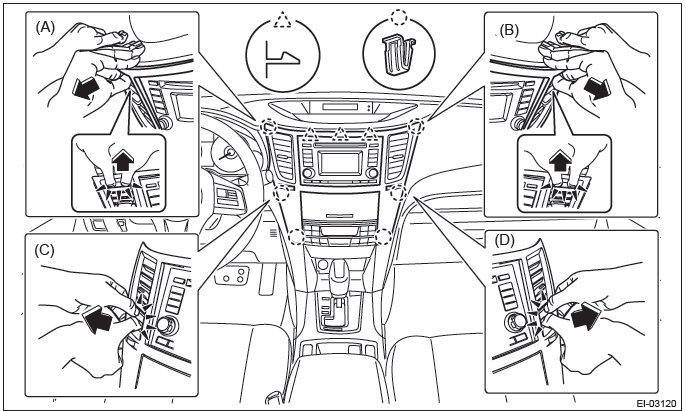
- Insert a finger into the air vent grille and release the left and right clips at the top of the center panel.
(A), (B)
- Insert a finger into the air vent grille and release the left and right clips at the center of the center panel.
(C), (D)
- Release the clips at the bottom of the center panel and remove the center panel assembly.
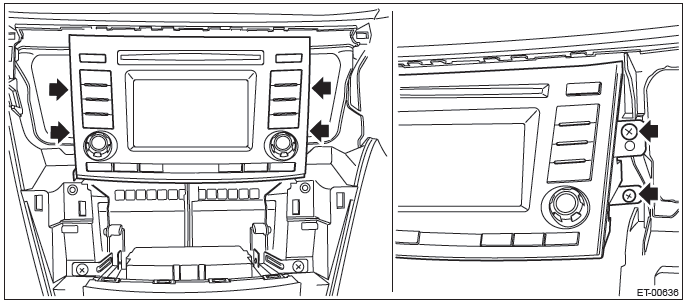
3) Remove the audio assembly.
- Remove the left and right screws, and partially pull the audio out from center console.
- Disconnect the connectors, and remove the audio assembly.
B: INSTALLATION
Install each part in the reverse order of removal.
READ NEXT:
 Front Speaker
A: REMOVAL
1. FRONT SIDE SPEAKER
1) Disconnect the ground cable from battery.
2) Remove the front side speaker.
Release the clips and claws, then detach the speaker cover.
CAUTION:
Use a plastic c
Woofer
A: REMOVAL
1. SEDAN MODEL
NOTE:
harman/kardon audio system only.
1) Disconnect the ground cable from battery.
2) Remove the rear shelf trim. <Ref. to EI-120, REMOVAL, Rear Shelf Trim.>
3) Remo
Antenna
A: REMOVAL
1. RADIO ANTENNA AMPLIFIER
Sedan model
1) Remove the rear quarter trim LH. <Ref. to EI-110, SEDAN MODEL, REMOVAL,
Rear Quarter Trim.>
2) Remove the radio antenna amplifier assemb
SEE MORE:
Pressure Sensor
A: INSPECTION
1) Perform a diagnosis code (DTC) check by connecting the Subaru Select
Monitor.
2) If any diagnosis code (DTC) is displayed, refer to "List of Diagnostic
Trouble Code (DTC)" in "HVAC SYSTEM
(DIAGNOSTICS)" section. <Ref. to AC(diag)-53, LIST, List of Diagnostic Trouble
Code (DTC
Refueling
Only one person should be involved in refueling. Do not allow others to approach
the area of the vehicle near the fuel filler pipe while refueling is in progress.
Be sure to observe any other precautions that are posted at the service station.
1. To open the fuel filler lid, pull the lid relea
