Subaru Outback (BR): Front Speaker
A: REMOVAL
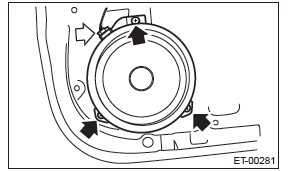
1. FRONT SIDE SPEAKER
1) Disconnect the ground cable from battery.
2) Remove the front side speaker.
- Release the clips and claws, then detach the speaker cover.
CAUTION: Use a plastic clip remover for removal.
- Remove the screws.
Preparation tool: Stubby screwdriver
- Disconnect the connector and remove the front side speaker assembly.
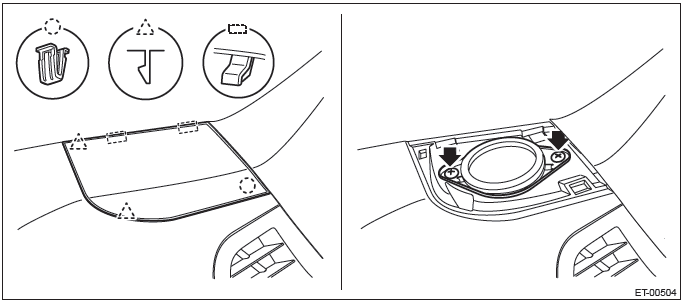
NOTE: On the passenger's side, also disconnect the sunload sensor connector.
2. FRONT DOOR SPEAKER
1) Disconnect the ground cable from battery.
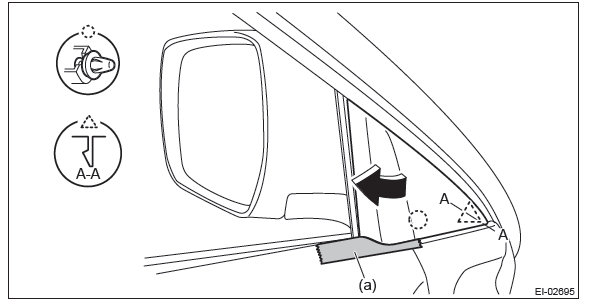
2) Remove the gusset cover.
- Attach the protective tape (a) to the door trim.
- Release the clips and claws, then detach the gusset cover.
3) Remove the door trim assembly.
- Open the cover and remove the screw.
- Remove the clips in the order of (A) to (J) and remove the door trim assembly from the door panel.
CAUTION: When removing the door trim, be sure to remove the clips in the correct order. Forcibly removing clips may damage the door panel assembly.
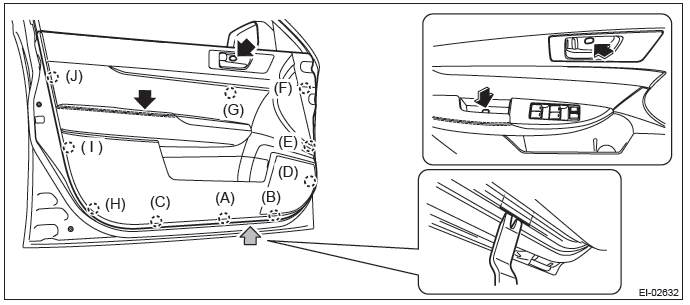
NOTE: Insert a plastic clip remover into the slit at the bottom of the door trim, to lift the door trim.
- Remove the cables (a) and (b) from the cable holder of inner remote.
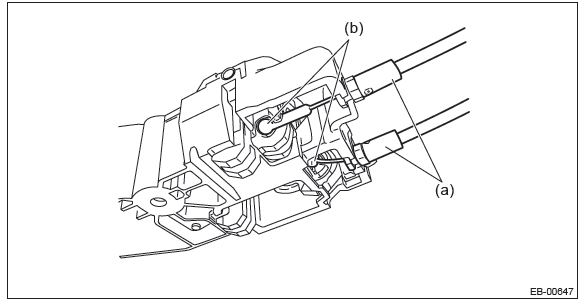
- Disconnect the harness connector and remove the door trim assembly.
4) Remove the front door speaker assembly.
- Remove the screws.
- Disconnect the harness connector and remove the front door speaker assembly.
B: INSTALLATION
Install each part in the reverse order of removal.
Rear Speaker
A: REMOVAL
1) Disconnect the ground cable from battery.
2) Remove the door trim assembly.
- Open the cover and remove the screw.
- Remove the clips in the order of (A) to (H) and remove the door trim assembly from the door panel.
CAUTION: When removing the door trim, be sure to remove the clips in the correct order. Forcibly removing clips may damage the door panel assembly.
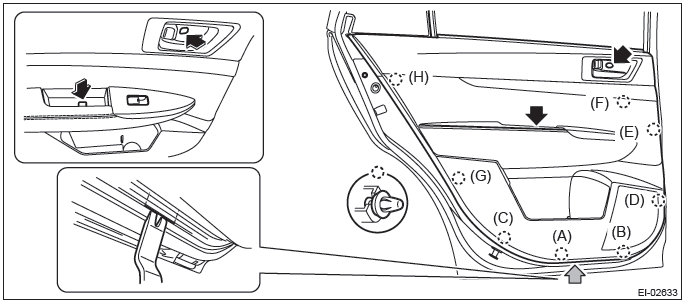
NOTE: Insert a plastic clip remover into the slit at the bottom edge of the door trim and lift the door trim.
- Remove the cables (a) and (b) from the cable holder of inner remote.

- Disconnect the harness connector and remove the door trim.
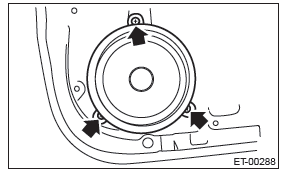
3) Remove the rear speaker assembly.
- Remove the screws.
- Disconnect the harness connector and remove the rear speaker assembly.
B: INSTALLATION
Install each part in the reverse order of removal.
READ NEXT:
 Woofer
A: REMOVAL
1. SEDAN MODEL
NOTE:
harman/kardon audio system only.
1) Disconnect the ground cable from battery.
2) Remove the rear shelf trim. <Ref. to EI-120, REMOVAL, Rear Shelf Trim.>
3) Remo
Antenna
A: REMOVAL
1. RADIO ANTENNA AMPLIFIER
Sedan model
1) Remove the rear quarter trim LH. <Ref. to EI-110, SEDAN MODEL, REMOVAL,
Rear Quarter Trim.>
2) Remove the radio antenna amplifier assemb
Steering Satellite Switch
A: REMOVAL
CAUTION:
Refer to "CAUTION" of "General Description" before handling the airbag module.
<Ref. to AB-9,
CAUTION, General Description.>
1) Position the front wheels straight ahead. (Af
SEE MORE:
Wheel balance
Each wheel was correctly balanced when your vehicle was new, but the wheels will
become unbalanced as the tires become worn during use. Wheel imbalance causes the
steering wheel to vibrate slightly at certain vehicle speeds and detracts from the
vehicle’s straight-line stability. It can also
Oil Pressure System
A: WIRING DIAGRAM
B: INSPECTION
Engine Oil
A: INSPECTION
CAUTION:
If the engine oil is spilt over exhaust pipe or the
under cover, wipe it off with cloth to avoid emitting
smoke or causing a fire.
1) Park the vehicle on a level surface.
2) Remove the oil level gauge and wipe away the
oil.
3) Rei
