Subaru Outback (BR): Rear Drive Shaft, Reduction Driven Gear
A: REMOVAL
1) Remove the transmission assembly from the vehicle.
<Ref. to 5AT-37, REMOVAL, Automatic Transmission Assembly.>
2) Remove the rear vehicle speed sensor, and then remove the extension case. <Ref. to 5AT-65, REMOVAL, Extension Case.>
3) Pull out the rear drive shaft from center differential assembly.
4) Remove the drive plate and driven plate.
B: INSTALLATION
1) Select shims. <Ref. to 5AT-67, ADJUSTMENT, Transfer Clutch.>
2) Install the drive plate and driven plate.
3) Insert the rear drive shaft into the center differential assembly.
4) Combine the extension case, and then install the rear vehicle speed sensor. <Ref. to 5AT-65, INSTALLATION, Extension Case.>
5) Install the transmission assembly to the vehicle.
<Ref. to 5AT-42, INSTALLATION, Automatic Transmission Assembly.>
C: DISASSEMBLY
1) Using a press, remove the revolution gear.
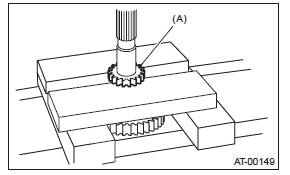
- Revolution gear
2) Using a press, remove the front and rear side ball bearings and clutch hub.
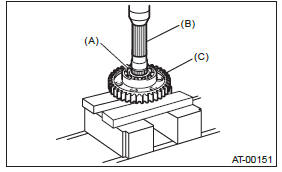
- Rear ball bearing
- Rear drive shaft
- Clutch hub
D: ASSEMBLY
Assemble in the reverse order of disassembly.
NOTE:
- Use new ball bearings and revolution gear.
- Make sure the clutch hub is facing the correct direction.
- Front side
- Clutch hub
- Rear side
- Revolution gear
E: INSPECTION
- Check each parts for holes, damages or other foreign matters.
- Inspect the extension end play, and adjust it to within the standard value. <Ref. to 5AT-67, ADJUSTMENT, Transfer Clutch.>
Reduction Driven Gear
A: REMOVAL
1) Remove the transmission assembly from vehicle body. <Ref. to 5AT-37, REMOVAL, Automatic Transmission Assembly.>
2) Remove the rear vehicle speed sensor, and separate the extension case from transmission case.
<Ref. to 5AT-65, REMOVAL, Extension Case.>
3) Remove the center differential carrier. <Ref. to 5AT-74, REMOVAL, Center Differential Carrier.>
4) Set the range select lever to the "P" range.
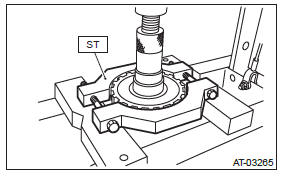
5) Using ST1, ST2 and ST3, pull out the reduction driven gear.
ST1 499737100 PULLER SET
ST2 18680AA010 GEAR HOLDER
ST3 18766AA000 SUPPORT PULLER
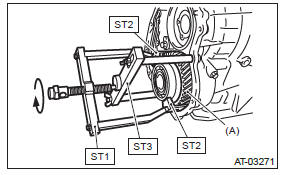
- Reduction driven gear
B: INSTALLATION
1) Set the range select lever to the "P" range.
2) Use a plastic hammer to install reduction driven gear assembly.
3) Select the reduction gear shims. <Ref. to 5AT- 72, ADJUSTMENT, Reduction Driven Gear.>
4) Join the transmission case and the extension case, and then install the rear vehicle speed sensor.
<Ref. to 5AT-65, INSTALLATION, Extension Case.>
5) Install the transmission assembly to the vehicle.
<Ref. to 5AT-42, INSTALLATION, Automatic Transmission Assembly.>
C: DISASSEMBLY
1) Remove the ball bearing from reduction driven gear using ST.
ST 498077300 REMOVER
- Ball bearing
2) Remove the ball bearing on the reverse side with the same procedure as step 1).
ST 498077300 REMOVER
- Ball bearing
3) Remove the snap ring of the parking gear.
4) Using the ST, remove the parking gear.
ST 18767AA000 REMOVER
D: ASSEMBLY
1) Using the ST, install the parking gear.
ST 499755602 PRESS
2) Install the snap ring.
3) Install the ball bearing to the reduction driven gear using a press.
NOTE: Use a new ball bearing.
ST 18654AA000 INSTALLER
4) Install the ball bearing on the reverse side with the same procedure as step 3).
ST 18654AA000 INSTALLER

E: INSPECTION
Check the ball bearing and gear for break or damage.
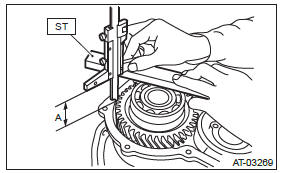
F: ADJUSTMENT
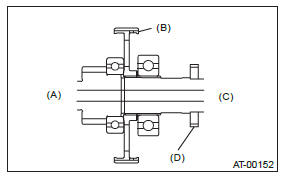
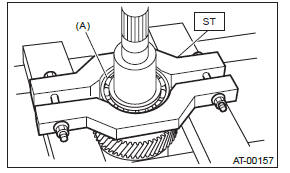
1) Using the ST, measure the height "A" from the AT main case mating surface to the ball bearing outer ring contact surface.
ST 499575400 GAUGE
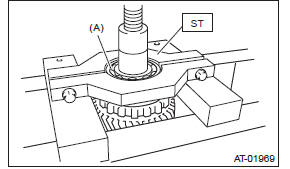
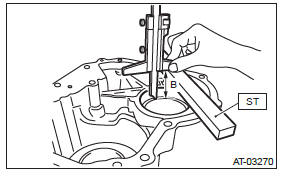
2) Using the ST, measure the depth "B", which is from mating surface of extension case to ball bearing outer ring contact surface.
ST 499575400 GAUGE
3) Calculation formula:
When clearances are 0.05 mm (0.0020 in):
T (mm) = B - A + 0.23
[T (in) = B - A + 0.0091]
When clearances are 0.25 mm (0.0098 in):
T (mm) = B - A + 0.03
[T (in) = B - A + 0.0012]
T: Shim clearance
A: Height from the mating surface of the AT main case to the ball bearing outer ring end surface
B: Depth from mating surface of extension case to ball bearing outer ring contact surface
Specification: 0.05 - 0.25 mm (0.0020 - 0.0098 in)
4) Select the reduction gear shim so that the clearance is within the specified range.

READ NEXT:
 Center Differential Carrier
A: REMOVAL
1) Remove the transmission assembly from the vehicle.
<Ref. to 5AT-37, REMOVAL, Automatic
Transmission Assembly.>
2) Remove the rear vehicle speed sensor, and separate
the extension
Oil Pump Cover removal
A: REMOVAL
1) Remove the transmission assembly from the vehicle.
<Ref. to 5AT-37, REMOVAL, Automatic Transmission Assembly.>
2) Pull out the torque converter assembly. <Ref. to 5AT-63, REM
Drive Pinion Shaft Assembly in Automatic Transmission
A: REMOVAL
1) Remove the transmission assembly from the vehicle.
<Ref. to 5AT-37, REMOVAL, Automatic Transmission Assembly.>
2) Pull out the torque converter assembly. <Ref. to 5AT-63, REM
SEE MORE:
Brake Booster
A: REMOVAL
CAUTION:
Do not allow brake fluid to come in contact with the painted surface of the
vehicle body. If it does,
wash off with water and wipe away completely.
1) Disconnect the ground cable from battery.
2) Drain brake fluid from the reservoir tank completely.
3) Remove the master cylind
Tilt/telescopic steering wheel
WARNING
Do not adjust the steering wheel tilt/ telescopic position while driving. This
may cause loss of vehicle control and result in personal injury.
1. Adjust the seat position. Refer to “Front seats” F1-2.
2. Pull the tilt/telescopic lock lever down.
3. Move the steering wheel to the
