Subaru Outback (BR): Roof Molding
A: REMOVAL
CAUTION: Be careful not to damage the body.
1) Remove the roof rail assembly. (OUTBACK model) <Ref. to EI-59, REMOVAL, Roof Rail.>
2) Turn over the front end of roof molding.
3) Using a flat tip screwdriver, slide the internal clip in the direction of arrow.
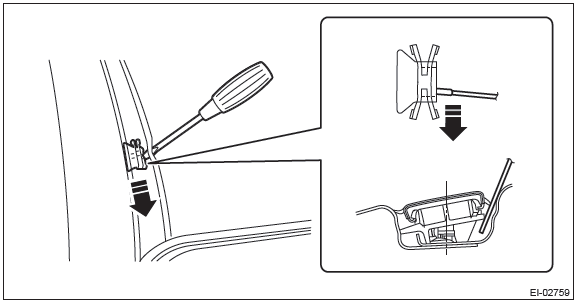
Right: Slide toward vehicle front.
Left: Slide toward vehicle rear.
4) Remove the clip from the stud on the body by sliding it.
- Sedan model: 6 clips per side
- OUTBACK model: 1 clip per side
5) Remove the roof molding from the vehicle body by pulling it upward.
B: INSTALLATION
1) Remove the clips from the roof molding and attach them on the stud on body.
CAUTION:
- Any clips damaged during roof molding removal must be replaced with new parts.
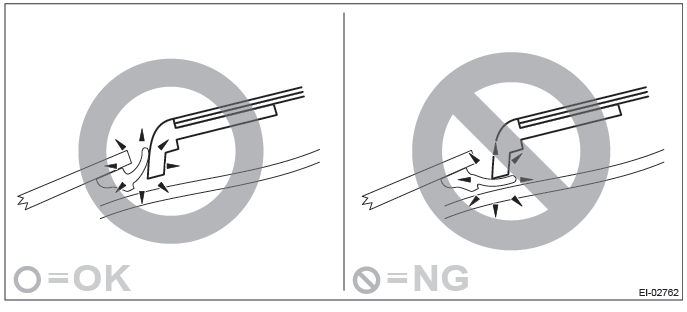
- While installing the roof molding, be careful not to catch the glass molding with the tip of the front side and rear side.
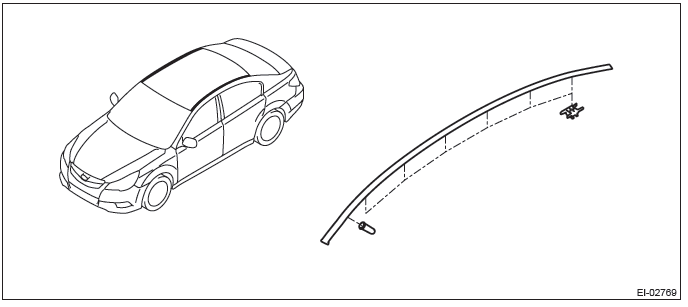
2) Apply the front end of roof molding to the front window, and attach the front positioning clip to the rivet on body.
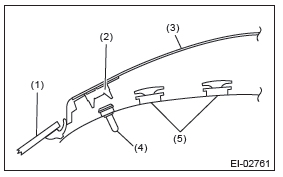
- Windshield
- Positioning clip
- Roof molding
- Rivet
- Clip
3) While pressing the roof molding from above, connect the roof molding with clips.
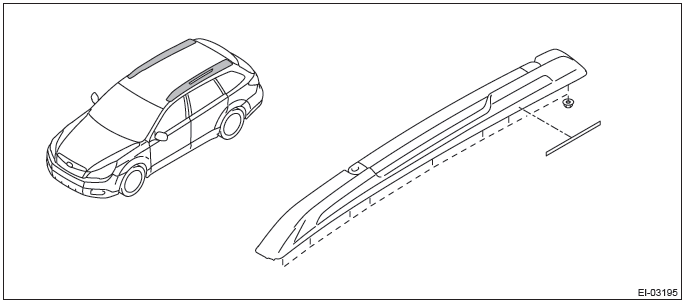
Roof Rail
A: REMOVAL
1) Remove the roof trim. <Ref. to EI-145, OUTBACK MODEL, REMOVAL, Roof Trim.>
2) Remove the curtain airbag module. <Ref. to AB-66, OUTBACK MODEL, REMOVAL, Curtain Airbag Module.>
CAUTION:
- Refer to "CAUTION" of "General Description" before handling the airbag module. <Ref. to AB-9, CAUTION, General Description.>
- Be careful not to damage the curtain airbag module during removal.
3) Remove the eight installing nuts.
B: INSTALLATION
CAUTION: When removing or installing the roof rail, be careful not to scratch the body panel with the stud bolt of roof rail.
Install each part in the reverse order of removal.
Tightening torque: 7.5 N*m (0.76 kgf-m, 5.5 ft-lb)
READ NEXT:
 Door Trim
A: REMOVAL
1. FRONT DOOR
1) Disconnect the ground cable from battery.
2) Remove the gusset cover.
Attach the protective tape (a) to the door trim.
Release the clips and claws, then detach the guss
Instrument Panel Lower Cover
A: REMOVAL
1) Disconnect the ground cable from battery.
2) Remove the clips, and remove the instrument panel side cover LH.
3) Remove the instrument panel lower cover.
Remove the clips and data li
Center Console
A: REMOVAL
1. CENTER PANEL ASSY
1) Attach the protective tape (a) to the meter visor.
2) Remove the center panel assembly.
CAUTION:
Do not put your finger on the fin of the air vent grille. Doing so
SEE MORE:
Operation during cold weather
Carry some emergency equipment, such as a window scraper, a bag of sand, flares,
a small shovel and jumper cables. Check the battery and cables. Cold temperatures
reduce battery capacity. The battery must be in good condition to provide enough
power for cold winter starts.
Use an engine oil
Seatbelt maintenance
To clean the seatbelts, use a mild soap and lukewarm water. Never bleach or dye
the belts because this could seriously affect their strength.
Inspect the seatbelts and attachments including the webbing and all hardware
periodically for cracks, cuts, gashes, tears, damage, loose bolts or worn ar
