Subaru Outback (BR): Door Trim
A: REMOVAL
1. FRONT DOOR
1) Disconnect the ground cable from battery.
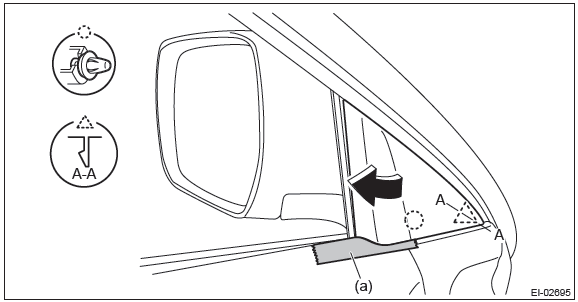
2) Remove the gusset cover.
- Attach the protective tape (a) to the door trim.
- Release the clips and claws, then detach the gusset cover.
3) Remove the front door trim assembly.
- Open the cover and remove the screw.
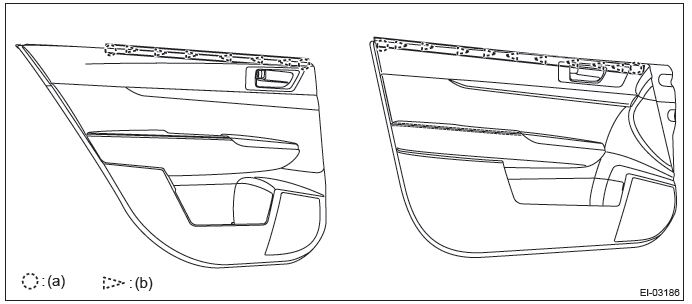
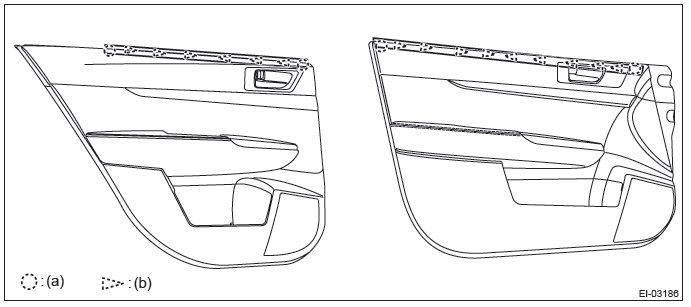
- Remove the clips in the order of (A) to (J) and remove the front door trim assembly from the door panel.
CAUTION: When removing the door trim, be sure to remove the clips in the correct order. Forcibly removing clips may damage the door panel assembly.
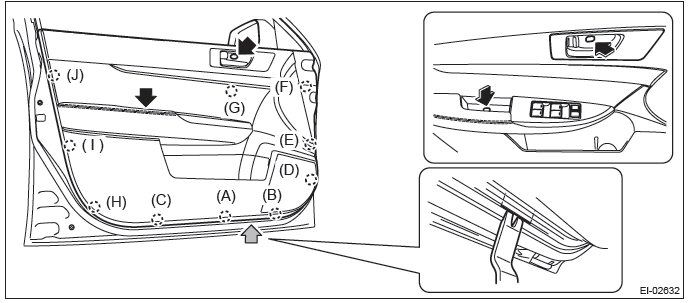
NOTE: Insert a plastic clip remover into the slit at the bottom of the door trim, to lift the door trim.
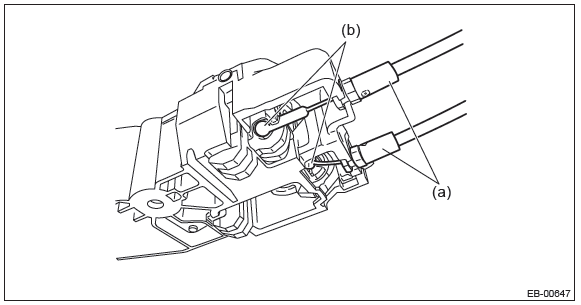
- Remove the cables (a) and (b) from the cable holder of inner remote.
- Disconnect the harness connector and remove the door trim assembly.
4) Remove each part as required.
- Inner remote handle: <Ref. to SL-30, REMOVAL, Front Inner Remote.>
- Power window control switch: <Ref. to GW-12, MAIN SWITCH, REMOVAL, Power Window Control Switch.>
- Weather strip inner: <Ref. to EI-62, DISASSEMBLY, Door Trim.>
2. REAR DOOR
1) Disconnect the ground cable from battery.
2) Remove the rear door trim assembly.
- Open the cover and remove the screw.
- Remove the clips in the order of (A) to (H) and remove the rear door trim assembly from the door panel.
CAUTION: When removing the door trim, be sure to remove the clips in the correct order. Forcibly removing clips may damage the door panel assembly.
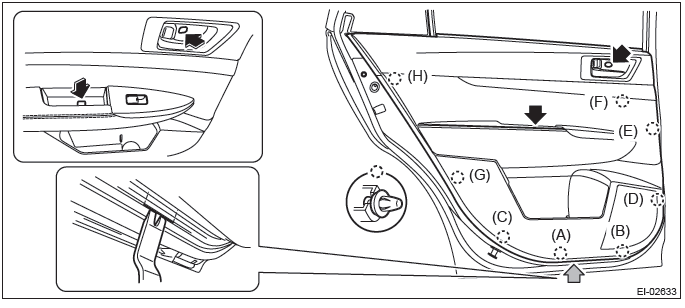
NOTE: Insert a plastic clip remover into the slit at the bottom of the door trim, to lift the door trim.
- Remove the cables (a) and (b) from the cable holder of inner remote.
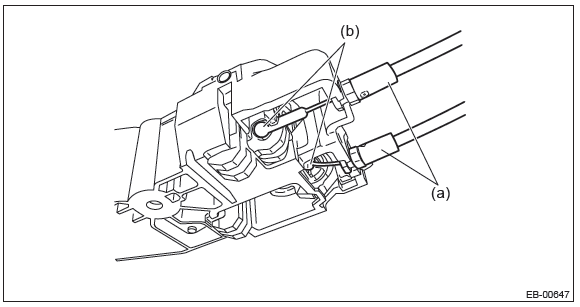
- Disconnect the harness connector and remove the door trim.
3) Remove each part as required.
- Inner remote handle: <Ref. to SL-37, REMOVAL, Rear Inner Remote.>
- Power window control switch: <Ref. to GW-13, SUB-SWITCH, REMOVAL, Power Window Control Switch.>
- Weather strip inner: <Ref. to EI-62, DISASSEMBLY, Door Trim.>
B: INSTALLATION
Install each part in the reverse order of removal.
C: DISASSEMBLY
1) Remove the door trim.
2) Remove the rivets and detach the claws, then remove the weather strip inner from the door trim.
- Rivet
- Claw
NOTE: Remove the rivets with a rivet cutter or nipper, etc.
D: ASSEMBLY
1) Fold the claws while pressing the weather strip inner to the door trim.
CAUTION: Beware of the direction of folding the claws.
2) Install the rivets and apply unwoven cloth.
CAUTION: Set the height of rivet crimped section as 3 mm (0.12 in). If the crimp is not sufficient, press them with pliers, etc. in order not to interfere the door trim.
Preparation tool and item:
Hand riveter (corresponding to φ3.2 mm (0.13 in) )
Rivet
Unwoven cloth (cut into 15 x 15 mm (0.59 x 0.59 in) )
- Rivet
- Direction of folding claws
3) After installing the weather strip inner, perform the following inspections.
- There is no clearance between the weather strip inner and the door trim.
- No loose fit is found when pulling the weather strip inner lightly.
READ NEXT:
 Instrument Panel Lower Cover
A: REMOVAL
1) Disconnect the ground cable from battery.
2) Remove the clips, and remove the instrument panel side cover LH.
3) Remove the instrument panel lower cover.
Remove the clips and data li
Center Console
A: REMOVAL
1. CENTER PANEL ASSY
1) Attach the protective tape (a) to the meter visor.
2) Remove the center panel assembly.
CAUTION:
Do not put your finger on the fin of the air vent grille. Doing so
Instrument Panel Assembly
A: REMOVAL
CAUTION:
Be careful not to damage the airbag system harness when servicing the instrument
panel. Damage
may cause the system to malfunction.
1) Disconnect the ground cable from battery.
2
SEE MORE:
Front Axle
A: REMOVAL
1) Lift up the vehicle, and then remove the front wheels.
2) Remove the axle nut.
CAUTION:
Do not loosen the axle nut while the front axle is loaded. Doing so may damage
the hub bearing.
Lift the crimped section of axle nut.
Remove the axle nut using a socket wrench while depressing
General Description of Clutch System
A: SPECIFICATION
B: COMPONENT
1. CLUTCH ASSEMBLY
Dust cover
Lever spring
Pivot
Release lever (non-turbo model)
Clip (non-turbo model)
Release bearing (non-turbo model)
Release lever (turbo model)
Release bearing (turbo model)
Clutch cover
Cl
