Subaru Outback (BR): Sunroof/T-Top/Convertible Top (Sunroof)
General Description
A: COMPONENT
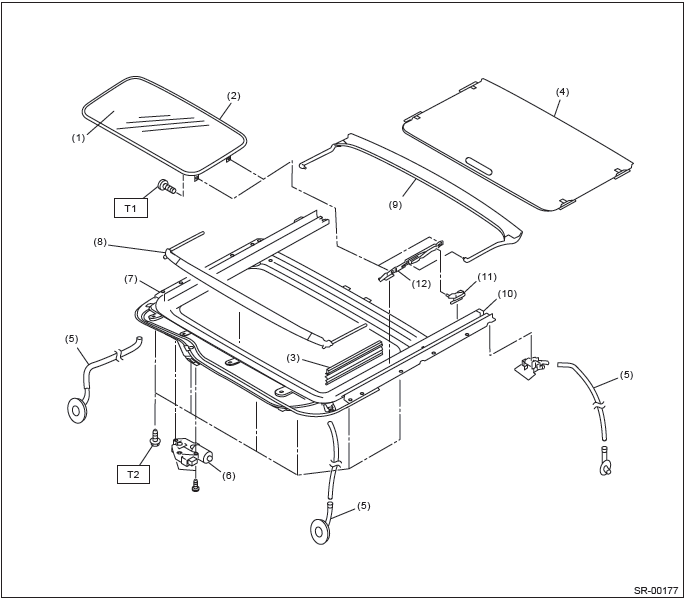
- Glass lid
- Weather strip
- Lid cover
- Sunshade
- Drain tube
- Motor ASSY
- Frame ASSY
- Deflector
- Drain plate
- Stopper rubber
- Link ASSY
- Lid bracket
Tightening torque: N*m (kgf-m, ft-lb)
T1: 4.5 (0.46, 3.3)
T2: 6.0 (0.61, 4.4)
B: CAUTION
- Before disassembling or reassembling parts, always disconnect the
battery ground cable from battery.
When replacing the audio, control module and other parts provided with memory functions, record the memory contents before disconnecting the battery ground cable. Otherwise, the memory is cleared.
- Reassemble the parts in the reverse order of disassembly unless otherwise indicated.
- Adjust parts to the given specifications.
- Connect the connectors securely during reassembly.
- After reassembly, make sure that the functional parts operate normally.
C: PREPARATION TOOL
1. GENERAL TOOL

Relay and Fuse
A: LOCATION

NOTE: For other related fuses, refer to the wiring diagram. <Ref. to WI-15, Power Supply Circuit.>
B: INSPECTION
1. CHECK FUSE.
1) Remove the fuse and check visually.
2) If the fuse is blown out, replace the fuse.
Sunroof Control System
A: WIRING DIAGRAM
Refer to "Sunroof Control System" in the wiring diagram. <Ref. to WI-247, WIRING DIAGRAM, Sunroof Control System.>
B: INSPECTION
- Failure turn of glass lid while driving rough road.
Glass lid has auto-reverse function. When specified or more force is applied to the glass lid, the lid turns back and stops. When operating the glass lid (open or close) while driving the rough road, the lid judges vibration as a force and may causes failure turns. When the failure turn is occurred, need to perform the initialize operation with following procedure.
C: OPERATION
1. INITIALIZE OPERATION
NOTE: When initialize operation is performed, it is necessary to press the switch repeatedly as it operates for only at the moment when the switch is pressed, even when the switch is held down.
1) Press the slide switch to close the glass lid completely.
2) Press the slide switch again and tilt up the glass lid to lock.
3) Press the slide switch for more than 0.3 seconds.
4) Initialize operation is completed.
D: NOTE
For operation procedures of each component of the sunroof control system, refer to the respective section.
- Glass lid: <Ref. to SR-6, Glass Lid.>
- Sunroof assembly: <Ref. to SR-9, Sunroof Assembly.>
- Sunroof motor: <Ref. to SR-15, Sunroof Motor.>
- Sunroof switch: <Ref. to SR-17, Sunroof Switch.>
- Sunshade: <Ref. to SR-19, Sunshade.>
Glass Lid
A: REMOVAL
1) Completely close the glass lid, and then open the sunshade.
2) Disconnect the claws and then remove the lid cover.
3) Remove the bolts, then remove the glass lid.
CAUTION: Be careful not to damage the glass lid.
B: INSTALLATION
Install each part in the reverse order of removal.
Tightening torque: Refer to "COMPONENT" of "General Description". <Ref. to SR-2, COMPONENT, General Description.>
C: ADJUSTMENT
Adjust the height of the glass lid and roof panel.
- Loosen the glass lid mounting bolts (A), and then adjust the height with moving the lid side.
Difference in height between weather strip and roof panel L: 0+-1.0 mm (0+-0.04 in)
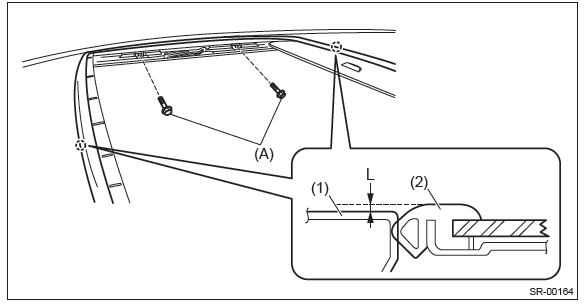
- Roof panel
- Weather strip
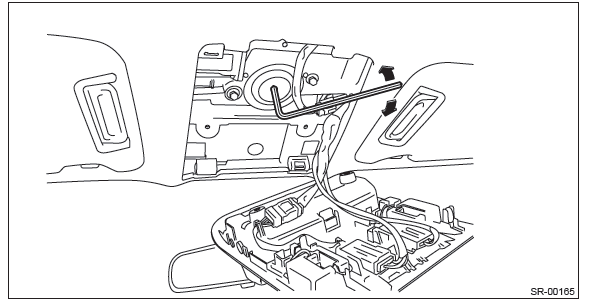
D: FORCED DRIVE
If the glass lid does not operate or the sunroof motor is not supplied with power, move the glass lid using the hexagon wrench.
Width across flat 5 mm (0.20 in)
CAUTION: After a forced operation, make sure to perform an initialize operation. <Ref. to SR-5, INITIALIZE OPERATION, OPERATION, Sunroof Control System.>
1) Remove the spot map light. <Ref. to LI-62, REMOVAL, Spot Map Light.>
2) Insert the hexagon wrench securely until it touches the motor shaft edge.
3) Turn the hexagon wrench, and move the glass lid.
- Turning right, the glass lid open.
- Turning left, the glass lid close.
CAUTION: Be careful not to damage the adjacent parts with the rod end when moving the glass lid with the hexagon wrench.
Sunroof Assembly
A: REMOVAL
CAUTION: When removing the clip, use great care not to damage the roof trim.
1) Remove the glass lid.
- Completely close the glass lid, and then open the sunshade.
- Disconnect the claws and then remove the lid cover.
- Remove the bolts, then remove the glass lid.
CAUTION: Be careful not to damage the glass lid.
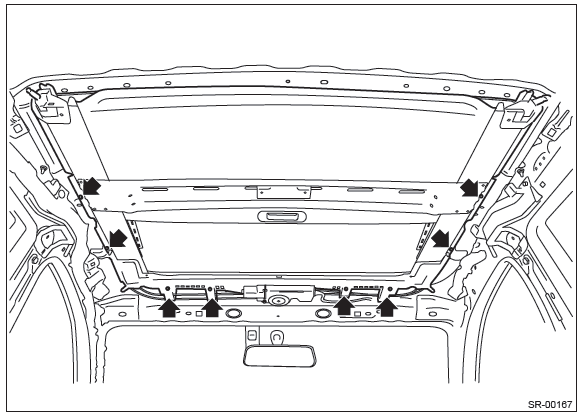
2) Remove the roof trim. <Ref. to EI-131, REMOVAL, Roof Trim.>
3) Disconnect the sunroof motor connector.
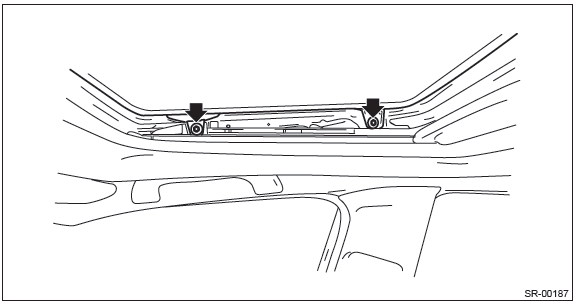
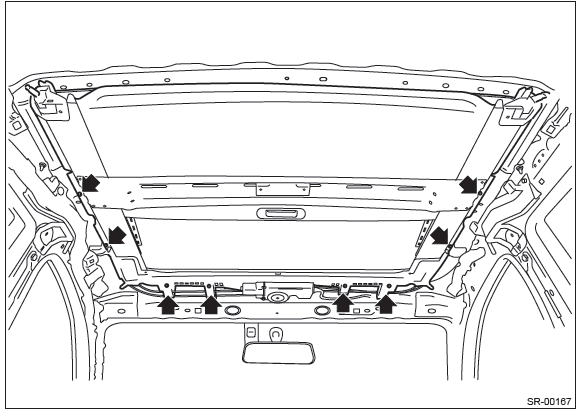
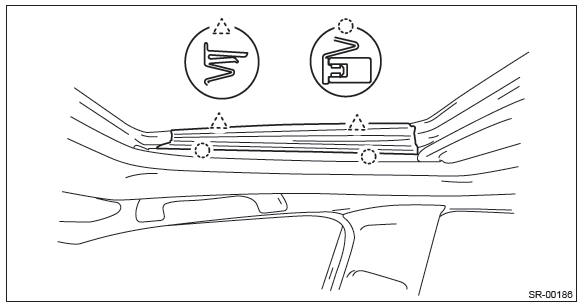
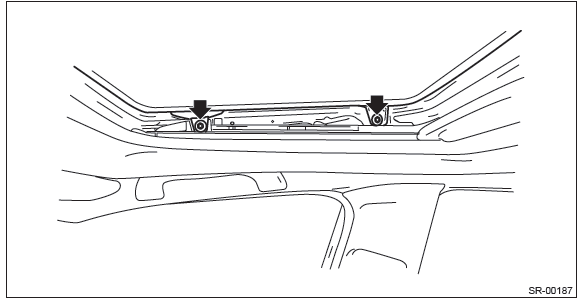
4) Remove the frame assembly.
- Remove the drain tube.
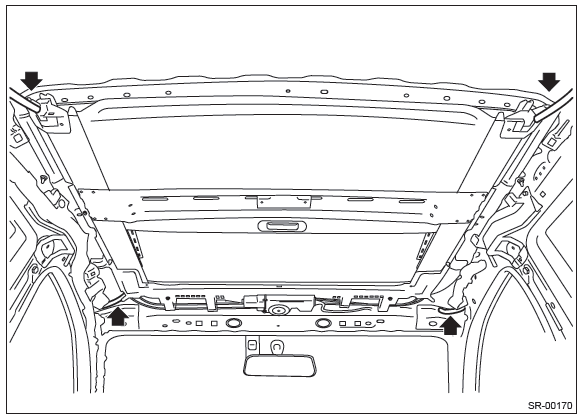
- Remove the bolts and then remove the sunroof bracket.
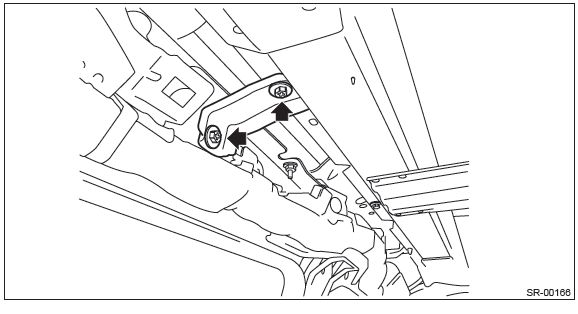
- Remove the bolts, then remove the frame assembly.
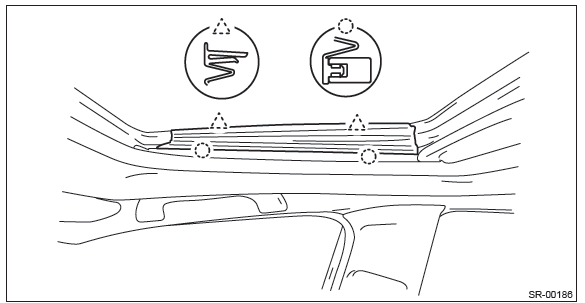
B: INSTALLATION
CAUTION: Be careful not to snag the harness.
Install each part in the reverse order of removal.
Tightening torque: Refer to "COMPONENT" of "General Description". <Ref. to SR-2, COMPONENT, General Description.>
NOTE:
- Be sure to connect the harness connector.
- When installing the drain tube, insert it securely into drain pipe.
Length A: 15 mm (0.59 in) or more

C: DISASSEMBLY
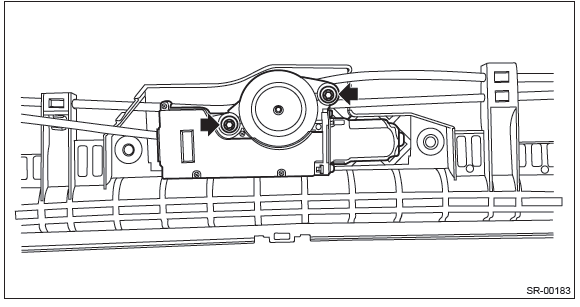
1) Remove the bolts and then remove the sunroof motor.
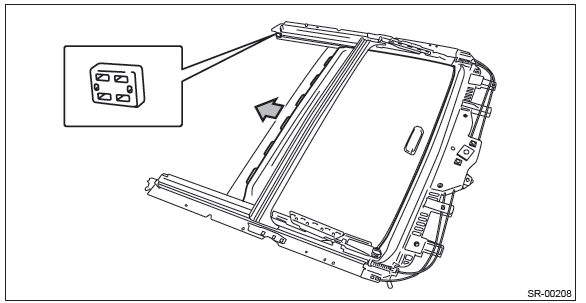
2) Remove the stopper rubber and pull out the sunshade from sunroof frame.
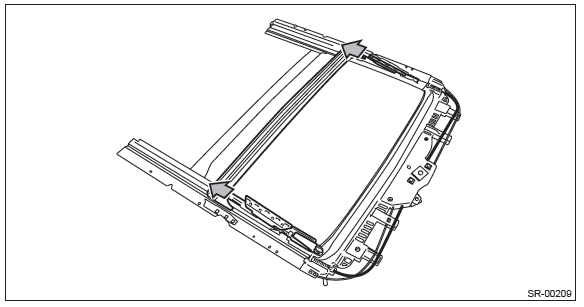
3) Remove the sunroof cable assembly.
- Remove the screw and remove the drain holder.
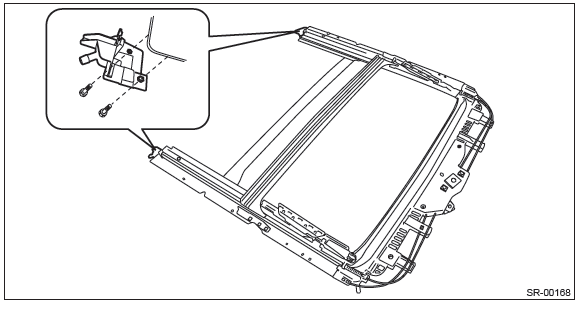
- Remove the screw and pull out the sunroof cable assembly from the frame roof assembly.
D: ASSEMBLY
Install each part in the reverse order of removal.
Sunroof Motor
A: REMOVAL
1) Completely close the glass lid.
2) Disconnect the ground cable from battery.
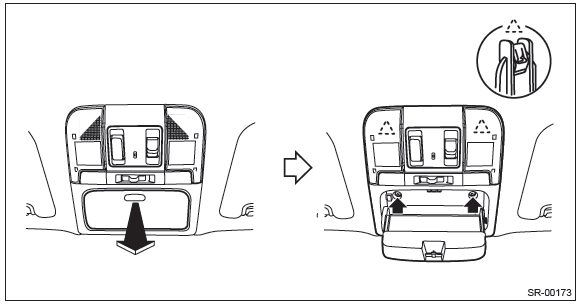
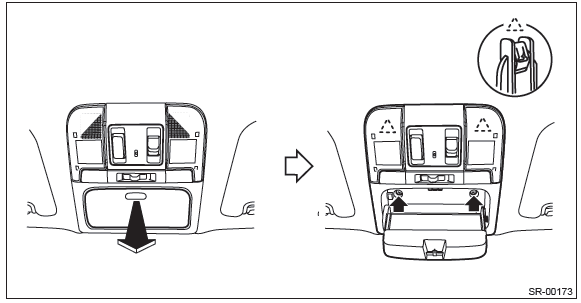
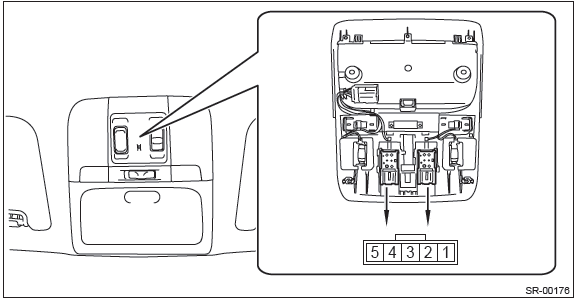
3) Remove the overhead console.
- Push and open the rear end of the overhead console lid, and remove the screws.
- Remove the clips and pull out the overhead console to disconnect the connectors.
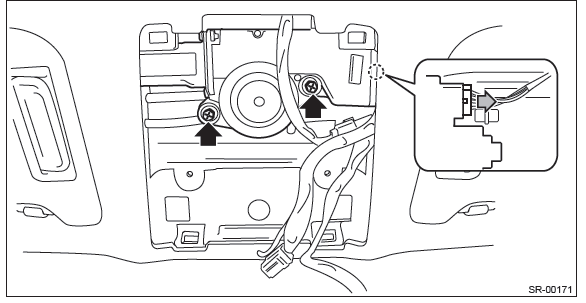
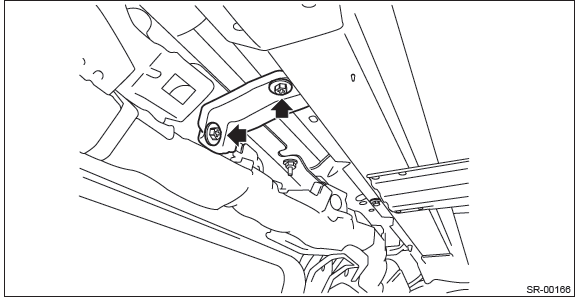
4) Remove the sunroof motor assembly.
- Disconnect the connector.
- Remove the bolts and remove the sunroof motor assembly.
CAUTION: When removing the motor assembly, secure the cable wires so that it does not move.
B: INSTALLATION
CAUTION: When installing the motor assembly, be careful not to move the sunroof cable.
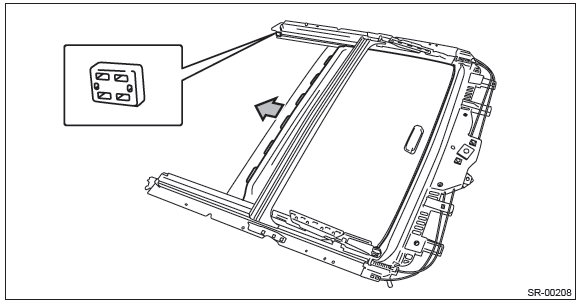
1) Align the lid bracket and link assembly in the same position.
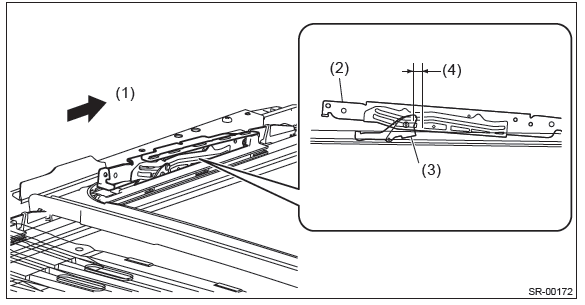
- Front
- Lid bracket
- Link ASSY
- 8.9 mm (0.35 in)
2) Install the sunroof motor assembly.
3) Install the spot map light, and connect the ground cable to the battery.
4) Perform the initialize operation. <Ref. to SR-5, INITIALIZE OPERATION, OPERATION, Sunroof Control System.>
5) Check the operation of sunroof with following table below.

C: INSPECTION
Check the auto-reverse mechanism.
CAUTION: Do not place objects in the way to check the auto-reverse mechanism.
1) Open the glass lid.
2) Forcefully push the glass lid in the opening direction while auto-closing, to check whether the window auto-reverse mechanism functions.
NOTE:
- The auto-function is cancelled when the window auto-reverse mechanism is activated more than five times.
- If the auto function is cancelled, reset it. <Ref. to SR-5, OPERATION, Sunroof Control System.>
Sunroof Switch
A: REMOVAL
1) Disconnect the ground cable from battery.
2) Remove the overhead console.
- Push and open the rear end of the overhead console lid, and remove the screws.
- Remove the clips and pull out the overhead console to disconnect the connectors.
3) Release the claws and remove the sunroof switch from the overhead console.
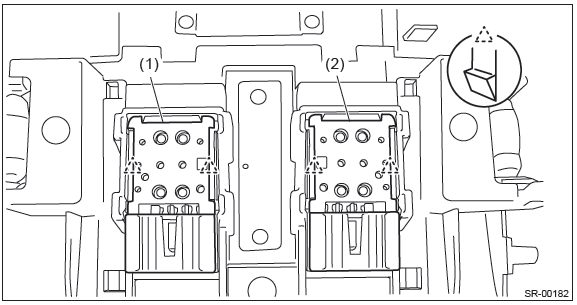
- Sunroof switch (tilt)
- Sunroof switch (slide)
B: INSTALLATION
Install each part in the reverse order of removal.
C: INSPECTION
1) Remove the overhead console.
2) Check the resistance between sunroof switch terminals.
Preparation tool: Circuit tester

3) Replace the sunroof switch if the inspection result is not within the standard value.
Sunshade
A: REMOVAL
CAUTION: When removing the clip, use great care not to damage the roof trim.
1) Remove the glass lid.
- Completely close the glass lid, and then open the sunshade.
- Disconnect the claws and then remove the lid cover.
- Remove the bolts, then remove the glass lid.
CAUTION: Be careful not to damage the glass lid.
2) Remove the roof trim. <Ref. to EI-131, REMOVAL, Roof Trim.>
3) Disconnect the sunroof motor connector.
4) Remove the frame assembly.
- Remove the drain tube.

- Remove the bolts and then remove the sunroof bracket.
- Remove the bolts, then remove the frame assembly.
5) Remove the stopper rubber and pull out the sunshade from sunroof frame.
B: INSTALLATION
Install each part in the reverse order of removal.
Tightening torque: Refer to "COMPONENT" of "General Description". <Ref. to SR-2, COMPONENT, General Description.>
C: INSPECTION
1. CHECK FOR MOVING LOAD OF SUNSHADE
1) Attach a spring scale to sunshade edge using a cloth.
2) Pull the spring scale to check the moving load of the sunshade.
Moving load of sunshade: 14+-6 N (1.43 kgf, 3.1 lbf+-0.61 kgf, 1.3 lbf)
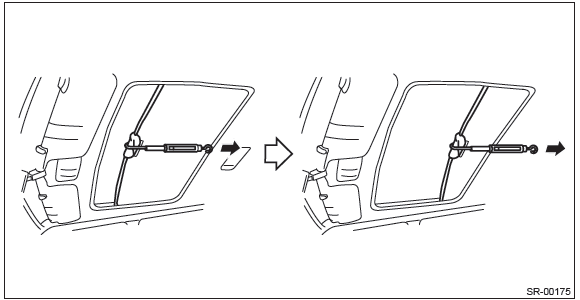
NOTE: Moving load is larger at the beginning of pulling a spring scale, so take a spring scale reading while sunshade sliding smoothly.
3) If the inspection result exceeds the standard value, check if the installation to sunshade or frame assembly is sufficient, and replace if necessary.
READ NEXT:
 General Description of Trim
A: COMPONENT
1. FRONT UNDER COVER
Small type
Medium type
Large type
Tightening torque: N*m (kgf-m, ft-lb)
T: 17.5 (1.78, 12.9)
2. FLOOR UNDER PROTECTOR
Tightening torque: N
Front Grille
A: REMOVAL
1) Remove the front bumper face assembly.
Remove the clips, turn over the front mud guard, and disconnect the fog
light connector. (Model with
fog light)
Remove the clips at the up
SEE MORE:
If the light is blinking
If the light is blinking while driving, an engine misfire condition has been
detected which may damage the emission control system.
To prevent serious damage to the emission control system, you should conform
to the following instructions.
● Reduce vehicle speed.
● Avoid hard acce
Waxing and polishing
Always wash and dry the vehicle before waxing and polishing.
Use a good quality polish and wax and apply them according to the manufacturer’s
instructions. Wax or polish when the painted surface is cool.
Be sure to polish and wax the chrome trim, as well as the painted surfaces. Loss
of wax
