Subaru Outback (BR): Viewing range on the screen
Range of view
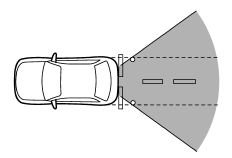
Range of view
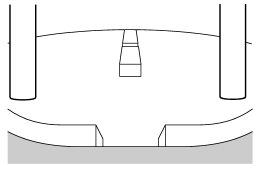
Image from camera
The area from the rear end of the bumper can be viewed. Areas at both ends of the bumper and areas just under the bumper cannot be viewed.
Also, the image from the rear view camera looks shorter than the actual distance.
CAUTION
The range that can be viewed with the rear view camera is limited. Always be sure to check with your eyes when moving backward and proceed slowly.
Range of view
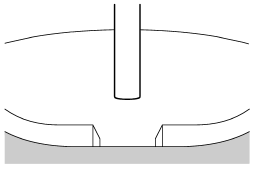
Image from camera
The area from the rear end of the bumper can be viewed. Areas at both ends of the bumper and areas just under the bumper cannot be viewed.
Also, the image from the rear view camera looks shorter than the actual distance.
CAUTION
The range that can be viewed with the rear view camera is limited. Always be sure to check with your eyes when moving backward and proceed slowly.
Range of view
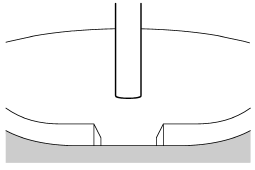
Image from camera
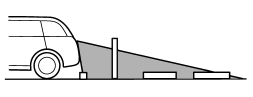
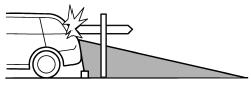
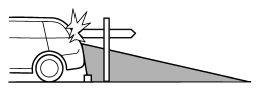
The area above the camera cannot be viewed. If there is an object that has a wide projection on its upper part such as a sign pole behind the vehicle, the projection cannot be seen on the screen.
CAUTION
The range that can be viewed with the rear view camera is limited. Always be sure to check with your eyes when moving backward and proceed slowly.
READ NEXT:
 Help line
The help line (distance marker and vehicle width line) is a guide to help you
realize the actual distance from the screen.
Help lines displayed on the navigation monitor
Help lines displayed o
Difference between screen and actual road
The distance markers show the distance for a level road when the vehicle is not
loaded. It may be different from the actual distance depending on the loading conditions
or road conditions.
When t
Feature of distance marker
1) 3 feet (1 m) line
2) 6.5 feet (2 m) line
3) 10 feet (3 m) line
The distance marker shows the distance on the road. If there is a car or other
object close behind, distance cannot be correctl
SEE MORE:
DTC U0073, U0101, U0122, U0140, U0402, U0416, U0422
EK:DTC U0073 CAN FAILURE, BUS 'OFF' DETECTION
1. OUTLINE OF DIAGNOSIS
Detect malfunction of CAN communication.
Judge as NG when CAN communication failure has occurred.
2. COMPONENT DESCRIPTION
(Common Specifications)
CAN Protocol 2.0 B (Active)
Frame Format: 11 Bit ID Frame (Standard Frame)
Conform
Safety precautions
WARNING
● For safety reasons, avoid operating of the cell phone while driving.
● Do not make a phone call while driving. When you have an incoming call, stop the
vehicle in a safe location before taking the incoming phone call. When you have
to absolutely take a phone call, tell th
