Subaru Outback (BR): Door interlock switch
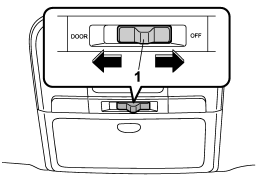
1) Door interlock switch
Although the map light switches are in the OFF position (manually off), the map lights can be set to illuminate automatically in conjunction with a door opening, etc. by use of the door interlock switch. The door interlock switch has the following two positions.
OFF: The map lights do not illuminate automatically in conjunction with a door opening. But, the lights can be turned on manually by pressing the map light switches.
DOOR: The map lights illuminate automatically in the following cases.
● Any of the doors (other than the rear gate or trunk lid) is opened. The map lights do not illuminate when only the rear gate is opened.
● The doors are unlocked using the remote keyless entry transmitter.
● The ignition switch is turned from the “Acc” position to the “LOCK” position. The automatically illuminated map lights remain on for several seconds and then gradually turn off after all doors are closed. While the lights are on, if any of the following operations are performed, the map lights turn off immediately.
● The ignition switch is turned from the “LOCK” position to the “Acc” or “ON” position.
● All doors are locked using the remote keyless entry transmitter.
The setting of the period for which the lights remain on (OFF delay timer) can be changed by a SUBARU dealer. Contact your SUBARU dealer for details.
READ NEXT:
 Cargo area light (Outback)
1) DOOR
2) OFF
3) ON
The cargo area light switch has three positions.
DOOR: The light illuminates only when the rear gate is opened.
OFF: The light remains off.
ON: The light remains on contin
Sun visors
To block out glare, swing down the visors. To use the sun visor at a side window,
swing it down and move it sideways.
Sun visor extension plate
With the sun visor positioned over the side window, you can use the sun visor
extension plate to prevent glare through the gap between the sun visor and center
pillar. To use the extension plate
SEE MORE:
Repeating
Type A audio
Type B audio
To repeat a track/file (track), briefly press the “RPT/RDM” button (type A audio)
or “RPT” button (type B audio) while the track/file (track) is playing.
Each time you briefly press the button, the mode changes in the following sequences.
Type A audio:
Basic Diagnostic Procedure of LAN System
A: PROCEDURE
CAUTION:
Subaru Select Monitor is required for reading DTC, performing diagnosis, reading current data, customizing and active test (compulsory drive).
Remove foreign matter (dust, water, oil, etc.) from each control module connector during removal and installation.
