
Subaru Outback (BR): Wear indicators
Subaru Outback (BR) 2010-2015 Owners Manual / Maintenance and service / Tires and wheels / Wear indicators
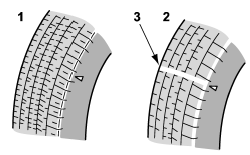
1) New tread
2) Worn tread
3) Tread wear indicator
Each tire incorporates a tread wear indicator, which becomes visible when the depth of the tread grooves decreases to 0.063 in (1.6 mm). A tire must be replaced when the tread wear indicator appears as a solid band across the tread.
WARNING
When a tire’s tread wear indicator becomes visible, the tire is worn beyond the acceptable limit and must be replaced immediately. With a tire in this condition, driving at high speeds in wet weather can cause the vehicle to hydroplane. The resulting loss of vehicle control can lead to an accident.
NOTE
For safety, inspect the tire tread regularly and replace the tires before their tread wear indicators become visible.
READ NEXT:
 Tire rotation direction mark
Example of tire rotation direction mark
1) Front
If the tire has a rotation direction specification, the tire rotation direction
mark is placed on its sidewall.
When you install a tire that has
Tire rotation
Vehicles equipped with 4 non-unidirectional tires
1) Front
Vehicles equipped with unidirectional tires
1) Front
Tire wear varies from wheel to wheel. To maximize the life of each tire and ensu
Tire replacement
The wheels and tires are important and integral parts of your vehicle’s design;
they cannot be changed arbitrarily. The tires fitted as standard equipment are optimally
matched to the characteri
SEE MORE:
Folder selection
Press the “” side of the “FOLDER”
button briefly to select the next folder.
Press the “” side of the button briefly
to go back to the previous folder.
NOTE
● Selecting folders in this way is possible only within a single disc.
● Only MP3/WMA/AAC folders are recogniz
General Description of Power Assisted System
A: SPECIFICATION
B: COMPONENT
1. STEERING WHEEL AND COLUMN
Bushing
Insulator (CVT model)
Steering shaft
Knee protector
Steering roll connector
Column cover
Steering wheel lower cover
Paddle shift
Steering wheel
Switch
Protector
© 2010-2026 Copyright www.suoutback.com
