Subaru Outback (BR): AT Main Case
A: REMOVAL
1) Remove the transmission assembly from the vehicle.
<Ref. to 5AT-37, REMOVAL, Automatic Transmission Assembly.>
2) Pull out the torque converter assembly. <Ref. to 5AT-63, REMOVAL, Torque Converter Assembly.>
3) Remove the transmission harness connector from stay.
4) Remove the ATF cooler inlet pipe and outlet pipe. <Ref. to 5AT-58, REMOVAL, ATF Cooler Pipe and Hose.>
5) Remove the extension case. <Ref. to 5AT-65, REMOVAL, Extension Case.>
6) Remove the center differential carrier. <Ref. to 5AT-74, REMOVAL, Center Differential Carrier.>
7) Remove the reduction driven gear. <Ref. to 5AT- 71, REMOVAL, Reduction Driven Gear.>
8) Separate the converter case from the transmission case. <Ref. to 5AT-78, REMOVAL, Converter Case.>
9) Remove the control valve body. <Ref. to 5AT- 55, REMOVAL, Control Valve Body.>
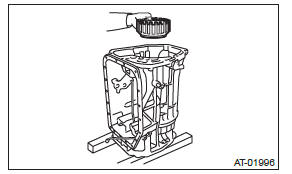
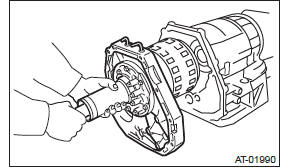
10) Remove the oil pump cover. <Ref. to 5AT-80, REMOVAL, Oil Pump Cover.>
NOTE: The input clutch pack assembly and front sun gear assembly are also removed together.
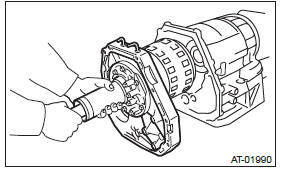
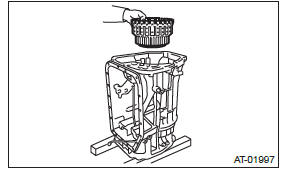
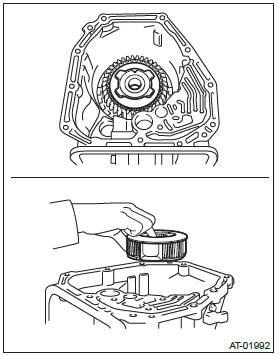
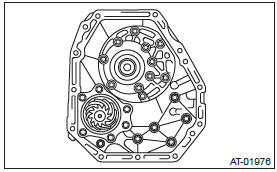
11) Remove the needle bearing of the middle carrier assembly.
12) Remove the middle carrier assembly.

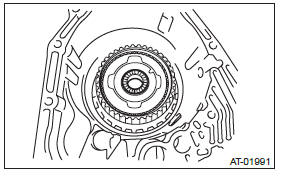
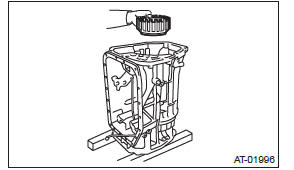
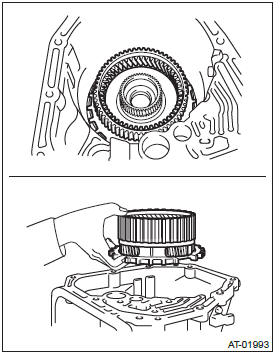
13) Remove the rear carrier assembly.
14) Remove the middle & rear sun gear assembly.
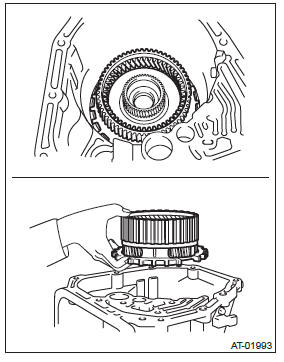
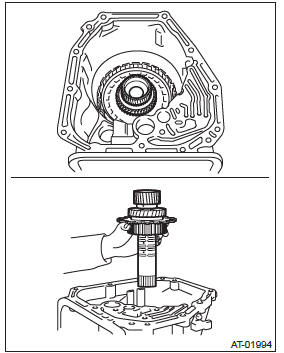
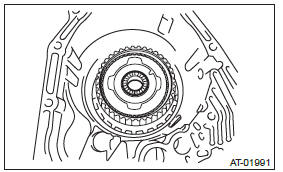
15) Remove the thrust needle bearing of high & low reverse clutch.
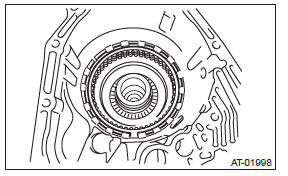
16) Remove the high & low reverse clutch assembly.
17) Remove the direct clutch assembly.

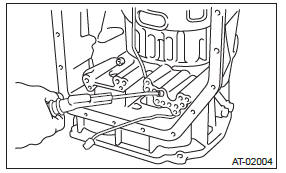
18) Remove the snap ring of reverse brake.
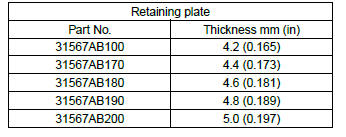
19) Remove the retaining plate.
20) Remove the leaf spring.
- Leaf spring
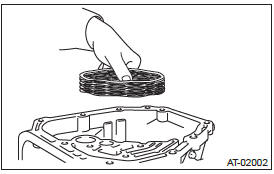
21) Take out the drive plate, driven plate and dish plate.
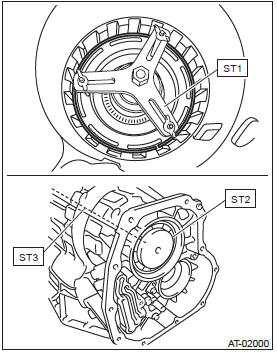
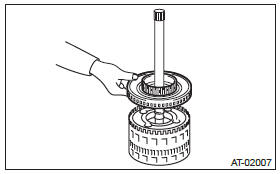
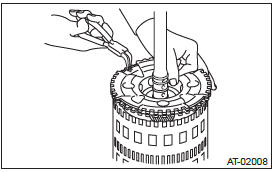
22) Remove the snap ring of the reverse brake spring retainer.
ST1 18762AA000 COMPRESSOR SPECIAL
TOOL
ST2 18765AA000 COMPRESSOR SUPPORT
ST3 18763AA000 COMPRESSOR SHAFT
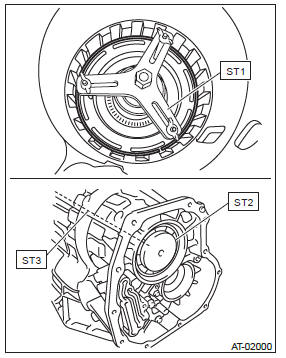
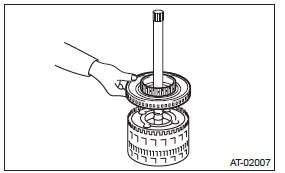
23) Remove the spring retainer.
24) Remove the return spring.
25) Apply compressed air.
26) Remove the reverse brake piston.

27) Remove the thrust bearing and seal ring.
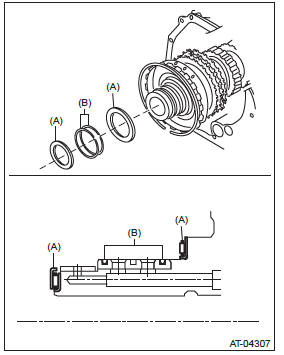
- Thrust bearing
- Seal ring
B: INSTALLATION
1) Apply ATF to the new seal ring.
2) Install the thrust bearing and new seal ring to the drum support.
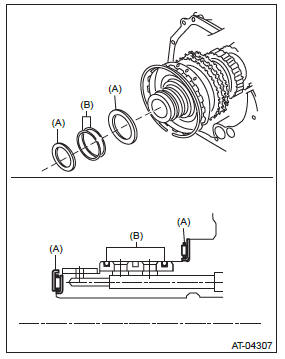
- Thrust bearing
- Seal ring
3) Install the reverse brake piston.
NOTE: Apply ATF onto the piston sliding surface.
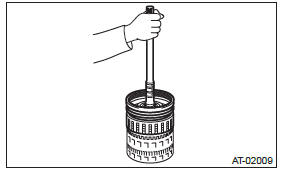
ST1 18762AA000 COMPRESSOR SPECIAL
TOOL
ST2 18765AA000 COMPRESSOR SUPPORT
ST3 18763AA000 COMPRESSOR SHAFT
4) Install the return spring.
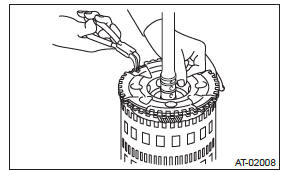
5) Install the spring retainer and snap ring.
ST1 18762AA000 COMPRESSOR SPECIAL
TOOL
ST2 18765AA000 COMPRESSOR SUPPORT
ST3 18763AA000 COMPRESSOR SHAFT
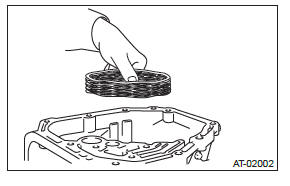
6) Install the dish plate.
NOTE: When installing, make sure that the identification mark is facing the rear side of transmission.
7) Install the drive plate and driven plate.
NOTE: When the reverse brake is disassembled, use a new drive plate and driven plate set.
8) Install the leaf spring.
- Leaf spring
9) Install the retaining plate.
10) Install the snap ring of the reverse brake.
11) Apply compressed air intermittently to check for operation.
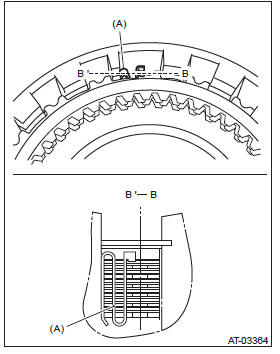
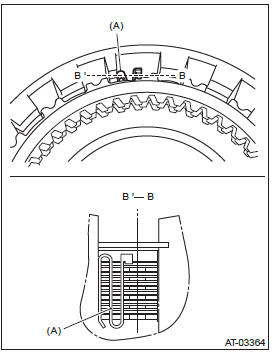
12) Check the piston stroke.
- Check the amount of drive plate compression "A" described in the wave clutch set of repair parts.

A - Amount of drive plate compression
- Drive plate
- Driven plate
- Retaining plate
- Measure the clearance "B" between the retaining plate and snap ring using a thickness gauge.
NOTE:
- Set shims of the same thickness on both sides so that the retaining plate will not tilt.
- Do not push the shim down with force to a point where the waves on the drive plate will become crushed.
B - Clearance between retaining plate and snap ring
- Select and install a retaining plate so that the value calculated from the dimensions A and B is within the standard.
T = A + B
T: Piston stroke
A: Amount of drive plate compression
B: Clearance between retaining plate and snap ring
Initial standard: 2.0 - 2.4 mm (0.08 - 0.09 in)
13) Install the direct clutch assembly.
14) Install the high & low reverse clutch assembly.
15) Install the thrust needle bearing of the high & low reverse clutch.

16) Install the middle & rear sun gear assembly.
17) Install the rear carrier assembly.
18) Install the middle carrier assembly.
19) Install the thrust needle bearing of middle carrier assembly.
20) Measure the total end play, and select the bearing. <Ref. to 5AT-103, ADJUSTMENT, AT Main Case.>
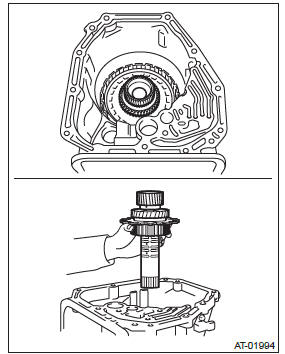
21) Install the input clutch pack assembly to oil pump cover.
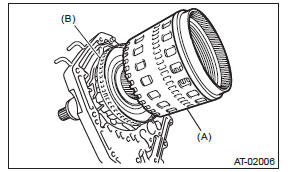
- Input clutch pack ASSY
- Front sun gear ASSY
22) Turn the transmission sideways.
23) Install the oil pump cover.
- Apply ATF to the O-ring of input clutch shaft.
- Install the oil pump cover to AT main case while supporting the input clutch shaft and oil pump housing with your hand.
NOTE: Use a new gasket.
- Protect the input clutch shaft with a cloth, and rotate to engage the spline of the input clutch and rear carrier using pliers.
NOTE: Work with pressing the oil pump cover.
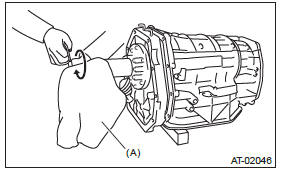
- Cloth
- Combine the oil pump cover with transmission main case.
Tightening torque: 41 N*m (4.2 kgf-m, 30.2 ft-lb)
24) Install the center differential carrier. <Ref. to 5AT-74, INSTALLATION, Center Differential Carrier.>
25) Install the reduction driven gear. <Ref. to 5AT- 71, INSTALLATION, Reduction Driven Gear.>
26) Install the extension case. <Ref. to 5AT-65, INSTALLATION, Extension Case.>
27) Install the control valve body. <Ref. to 5AT-55, INSTALLATION, Control Valve Body.>
28) Install the converter case assembly to the transmission case assembly. <Ref. to 5AT-78, INSTALLATION, Converter Case.>
29) Install the ATF cooler pipe. <Ref. to 5AT-59, INSTALLATION, ATF Cooler Pipe and Hose.>
30) Install the torque converter assembly. <Ref. to 5AT-63, INSTALLATION, Torque Converter Assembly.>
31) Install the transmission assembly to the vehicle.
<Ref. to 5AT-42, INSTALLATION, Automatic Transmission Assembly.>
32) Perform Clear Memory 2 operation. <Ref. to 5AT(diag)-21, Clear Memory Mode.>
33) Perform the diagnosis again. <Ref. to 5AT(diag)- 23, Learning Control.>
34) Perform the inspection at the end of repair work, and make sure there is no faulty as below;
- Excessive shift shock
- Oil leakage from the transmission body, etc.
- Occurrence of noise caused by interference etc.
C: DISASSEMBLY
1. INPUT CLUTCH PACK ASSEMBLY
1) Remove the front sun gear.
2) Remove the thrust bearing.
3) Remove the snap ring, and then remove the front carrier.
4) Remove the input clutch assembly from rear internal gear.

D: ASSEMBLY
1. INPUT CLUTCH PACK ASSEMBLY
1) Assemble the input clutch assembly to rear internal gear.
2) Install the front carrier, and then install the snap ring.
3) Install the thrust bearing.
4) Install the front sun gear.
E: INSPECTION
1. FRONT, MIDDLE & REAR PLANETARY CARRIER ASSEMBLY
Check the following items.
- Visually inspect the tooth surface of planetary gear, and replace with new part if damaged, broken or excessively worn.
- Inspect the planetary carrier body for damage or breakage.
2. INPUT CLUTCH
- Check the clearance of the input clutch. Measure the clearance "L" between snap ring and retaining plate using a thickness gauge. If it is out of specification, replace the entire input clutch assembly.
- Check for damage on the drive plate, driven plate and snap ring, and replace the entire input clutch assembly if damaged.
Standard: 0.7 - 1.1 mm (0.028 - 0.043 in)
3. HIGH & LOW REVERSE CLUTCH ASSEMBLY
- Check the clearance of the high & low reverse
clutch.
Measure the clearance "L" between snap ring and retaining plate using a thickness gauge. If it is out of specification, replace the entire high & low reverse clutch assembly.
- Check for damage on the drive plate, driven plate and snap ring, and replace the entire high & low reverse clutch assembly if damaged.
Standard: 1.8 - 2.2 mm (0.071 - 0.087 in)
4. DIRECT CLUTCH ASSEMBLY
- Check the clearance of direct clutch.
Measure the clearance "L" between snap ring and retaining plate using a thickness gauge. If it is out of specification, replace the entire direct clutch assembly.
- Check for damage on the drive plate, driven plate and snap ring, and replace the entire direct clutch assembly if damaged.
Standard: 0.6 - 1.0 mm (0.024 - 0.039 in)
5. REVERSE BRAKE
Check the following items.
- Snap ring for wear, return spring for breakage, and spring retainer for deformation
- Lip seal and D-ring for damage
- Piston operation
- Piston stroke
F: ADJUSTMENT
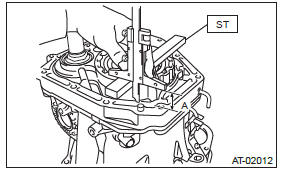
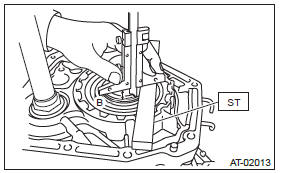
1) Using the ST, measure the height "A" from the AT main case mating surface to the convex surface of oil pump cover.
ST 499575400 GAUGE
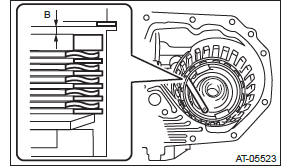
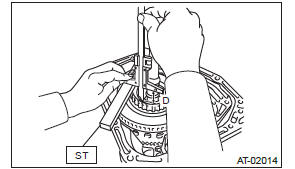
2) Using the ST, measure the depth "B" from the convex surface of oil pump cover to thrust bearing transferring surface.
ST 499575400 GAUGE
3) Calculate the measured value from step 1) and 2), and then set the calculated value as "C".
Calculation formula: C = A - B
4) Using the ST, measure the depth "D" from the AT main case mating surface to the thrust bearing transferring surface of front sun gear.
ST 499575400 GAUGE
5) Set the value as "E" which subtract the thickness of ST (499575400 GAUGE) from the measured value on step 4).
Calculation: E (mm) = D - 15
[E (in) = D - 0.59]
6) Calculation formula:
When clearances are 0.25 mm (0.0098 in):
T (mm) = E - C + 0.03
[T (in) = E - C + 0.0012]
When clearances are 0.55 mm (0.0217 in):
T (mm) = E - C + 0.27
[T (in) = E - C + 0.0106]
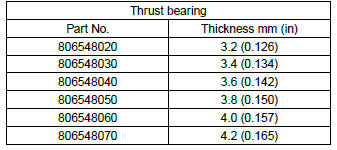
T: Thrust bearing thickness
C: Distance from oil pump cover mating surface to
rear end of oil pump cover
E: Depth from mating surface of AT main case to
bearing surface of front sun gear
Specification: 0.25 - 0.55 mm (0.0098 - 0.0217 in)
NOTE: Calculation formula for "T" above is applied when measuring with the ST (499575400 GAUGE). In the calculation without using ST, substitute the thickness of collar used to calculate the value "E" on step 5).
7) Select the thrust bearing so that the clearance is within the specified range.
READ NEXT:
 Automatic Transmission Control Device
A: REMOVAL
1) Remove the transmission assembly from the vehicle.
<Ref. to 5AT-37, REMOVAL, Automatic Transmission Assembly.>
2) Pull out the torque converter assembly. <Ref. to 5AT-63, REM
Basic Diagnostic Procedure of Automatic Transmission
A: PROCEDURE
Check List for Interview
A: CHECK
Check the following items when a problem has occurred.
NOTE: Use copies of this page for interviewing customers.
General Description
A: CAUTI
SEE MORE:
Aluminum wheels
Aluminum wheels can be scratched and damaged easily. Handle them carefully to
maintain their appearance, performance, and safety.
● When any of the wheels is removed and replaced for tire rotation or to change
a flat, always check the tightness of the wheel nuts after driving approximatel
Road Test with Continuously Variable Transmission
A: INSPECTION
1. GENERAL PRECAUTION
Road tests should be conducted to properly diagnose the condition of CVT.
CAUTION: Always observe the local traffic laws when performing the test.
2. D RANGE SHIFT FUNCTION
Make sure the engine speed is 1,100 - 1,300 rpm while driving on the level road at 50
