Subaru Outback (BR): Automatic Transmission Assembly
A: REMOVAL
1) Remove the front wheels.
2) Fully open the front hood.
3) Disconnect the ground cable from battery.
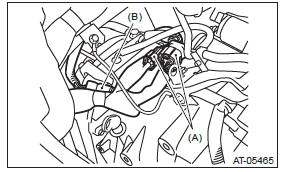
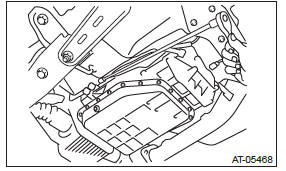
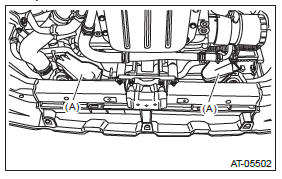
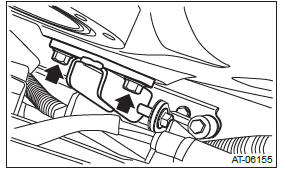
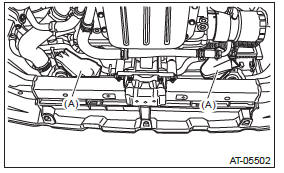
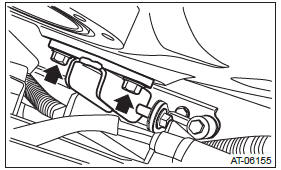
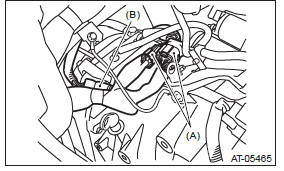
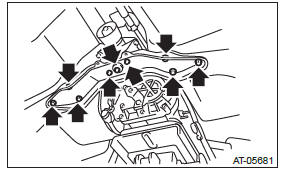
4) Remove the collector cover.
NOTE: Follow the steps below when removing the collector cover.
- Pull up the two points at the rear (A).
- Pull up the two points at the front (B) while moving them forward.

5) Remove the air intake duct. <Ref. to IN(H6DO)- 8, REMOVAL, Air Intake Duct.>
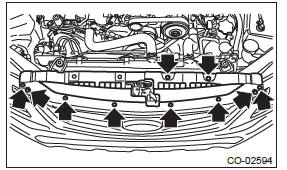
6) Remove the 10 clips and detach the grille bracket.

7) Remove the air intake boot. <Ref. to IN(H6DO)- 7, REMOVAL, Air Intake Boot.>
8) Disconnect the following connectors.
- Transmission harness connectors
- Front oxygen (A/F) sensor
9) Remove the transmission radio ground terminal.
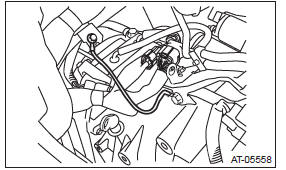
10) Remove the air breather hose. <Ref. to 5AT- 61, REMOVAL, Air Breather Hose.>
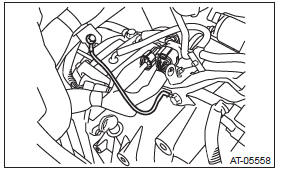
11) Remove the starter. <Ref. to SC(H4SO)-9, REMOVAL, Starter.>
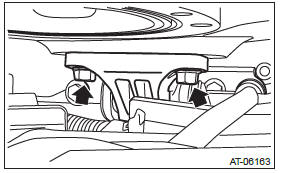
12) Remove the engine hanger rear.
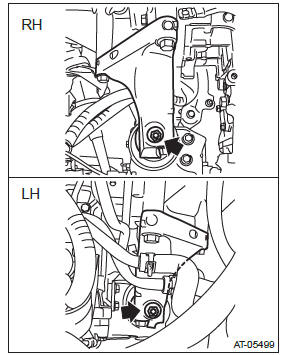
13) Separate the torque converter from drive plate.
CAUTION:
- Be careful not to drop bolts into converter housing.
- Be careful not to damage the mounting bolts.
- Remove the service hole plug.
- Remove the bolts which hold torque converter to drive plate.
- Remove the four bolts by rotating the crank pulley a little at a time.
- Make sure the torque converter moves freely by rotating with finger through the starter installation hole.
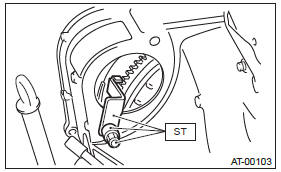
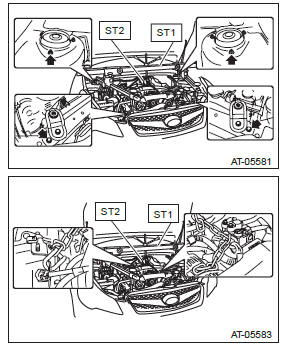
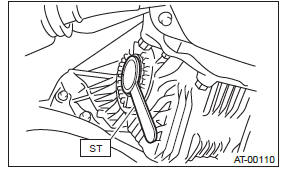
14) Attach the ST to the converter case.
ST 498277200 STOPPER SET
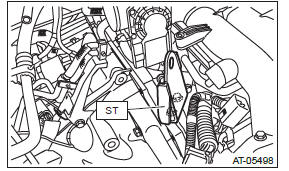
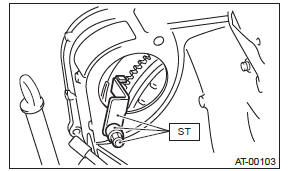
15) Attach the ST to the engine.
Tightening torque: 19 N*m (1.9 kgf-m, 14.0 ft-lb)
ST 18360AA020 HANGER
16) Lift up the vehicle.
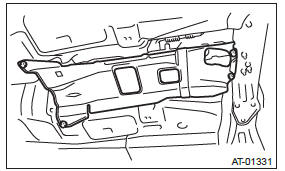
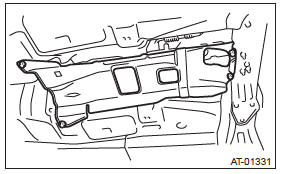
17) Remove the under cover. <Ref. to EI-35, REMOVAL, Front Under Cover.>
18) Remove the front and rear exhaust pipes.
<Ref. to EX(H6DO)-5, REMOVAL, Front Exhaust Pipe.> <Ref. to EX(H6DO)-8, REMOVAL, Rear Exhaust Pipe.>
19) Remove the heat shield cover.
20) Remove the steering shaft universal joint.
<Ref. to PS-21, REMOVAL, Universal Joint.>
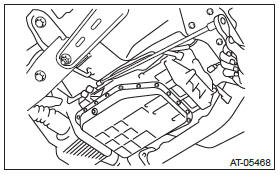
21) Remove the ATF drain plug to drain ATF.
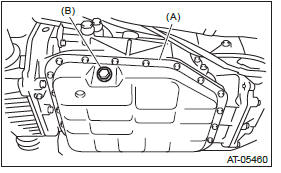
- Oil pan
- ATF drain plug
22) Remove the oil charge pipe.
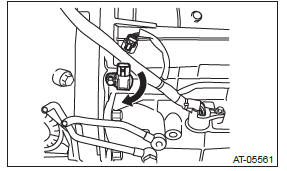
23) Disconnect the connector from turbine speed sensor 1.
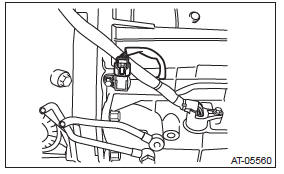
24) Remove the turbine speed sensor 1 mounting bolt and rotate the sensor by 180º.
CAUTION: Failure to follow this procedure may cause the interference between vehicle body and sensor while removing/installing transmission, and resulting in damage.
25) Remove the propeller shaft. <Ref. to DS-10, REMOVAL, Propeller Shaft.>
26) Remove the select cable. <Ref. to CS-42, REMOVAL, Select Cable.>
27) Disconnect the ATF AT inlet and outlet hoses from the ATF cooler inlet and outlet pipes.

28) Remove the front stabilizer bracket. <Ref. to FS-29, REMOVAL, Front Stabilizer.>
29) Remove the bolts which secure front ball joint to the housing. <Ref. to FS-32, REMOVAL, Front Ball Joint.>
30) Pull out the drive shaft from transmission.
31) Lower the vehicle.
32) Remove the nuts connecting the engine mounting and the transmission main mounting bracket.

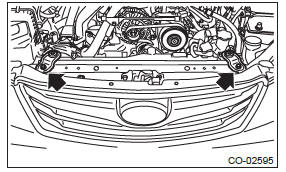
33) Remove the radiator upper brackets.
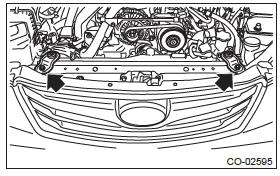
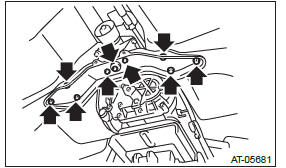
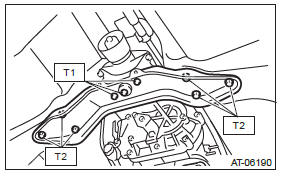
34) Set the ST on the vehicle.
CAUTION:
- Set the ST so that the chain does not contact the sensor and other parts while hanging the engine.
- Set the arms of ST (ENGINE HANGER) at the locations shown in the figure.
ST1 99099AJ000 ENGINE HANGER
ST2 99099AJ010 CHAIN BALANCER
35) Lift up the radiator approximately by 30 mm (1.2 in) and keep the position with cloth or other material placed under the radiator.
- Cloth
36) Lift the engine slightly and remove the engine mounting bolts.
37) Remove the engine mounting nut and bolt to remove the engine mounting.
38) Temporarily attach ST by using two bolts.
ST 41099AJ010 SPECIAL TOOL H6
39) Lift up the engine unit high enough to install the bolt and nut to vehicle.
CAUTION:
- Do not lift up higher than enough level to install the ST to avoid damage to the hoses and pipes inside the engine room.
- Do not tighten the nuts excessively, or the engine mounting bracket may be deformed.
NOTE:
- If it is difficult to pull out the stud bolt from transmission mounting bracket, shake the engine unit slightly while lifting up.
40) Tighten the mounting bolts on the engine side.
Tightening torque: 25 N*m (2.5 kgf-m, 18.4 ft-lb)
41) Remove the ST (ENGINE HANGER).
42) Remove the transmission main mounting bracket.
NOTE: First, remove the transmission mounting bracket on the right side of vehicle, and then tilt the engine unit to remove the left transmission mounting bracket.
43) Remove the transmission mounting bolt (upper side).
44) Set the ST (ENGINE HANGER) again to loosen the chain sling.
45) Lift up the vehicle.
46) Set the transmission jack under the transmission.

47) Remove the rear crossmember from the vehicle.
48) Lower the transmission rear end (dust cover rear end).
CAUTION: When lowering the transmission rear end, be careful not to let the converter case and steering mechanical parts contact each other.
NOTE: Lower the transmission rear end by approx. 80 mm (3.1 in) (reference).
49) Rotate the handle of ST (ENGINE HANGER) to apply tension to the chain sling.
50) Remove the transmission mounting bolt and nut (lower side).
51) Remove the transmission.
52) Remove the cushion rubber from the transmission.
B: INSTALLATION
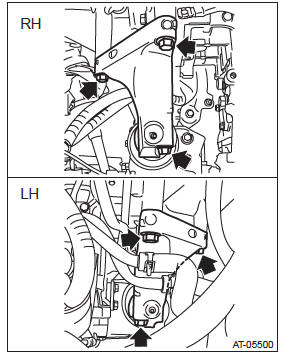
1) Replace the front differential side retainer oil seal.
- Remove the oil seal by using flat tip screwdriver etc.
- Using the ST, install the oil seal by lightly tapping with a plastic hammer.
NOTE:
- Use a new oil seal.
- Check the identification marks (L, R) during installation not to mix up the oil seal RH and LH.
- Apply gear oil to the oil seal lips.
- Be sure to replace the differential side retainer oil seal whenever the front drive shaft is removed from the transmission.
ST 18675AA000 DIFFERENTIAL SIDE OIL SEAL INSTALLER
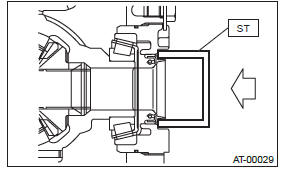
2) Attach the ST to converter case.
ST 498277200 STOPPER SET
3) Install the cushion rubber on the transmission.
Tightening torque: 40 N*m (4.1 kgf-m, 29.5 ft-lb)
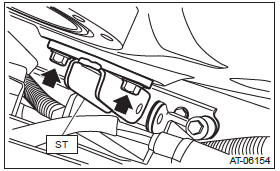
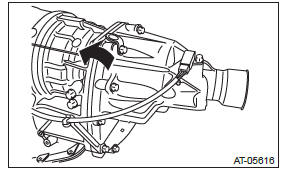
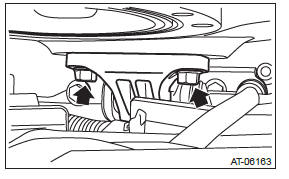
4) Tap the transmission hanger in the rear side of transmission with a rubber hammer to bend it until it is in close contact with the transmission case.
CAUTION: Do not apply excessive load or impact to the transmission case.
5) While lifting up the transmission gradually using transmission jack, install the transmission to the engine.
CAUTION: This operation requires at least two persons.
NOTE: Keep the engine level.
6) Install the engine mounting bolt and nut (lower side).
Tightening torque: 50 N*m (5.1 kgf-m, 36.9 ft-lb)
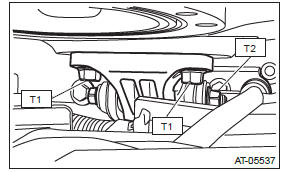
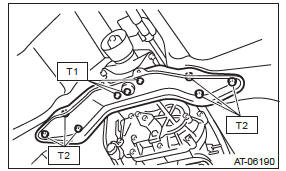
7) Install the transmission rear crossmember.
Tightening torque:
T1: 35 N*m (3.6 kgf-m, 25.8 ft-lb)
T2: 75 N*m (7.6 kgf-m, 55.3 ft-lb)
8) Remove the transmission jack.
9) Lower the vehicle.
10) Install the engine mounting bolt (upper side).
Tightening torque: 50 N*m (5.1 kgf-m, 36.9 ft-lb)
11) Remove the ST (ENGINE HANGER).
12) Install the transmission main mounting bracket.
NOTE: Install to the left side of vehicle first.
Tightening torque: 75 N*m (7.6 kgf-m, 55.3 ft-lb)

13) Attach the ST (ENGINE HANGER) again.
14) Remove the ST and install the front cushion rubber.
- Lift up the radiator approximately by 30 mm and keep the position with cloth or other material placed under the radiator.
- Cloth
- Remove the bolts from ST (SPECIAL TOOL H6).
- Remove the bolt and nut to remove ST (SPECIAL TOOL H6).
- Temporarily attach the front cushion rubber with bolts.
- Install the bolt and nut to the front engine mounting.
NOTE: Always start tightening from the bolts on the engine side.
Tightening torque:
T1: 25 N*m (2.5 kgf-m, 18.4 ft-lb)
T2: 45 N*m (4.6 kgf-m, 33.2 ft-lb)
- Insert the lower radiator pin into the radiator lower cushion on the vehicle side, and install the radiator upper bracket.
Tightening torque: 12 N*m (1.2 kgf-m, 8.9 ft-lb)
15) Remove the ST from the vehicle.
16) Tighten the nuts connecting the engine mounting and the transmission main mounting bracket.
Tightening torque: 45 N*m (4.6 kgf-m, 33.2 ft-lb)
17) Remove the ST from converter case.
18) Install the torque converter to drive plate.
CAUTION:
- Be careful not to drop bolts into the converter housing.
- Be careful not to damage the mounting bolts.
- Install the bolts which connect the torque converter and drive plate.
- Install all four bolts by rotating the crank pulley a little at a time.
- Install the service hole plug.
Tightening torque: 25 N*m (2.5 kgf-m, 18.4 ft-lb)

19) Install the starter. <Ref. to SC(H4SO)-10, INSTALLATION, Starter.>
20) Lift up the vehicle.
21) Set the ST to side retainer.
ST 28399SA010 OIL SEAL PROTECTOR
22) Install the front drive shaft into the transmission.
<Ref. to DS-49, INSTALLATION, Front Drive Shaft.>
23) Connect the ATF AT inlet and outlet hoses to the ATF cooler inlet and outlet pipes.
24) Insert the ball joint into housing. <Ref. to FS-33, INSTALLATION, Front Ball Joint.>
25) Install the front stabilizer bracket. <Ref. to FS- 31, INSTALLATION, Front Stabilizer.>
26) Install the propeller shaft. <Ref. to DS-11, INSTALLATION, Propeller Shaft.>
27) Install the select cable. <Ref. to CS-46, INSTALLATION, Select Cable.>
28) Rotate the turbine speed sensor 1 by 180º and then restore it to the original position to install.
Then, connect the connector.
Tightening torque: 7 N*m (0.7 kgf-m, 5.2 ft-lb)

29) Install the oil charge pipe.
NOTE: Use new bolts and O-rings.
Tightening torque: 38 N*m (3.9 kgf-m, 28.0 ft-lb)
30) Install the steering shaft universal joint. <Ref. to PS-22, INSTALLATION, Universal Joint.>
31) Install the heat shield cover. <Ref. to EI-168, INSTALLATION, Heat Shield Cover.>
32) Install the front and rear exhaust pipe. <Ref. to EX(H6DO)-6, INSTALLATION, Front Exhaust Pipe.> <Ref. to EX(H6DO)-8, INSTALLATION, Rear Exhaust Pipe.>
33) Install the under cover. <Ref. to EI-35, INSTALLATION, Front Under Cover.>
34) Lower the vehicle.
35) Remove the ST and install the engine hanger rear.
Tightening torque: 19 N*m (1.9 kgf-m, 14.0 ft-lb)

36) Connect the following connectors.
- Transmission harness connectors
- Front oxygen (A/F) sensor
37) Install the transmission radio ground terminal.
Tightening torque: 13 N*m (1.3 kgf-m, 9.6 ft-lb)
38) Pour ATF from the oil charge pipe. <Ref. to 5AT-29, Automatic Transmission Fluid.>
39) Install the air breather hose. <Ref. to 5AT-61, INSTALLATION, Air Breather Hose.>
40) Install the air intake boot. <Ref. to IN(H6DO)-7, INSTALLATION, Air Intake Boot.>
41) Attach the grille bracket.
42) Install the air intake duct. <Ref. to IN(H6DO)-8, INSTALLATION, Air Intake Duct.>
43) Install the collector cover.
44) Connect the battery ground terminal.
45) Check the ATF level. <Ref. to 5AT-29, INSPECTION, Automatic Transmission Fluid.>
46) Perform Clear Memory 2 operation. <Ref. to 5AT(diag)-21, Clear Memory Mode.>
47) Perform the diagnosis again. <Ref. to 5AT(diag)- 23, Learning Control.>
48) Perform the inspection at the end of repair work, and make sure there is no faulty as below;
- Excessive shift shock
- Oil leakage from the transmission body, etc.
- Occurrence of noise caused by interference etc.
Transmission Mounting System
A: REMOVAL
1. TRANSMISSION REAR CROSSMEMBER & REAR CUSHION RUBBER
1) Disconnect the ground cable from battery.
2) Lift up the vehicle.
3) Remove the under cover. <Ref. to EI-35, REMOVAL, Front Under Cover.>
4) Remove the front exhaust pipe. <Ref. to EX(H6DO)-5, REMOVAL, Front Exhaust Pipe.>
5) Remove the heat shield cover.
6) Set the transmission jack under transmission.
Make sure that the support plate of transmission jack does not touch the oil pan.
7) Remove the transmission rear crossmember.
8) Remove the rear cushion rubber.
B: INSTALLATION
1. TRANSMISSION REAR CROSSMEMBER & REAR CUSHION RUBBER
1) Install the rear cushion rubber.
Tightening torque: 40 N*m (4.1 kgf-m, 29.5 ft-lb)
2) Install the crossmember.
Tightening torque:
T1: 35 N*m (3.6 kgf-m, 25.8 ft-lb)
T2: 75 N*m (7.6 kgf-m, 55.3 ft-lb)
3) Remove the transmission jack.
4) Install the heat shield cover. <Ref. to EI-168, INSTALLATION, Heat Shield Cover.>
5) Install the front exhaust pipe. <Ref. to EX(H6DO)-6, INSTALLATION, Front Exhaust Pipe.>
6) Install the under cover. <Ref. to EI-35, INSTALLATION, Front Under Cover.>
7) Lower the vehicle.
8) Connect the battery ground terminal.
C: INSPECTION
Repair or replace parts if the results of the inspection below are not satisfied.
1. TRANSMISSION REAR CROSSMEMBER & REAR CUSHION RUBBER
Check crossmember for bends or damage. Check that there are no cracks, hardening, or damage on cushion rubbers.
READ NEXT:
 Extension Case Oil Seal
A: INSPECTION
Inspect there is no ATF leakage from the joint of
transmission and propeller shaft. If a leak is found,
replace the oil seal. <Ref. to 5AT-48, REPLACEMENT,
Extension Case Oil Seal.>
Front Vehicle Speed Sensor
A: REMOVAL
1) Remove the transmission assembly from the vehicle.
<Ref. to 5AT-37, REMOVAL, Automatic
Transmission Assembly.>
2) Disconnect the rear vehicle speed sensor connector.
NOTE:
Secur
ATF Cooler Pipe and Hose
A: REMOVAL
1) Remove the collector cover.
NOTE:
Follow the steps below when removing the collector
cover.
Pull up the two points at the rear (A).
Pull up the two points at the front (B) while
movi
SEE MORE:
General Description of Mechanical
A: SPECIFICATION
NOTE:
US: Undersize OS: Oversize
B: COMPONENT
1. V-BELT
V-belt
V-belt cover bracket
V-belt tensioner ASSY
Power steering pump bracket
Generator
Generator plate
A/C compressor bracket A
Idler pulley ASSY
Stopper rod RH
S
Operation during cold weather
Carry some emergency equipment, such as a window scraper, a bag of sand, flares,
a small shovel and jumper cables. Check the battery and cables. Cold temperatures
reduce battery capacity. The battery must be in good condition to provide enough
power for cold winter starts.
Use an engine oil
