Subaru Outback (BR): Front Vehicle Speed Sensor
A: REMOVAL
1) Remove the transmission assembly from the vehicle.
<Ref. to 5AT-37, REMOVAL, Automatic Transmission Assembly.>
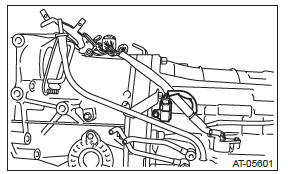
2) Disconnect the rear vehicle speed sensor connector.
NOTE: Secure the transmission harness to the transmission body using wire etc.
3) Remove the extension case.
4) Remove the center differential carrier. <Ref. to 5AT-74, REMOVAL, Center Differential Carrier.>
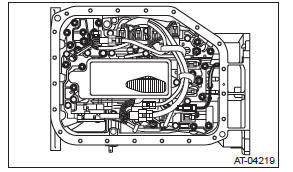
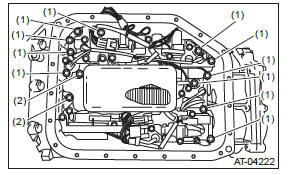
5) Lay along the transmission case, and then remove the oil pan.
6) Remove the old gasket on the oil pan and transmission case completely.
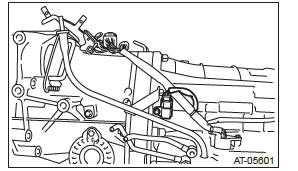
7) Disconnect the front vehicle speed sensor connector.
8) Remove the front vehicle speed sensor securing bolt.
9) Remove the front vehicle speed sensor through the hole of AT transmission main case.
B: INSTALLATION
1) Install the front vehicle speed sensor.
Tightening torque: 7 N*m (0.7 kgf-m, 5.2 ft-lb)
2) Connect the front vehicle speed sensor connector.
3) Apply proper amount of liquid gasket to the entire oil pan mating surface.
Liquid gasket: THREE BOND 1217B (Part No. K0877YA020) or equivalent
4) Install the oil pan by equally tightening the bolts.
Tightening torque: 5 N*m (0.5 kgf-m, 3.7 ft-lb)
5) Install the center differential carrier. <Ref. to 5AT-74, INSTALLATION, Center Differential Carrier.>
6) Install the extension case.
NOTE: Use a new gasket.
Tightening torque: 25 N*m (2.5 kgf-m, 18.4 ft-lb)
7) Connect the rear vehicle speed sensor connector.
8) Install the transmission assembly to the vehicle.
<Ref. to 5AT-42, INSTALLATION, Automatic Transmission Assembly.>
9) Pour ATF from the oil charge pipe. <Ref. to 5AT- 29, Automatic Transmission Fluid.>
10) Check the level and leaks of ATF. <Ref. to 5AT- 29, INSPECTION, Automatic Transmission Fluid.>
Rear Vehicle Speed Sensor
A: REMOVAL
1) Disconnect the ground cable from battery.
2) Lift up the vehicle.
3) Clean the transmission exterior.
4) Remove the bolts which connect the front exhaust pipe and rear exhaust pipe.
5) Remove the bolts holding the heat shield cover, and move the heat shield cover to the rear.
6) Disconnect the rear vehicle speed sensor connector.
7) Remove the rear vehicle speed sensor.
B: INSTALLATION
1) Install the rear vehicle speed sensor.
NOTE: Use new O-rings.
Tightening torque: 7 N*m (0.7 kgf-m, 5.2 ft-lb)
2) Connect the rear vehicle speed sensor connector.

3) Install the heat shield cover. <Ref. to EI-168, INSTALLATION, Heat Shield Cover.>
4) Tighten the bolts which connect the front exhaust pipe and rear exhaust pipe.
Tightening torque: 18 N*m (1.8 kgf-m, 13.3 ft-lb)
5) Lower the vehicle.
Turbine Speed Sensor 1
A: REMOVAL
1) Disconnect the ground cable from battery.
2) Lift up the vehicle.
3) Remove the front exhaust pipe. <Ref. to EX(H6DO)-5, REMOVAL, Front Exhaust Pipe.>
4) Disconnect the turbine speed sensor 1 connector.
5) Remove the turbine speed sensor 1.
B: INSTALLATION
1) Install the turbine speed sensor 1.
NOTE: Use new O-rings.
Tightening torque: 7 N*m (0.7 kgf-m, 5.2 ft-lb)
2) Connect the turbine speed sensor 1 connector.
3) Install the front exhaust pipe. <Ref. to EX(H6DO)-6, INSTALLATION, Front Exhaust Pipe.>
4) Lower the vehicle.
5) Connect the battery ground terminal.
Control Valve Body
A: REMOVAL
1) Disconnect the ground cable from battery.
2) Lift up the vehicle.
3) Clean the transmission exterior.
4) Remove the ATF drain plug to drain ATF.
CAUTION: Directly after the vehicle has been running or the engine has been long idle running, the ATF is hot. Be careful not to burn yourself.
5) Tighten the ATF drain plug.
NOTE: Use a new gasket.
Tightening torque: 20 N*m (2.0 kgf-m, 14.8 ft-lb)
6) Remove the oil pan.
CAUTION: Be sure to prevent the entering of dust and other foreign matters into oil pan.
7) Remove the magnet.
8) Clean the magnet.
9) Completely remove the remaining liquid gasket on the transmission case and oil pan.
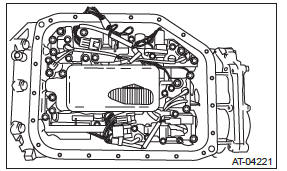
10) Disconnect the control valve connector and front vehicle speed sensor connector.

- Control valve connector
- Front vehicle speed sensor connector
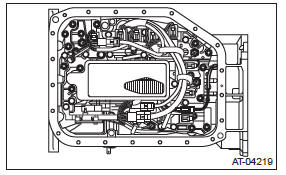
11) Remove the control valve body.
NOTE: The control valve body is replaced as an assembly only, because it is a non-disassembly part.
B: INSTALLATION
1) Check the control valve body for dust and other foreign matter.
2) Install the control valve body to transmission by equally tightening the bolts.
Tightening torque: 8 N*m (0.8 kgf-m, 5.9 ft-lb)
- 30 mm (1.18 in)
- 40 mm (1.57 in)
3) Connect the control valve connector and front vehicle speed sensor connector.
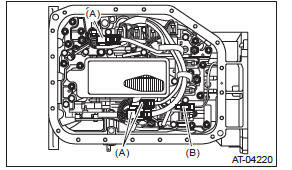
- Control valve connector
- Front vehicle speed sensor connector
4) Attach the magnet at the specified position of the oil pan.

5) Apply liquid gasket to the oil pan.
Liquid gasket: THREE BOND 1217B (Part No. K0877YA020) or equivalent
6) Install the oil pan by equally tightening the bolts.
Tightening torque: 5 N*m (0.5 kgf-m, 3.7 ft-lb)
7) Lower the vehicle.
8) Connect the ground cable to battery.
9) Pour ATF through the oil charge pipe. <Ref. to 5AT-29, Automatic Transmission Fluid.>
10) Check the ATF level. <Ref. to 5AT-29, INSPECTION, Automatic Transmission Fluid.>
11) Perform Clear Memory 2 operation. <Ref. to 5AT(diag)-21, Clear Memory Mode.>
12) Perform learning operation. <Ref. to 5AT(diag)- 23, Learning Control.>
13) Perform the inspection at the end of repair work, and make sure there is no faulty as below;
- Excessive shift shock
- Oil leakage from the transmission body, etc.
- Occurrence of noise caused by interference etc.
C: INSPECTION
Check each parts for holes, damages or other foreign matters.
Transmission Control Module (TCM)
A: REMOVAL
1) Disconnect the ground cable from battery.
2) Remove the instrument panel lower cover. <Ref. to EI-64, REMOVAL, Instrument Panel Lower Cover.>
3) Disconnect the connector from TCM.
- Transmission control module (TCM)
- Steering column
4) Remove the TCM.
NOTE: Replace the TCM and bracket as a set.
B: INSTALLATION
1) Install the TCM to the bracket.
CAUTION: Do not remove the TCM after installed to the bracket, or the bracket and TCM may be damaged.
If installed by mistake, the part must be replaced with a new part.
2) Install the TCM.
Tightening torque: 7.5 N*m (0.8 kgf-m, 5.5 ft-lb)
- Transmission control module (TCM)
- Steering column
3) Connect the connector to TCM.
4) Install the instrument panel lower cover. <Ref. to EI-65, INSTALLATION, Instrument Panel Lower Cover.>
5) Perform Clear Memory 2 operation. <Ref. to 5AT(diag)-21, Clear Memory Mode.>
6) Perform learning operation. <Ref. to 5AT(diag)- 23, Learning Control.>
READ NEXT:
 ATF Cooler Pipe and Hose
A: REMOVAL
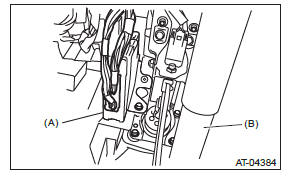
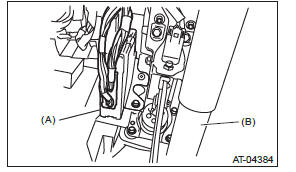
1) Remove the collector cover.
NOTE:
Follow the steps below when removing the collector
cover.
Pull up the two points at the rear (A).
Pull up the two points at the front (B) while
movi
Oil Charge Pipe
A: REMOVAL
1) Disconnect the ground cable from battery.
2) Lift up the vehicle.
3) Remove the under cover. <Ref. to EI-35, REMOVAL,
Front Under Cover.>
4) Remove the front exhaust pipe. <R
Extension Case
A: REMOVAL
1) Remove the transmission assembly. <Ref. to
5AT-37, REMOVAL, Automatic Transmission Assembly.>
2) Disconnect the rear vehicle speed sensor connector.
3) Remove the rear vehicle sp
SEE MORE:
Checking the oil level in Manual transmission
Non-turbo models
1) Yellow handle
Turbo models
1) Yellow handle
Check the oil level monthly.
1. Park the vehicle on a level surface and stop the engine.
2. Pull out the level gauge, wipe it clean, and insert it again.
1) Upper level
2) Lower level
3. Withdraw t
DTC U0073, U0101, U0122, U0140, U0402, U0416, U0422
EK:DTC U0073 CAN FAILURE, BUS 'OFF' DETECTION
1. OUTLINE OF DIAGNOSIS
Detect malfunction of CAN communication.
Judge as NG when CAN communication failure has occurred.
2. COMPONENT DESCRIPTION
(Common Specifications)
CAN Protocol 2.0 B (Active)
Frame Format: 11 Bit ID Frame (Standard Frame)
Conform
