Subaru Outback (BR): Drive Pinion Shaft Assembly in Continuously Variable Transmission
A: REMOVAL
1) Remove the transmission assembly from the vehicle. <Ref. to CVT-55, REMOVAL, Automatic Transmission Assembly.>
2) Remove the air breather hose. <Ref. to CVT-132, REMOVAL, Air Breather Hose.>
3) Remove the oil pan and control valve body. <Ref. to CVT-111, REMOVAL, Control Valve Body.>
4) Remove the transmission harness. <Ref. to CVT-121, REMOVAL, Transmission Harness.>
5) Remove the extension case. <Ref. to CVT-138, REMOVAL, Extension Case.>
6) Remove the rear drive shaft. <Ref. to CVT-141, REMOVAL, Rear Drive Shaft.>
7) Remove the transfer clutch assembly. <Ref. to CVT-146, REMOVAL, Transfer Clutch.>
8) Remove the transfer reduction driven gear assembly. <Ref. to CVT-158, REMOVAL, Transfer Reduction Driven Gear.>
9) Remove the intermediate case. <Ref. to CVT-165, REMOVAL, Intermediate Case.>
10) Remove the forward clutch assembly. <Ref. to CVT-180, REMOVAL, Forward Clutch Assembly.>
11) Remove the transmission case. <Ref. to CVT-211, REMOVAL, Transmission Case.>
12) Remove the primary pulley, secondary pulley and variator chain. <Ref. to CVT-226, REMOVAL, Primary Pulley and Secondary Pulley.>
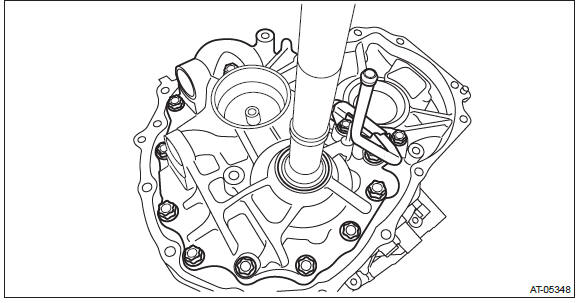
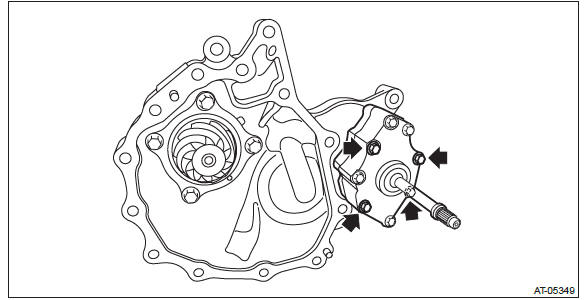
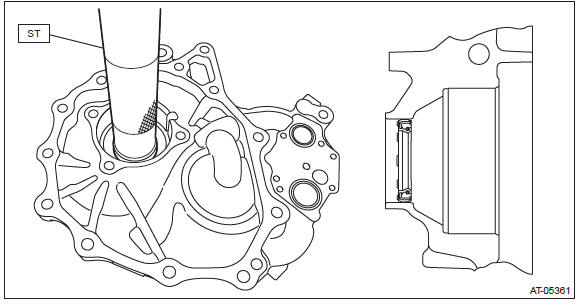
13) Using the ST, remove the drive pinion retainer and lubrication pipe.
ST 18270KA020 SOCKET (E20)
14) Remove the O-ring.

15) Remove the oil pump.
16) Remove the O-ring.
B: INSTALLATION
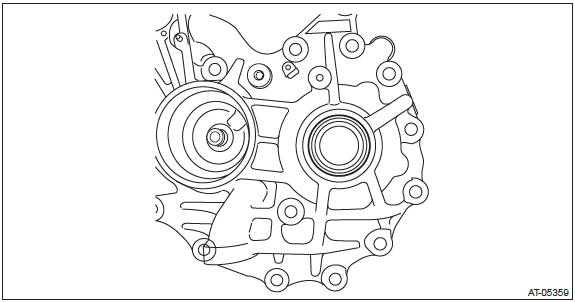
1) Clean the mating surface of drive pinion retainer and converter case.
2) Adjust the backlash and tooth contact between drive pinion shaft assembly and the front differential side gear. <Ref. to CVT-256, ADJUSTMENT, Drive Pinion Shaft Assembly.>
3) Install the O-ring for oil pump to drive pinion retainer.
NOTE:
- Use new O-rings.
- Apply CVTF to the O-ring.
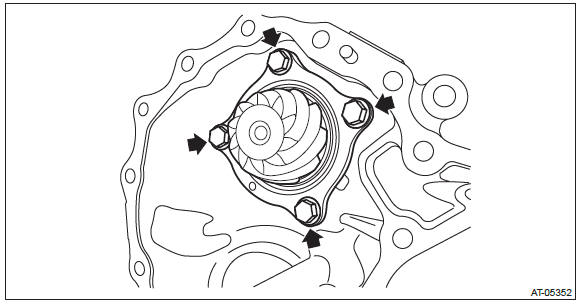
4) Install the oil pump.
NOTE: Apply CVTF to the bolt.
Tightening torque: 8.5 N*m (0.9 kgf-m, 6.3 ft-lb)
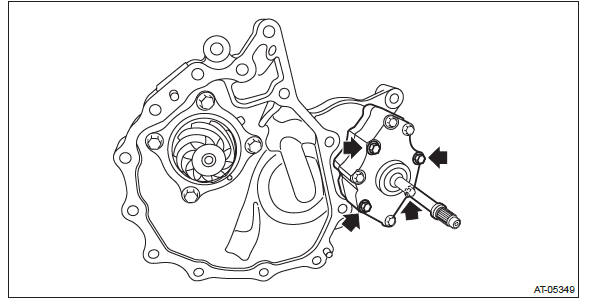
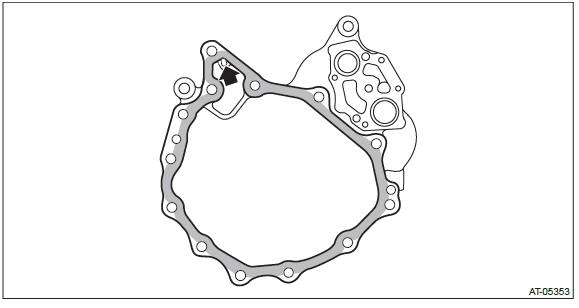
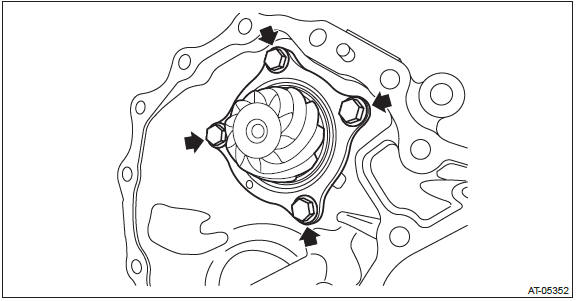
5) Apply liquid gasket seamlessly to the mating surface of drive pinion retainer.
NOTE: Be careful not to block the arrowed hole when applying liquid gasket.
Liquid gasket: THREE BOND 1215 (Part No. 004403007) or equivalent
6) Install the O-ring to the lubrication pipe.
NOTE:
- Use new O-rings.
- Apply CVTF to the O-ring.

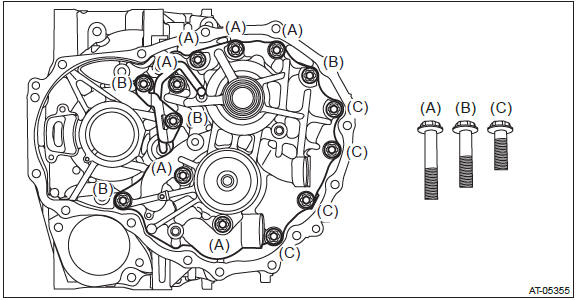
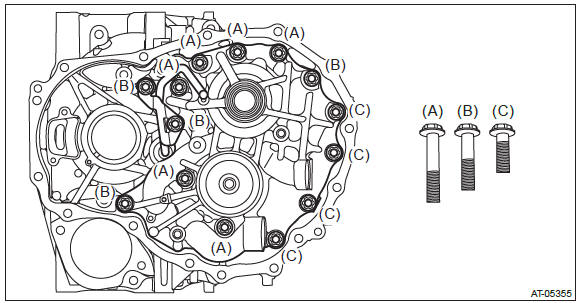
7) Install the drive pinion retainer and lubrication pipe to converter case and tighten the bolt using the ST.
ST 18270KA020 SOCKET (E20)
NOTE: Do not confuse the three different-length bolts when installing.
Tightening torque: 43 N*m (4.4 kgf-m, 31.7 ft-lb)
8) Install the primary pulley, secondary pulley and variator chain. <Ref. to CVT-230, INSTALLATION, Primary Pulley and Secondary Pulley.>
9) Install the transmission case. <Ref. to CVT-213, INSTALLATION, Transmission Case.>
10) Install the forward clutch assembly. <Ref. to CVT-181, INSTALLATION, Forward Clutch Assembly.>
11) Install the intermediate case. <Ref. to CVT-166, INSTALLATION, Intermediate Case.>
12) Install the transfer reduction driven gear assembly. <Ref. to CVT-158, INSTALLATION, Transfer Reduction Driven Gear.>
13) Install the transfer clutch assembly. <Ref. to CVT-147, INSTALLATION, Transfer Clutch.>
14) Install the rear drive shaft. <Ref. to CVT-141, INSTALLATION, Rear Drive Shaft.>
15) Install the extension case. <Ref. to CVT-138, INSTALLATION, Extension Case.>
16) Install the transmission harness. <Ref. to CVT-123, INSTALLATION, Transmission Harness.>
17) Install the oil pan and control valve body. <Ref. to CVT-115, INSTALLATION, Control Valve Body.>
18) Install the air breather hose. <Ref. to CVT-132, INSTALLATION, Air Breather Hose.>
19) Install the transmission assembly to the vehicle. <Ref. to CVT-70, INSTALLATION, Automatic Transmission Assembly.>
C: DISASSEMBLY
1) Remove the drive pinion assembly.
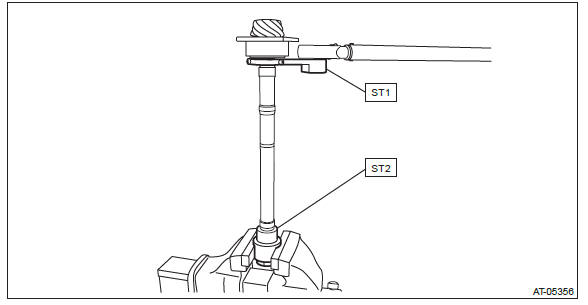
2) Flatten the tab of the lock nut.
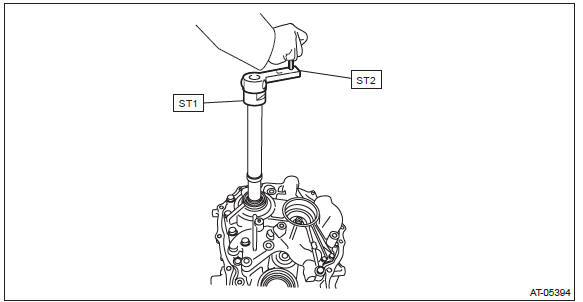
3) Using ST1 and ST2, fix at the spline portion of drive pinion shaft to remove the lock nut.
ST1 18621AA000 WRENCH
ST2 18667AA010 HOLDER
4) Remove the taper roller bearing rear side inner race and outer race from drive pinion shaft.
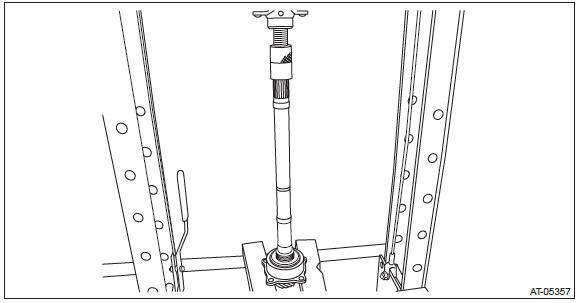
5) Using ST, remove the taper roller bearing front side inner race from drive pinion shaft.
ST 498077000 REMOVER
6) Remove the two oil seals using a screwdriver wrapped with cloth etc.
CAUTION: Do not damage the fitting surface of drive pinion bearing.
7) Remove the plug from drive pinion retainer.
D: ASSEMBLY
1) Install the O-ring to plug and install the plug to drive pinion retainer.
NOTE:
- Use new O-rings.
- Apply CVTF to the O-ring.
Tightening torque: 25 N*m (2.5 kgf-m, 18.4 ft-lb)
2) Using the ST, install the oil seal to drive pinion retainer.
NOTE:
- Apply CVTF to the oil seal press-fitting surface and lip.
- Install the oil seal in the correct direction.
Pulley side
ST 18657AA020 OIL SEAL INSTALLER

Front differential side
ST 499277100 INSTALLER
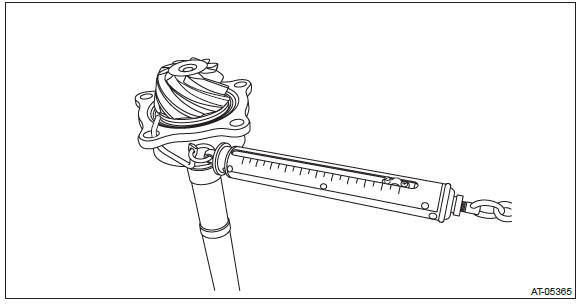
3) Measure the dimension "A" of drive pinion shaft.
ST 398643600 GAUGE
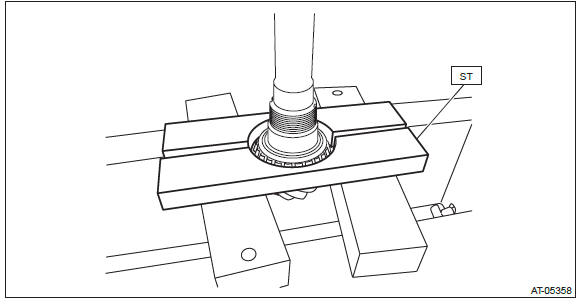
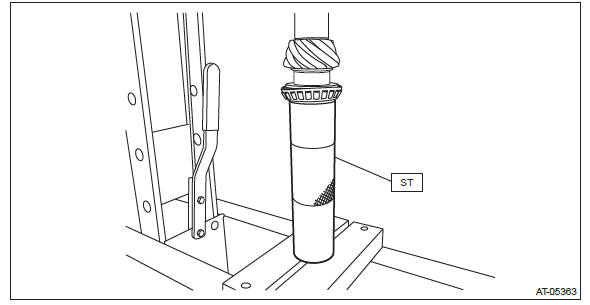
4) Press-fit the new inner bearing inner race using the ST.
ST 499277200 INSTALLER
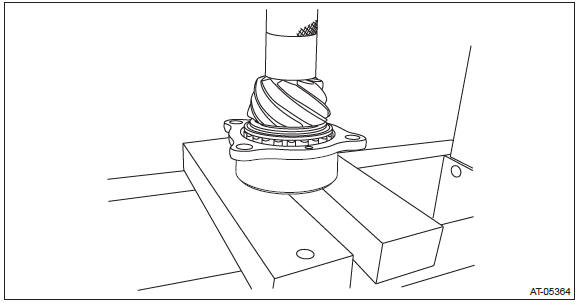
5) Press-fit the new outer bearing outer race and inner bearing inner race.
CAUTION: Damage may result if too much force is applied to the roller bearing.
NOTE: Press in to a position where the bearing rotates smoothly without play.
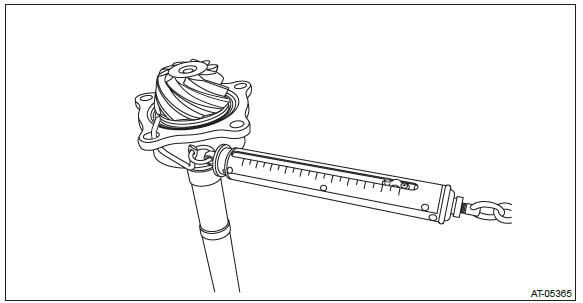
6) Tighten a new lock nut using the ST.
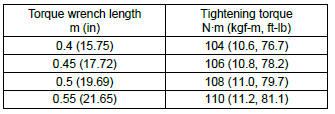
Using the following formula, calculate the torque for a torque wrench.
T2 = L2/(L1 + L2) × T1
T1: 130 N*m (13.3 kgf-m, 95.9 ft-lb)
[Required torque setting]
T2: Tightening torque
L1: ST1 length 0.1 m (3.94 in)
L2: Torque wrench length
Example:
ST1 18621AA000 WRENCH
ST2 18667AA010 HOLDER
NOTE: Tighten the lock nut while directly aligning ST1 and torque wrench.

7) Apply differential gear oil to roller of bearing and rotate the bearing several times.
8) Measure the starting torque of the bearing. Make sure the starting torque is within the specified range. If the torque is not within specified range, replace the roller bearing.
Starting torque: 11.6 - 34.7 N (1.2 - 3.5 kgf, 2.6 - 7.8 lb)
9) Crimp the lock nut in 2 locations.
10) Measure the dimension "B" of the drive pinion shaft.
ST 398643600 GAUGE
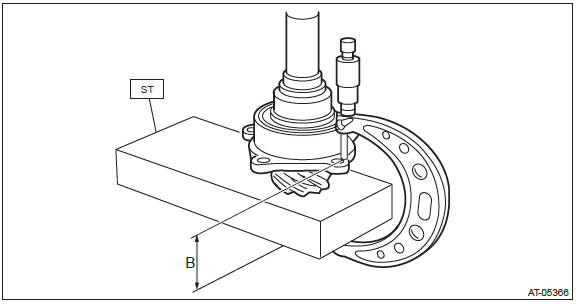
11) Obtain thickness "t" mm (in) of the drive pinion shim.
t = 6.55+-0.1225 - (B - A)
12) Select three or less shims from following table.

13) Install the shims selected for drive pinion retainer and drive pinion shaft assembly.
NOTE: Be careful not to bend the shim.
Tightening torque: 70 N*m (7.1 kgf-m, 51.6 ft-lb)
E: INSPECTION
- Make sure that all component parts are free of scratches, holes and other faults.
- Check the tooth contact. <Ref. to CVT-256, ADJUSTMENT, Drive Pinion Shaft Assembly.>
- Apply CVTF to bearing and rotate the bearing to check for noise or dragging etc.
- Check the bearing preload of drive pinion shaft.
CAUTION: Before measuring, apply differential gear oil to roller of bearing and rotate the bearing several times.
Starting torque: 11.6 - 34.7 N (1.2 - 3.5 kgf, 2.6 - 7.8 lb)
F: ADJUSTMENT
1) Remove the liquid gasket from the mating surface completely.
2) Using the ST, install the drive pinion retainer to converter case.
ST1 18270KA020 SOCKET (E20)
NOTE: Do not confuse the three different-length bolts when installing.
Tightening torque: 43 N*m (4.4 kgf-m, 31.7 ft-lb)
3) Rotate the drive pinion several times using ST1 and ST2.
ST1 18667AA010 HOLDER
ST2 499787700 WRENCH
4) Adjust the drive pinion and hypoid driven gear backlash. <Ref. to CVT-277, ADJUSTMENT, Front Differential Assembly.>
5) Using the ST, remove the drive pinion retainer from converter case.
ST1 18270KA020 SOCKET (E20)
6) Apply lead-free red dye evenly on the both sides of three to four teeth of the hypoid driven gear. Then install the drive pinion retainer and rotate the drive pinion in both directions several times. Remove the drive pinion retainer and check the tooth contact pattern.
If the teeth contact is inappropriate, adjust the backlash or thickness of the shim. <Ref. to CVT-277, ADJUSTMENT, Front Differential Assembly.>
NOTE:
After correction, wipe off the lead-free red dye.
- Correct tooth contact
Check item: Tooth contact surface is slightly shifted toward the toe side under a no-load condition.
(When driving, it moves towards the heel side.)
- Toe side
- Heel side
- Face contact
Check item: Backlash is too large.
Contact pattern
Corrective action: Increase thickness of pinion height adjusting washer according to the procedure for bringing drive pinion close to hypoid driven gear side.
- Flank contact
Check item: Backlash is too small.
Contact pattern
Corrective action: Reduce the thickness of pinion height adjusting washer according to the procedure for bringing drive pinion away from hypoid driven gear.
- Toe contact (inside contact)
Check item: Teeth contact area is too small.
Contact pattern
Corrective action: Reduce the thickness of pinion height adjusting washer according to the procedure for bringing drive pinion away from hypoid driven gear side.
- Heel contact (outside end contact)
Check item: Teeth contact area is too small.
Contact pattern
Corrective action: Increase the thickness of the pinion height adjusting washer according to the procedures for moving the drive pinion closer to the hypoid driven gear.
7) If tooth contact is correct, mark the differential side retainer position and loosen. After fitting a new O-ring and oil seal, screw in the differential side retainer to the marked position.
8) Tighten the lock plate with specified torque.
Tightening torque: 25 N*m (2.5 kgf-m, 18.4 ft-lb)
- Lock plate
READ NEXT:
 Front Differential Assembly in Continuously Variable Transmission
A: REMOVAL
1) Remove the transmission assembly from the vehicle. <Ref. to CVT-55, REMOVAL, Automatic Transmission Assembly.>
2) Remove the air breather hose. <Ref. to CVT-132, REMOVAL, Air
Oil Pump
A: REMOVAL
NOTE:
Refer to "Drive Pinion Shaft" for removal procedures. <Ref. to CVT-242, REMOVAL,
Drive Pinion Shaft Assembly.>
B: INSTALLATION
NOTE:
Refer to "Drive Pinion Shaft" for removal p
Converter Case Cover
A: REMOVAL
1) Remove the transmission assembly from the vehicle. <Ref. to CVT-55,
REMOVAL, Automatic Transmission
Assembly.>
2) Remove the air breather hose. <Ref. to CVT-132, REMOVAL, Air
SEE MORE:
Operating the driver’s window
1) Automatically open/close
2) Open/close
To open:
Press the switch down lightly and hold it. The window will open as long as the
switch is held.
This switch also has a one-touch auto down function that allows the window to
be opened fully without holding the switch. Press the switch down
Front Stabilizer
A: REMOVAL
1) Lift up the vehicle, and then remove the left and right front wheels.
2) Remove the front under cover. <Ref. to EI-35, REMOVAL, Front Under Cover.>
3) Remove the center exhaust pipe. (turbo model) <Ref. to EX(H4DOTC)-12,
REMOVAL, Center Exhaust
Pipe.>
4) Remove the fron
