Subaru Outback (BR): Oil Pump
A: REMOVAL
NOTE: Refer to "Drive Pinion Shaft" for removal procedures. <Ref. to CVT-242, REMOVAL, Drive Pinion Shaft Assembly.>
B: INSTALLATION
NOTE: Refer to "Drive Pinion Shaft" for removal procedures. <Ref. to CVT-244, INSTALLATION, Drive Pinion Shaft Assembly.>
C: INSPECTION
Check the following items.
- Check the oil pump for damage and wear.
- Rotate the oil pump by hand, and check that it rotates smoothly.
1) Measure the secondary pressure. <Ref. to CVT-50, INSPECTION, Secondary Pressure (Line Pressure) Test.>
2) If the secondary pressure is abnormal, remove the oil pan and oil strainer. <Ref. to CVT-111, REMOVAL, Control Valve Body.>
3) Check oil strainer for clogging.
When oil strainer has no clogging, replace the oil pump.
Oil Pump Chain
A: REMOVAL
1) Remove the transmission assembly from the vehicle. <Ref. to CVT-55, REMOVAL, Automatic Transmission Assembly.>
2) Remove the torque converter assembly. <Ref. to CVT-136, REMOVAL, Torque Converter Assembly.>
3) Remove the oil pump chain cover.
4) Remove the seal ring from center support COMPL.

5) Remove the driven sprocket from oil pump chain cover to remove the oil pump chain.
NOTE: The driven sprocket is replaced as an assembly only, because it is a non-disassembly part.
6) Remove the snap ring.

7) Remove the drive sprocket.

8) Remove the oil seal from the oil pump chain cover.
B: INSTALLATION
1) Clean the mating surface of oil pump chain cover and converter case cover.
2) Using the ST, install the oil seal.
ST 499755602 PRESS SNAP RING

3) Install the drive sprocket and install the snap ring.
4) Place the oil pump chain on drive sprocket.
5) Place the oil pump chain on driven sprocket and install the driven sprocket to oil pump chain cover.
6) Install the seal ring to center support COMPL.
NOTE:
- Use a new seal ring.
- Apply CVTF to the seal rings.
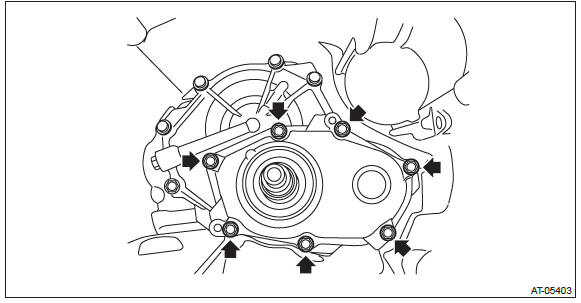
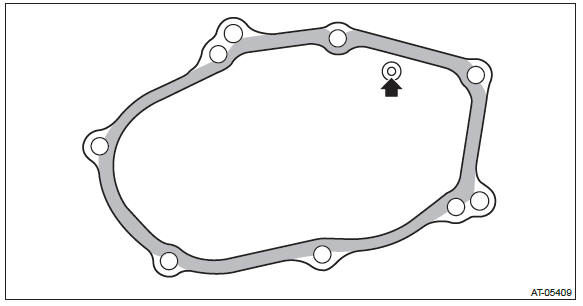
7) Apply liquid gasket seamlessly to the mating surface of oil pump chain cover.
CAUTION: Do not apply liquid gasket at the arrowed hole.
Liquid gasket: THREE BOND 1215 (Part No. 004403007) or equivalent
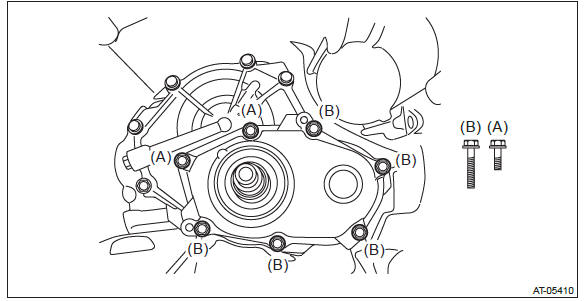
8) Install the oil pump chain cover.
NOTE: There are two types of bolt.
Tightening torque: 24 N*m (2.4 kgf-m, 17.7 ft-lb)
9) Install the torque converter assembly. <Ref. to CVT-136, INSTALLATION, Torque Converter Assembly.>
10) Install the transmission assembly to the vehicle. <Ref. to CVT-70, INSTALLATION, Automatic Transmission Assembly.>
C: DISASSEMBLY
1. DRIVE SPROCKET
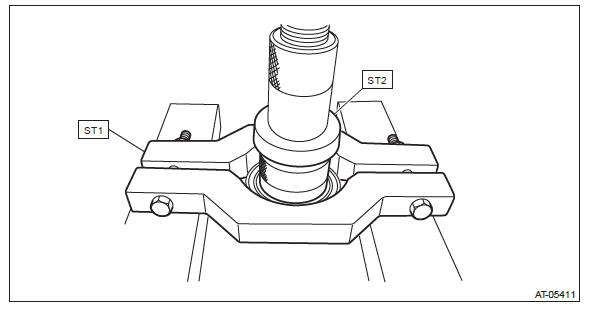
1) Remove the ball bearing using ST.
ST1 498077600 REMOVER
ST2 399513600 INSTALLER
D: ASSEMBLY
1. DRIVE SPROCKET
1) Using the ST, install the ball bearing.
NOTE: Use a new ball bearing.
ST 499755602 PRESS SNAP RING
E: INSPECTION
- Check the oil pump chain for damage.
- Replace if gear teeth are broken, damaged, sharpen or excessively worn.
- Check the bearing for seizure or wear.
- Apply CVTF to bearing and rotate the bearing to check for noise or dragging etc.
- Check the oil pump chain cover for damage.
- Check for leakage of CVTF from the mating surface of oil pump chain cover.
- Check the oil seal for damage.
READ NEXT:
 Converter Case Cover
A: REMOVAL
1) Remove the transmission assembly from the vehicle. <Ref. to CVT-55,
REMOVAL, Automatic Transmission
Assembly.>
2) Remove the air breather hose. <Ref. to CVT-132, REMOVAL, Air
Front Reduction Drive Gear
A: REMOVAL
1) Remove the transmission assembly from the vehicle. <Ref. to CVT-55,
REMOVAL, Automatic Transmission
Assembly.>
2) Remove the air breather hose. <Ref. to CVT-132, REMOVAL, Air
Front Reduction Driven Gear
A: REMOVAL
NOTE:
For removal of front reduction driven gear, refer to the "Front Reduction Drive
Gear". <Ref. to CVT-297, REMOVAL,
Front Reduction Drive Gear.>
B: INSTALLATION
NOTE:
For install
SEE MORE:
Engine oil
NOTE
● When the engine low oil level warning light illuminates, have your vehicle
inspected by your SUBARU dealer as soon as possible.
● The engine oil consumption rate is not stabilized, and therefore cannot be
determined until the vehicle has traveled at least several thousand
Programming the transmitters
The remote keyless entry system is equipped with a special code learning feature
that allows you to program new transmitter codes into the system or to delete old
ones. The system can learn up to four unique transmitter codes. The four transmitter
codes may be the same or different.
Programmi
