Subaru Outback (BR): Engine Mounting
A: REMOVAL
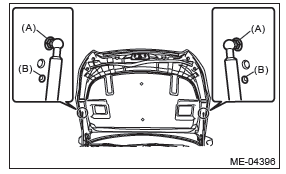
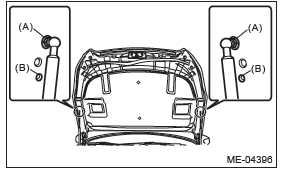
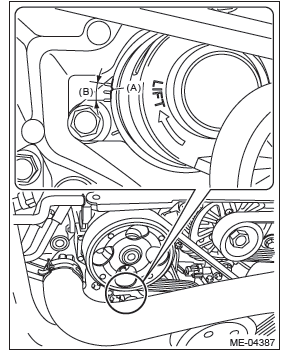
1) Change the front hood damper mounting position from (A) to (B), and completely open the front hood.
Tightening torque: 20 N*m (2.0 kgf-m, 14.8 ft-lb)
2) Disconnect the ground cable from battery.
3) Remove the radiator main fan motor assembly and radiator sub fan motor assembly. <Ref. to CO(H4SO)-24, REMOVAL, Radiator Main Fan and Fan Motor.> <Ref. to CO(H4SO)-25, REMOVAL, Radiator Sub Fan and Fan Motor.>
4) Lift up the vehicle.
5) Remove the under cover. <Ref. to EI-35, REMOVAL, Front Under Cover.>
6) Remove the front exhaust pipe. <Ref. to EX(H4SO)-5, REMOVAL, Front Exhaust Pipe.>
7) Lower the vehicle.
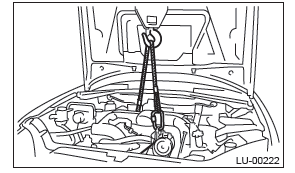
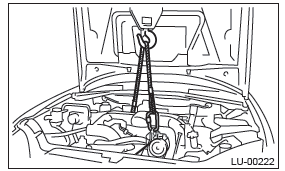
8) Support the engine with a lifting device and wire ropes.
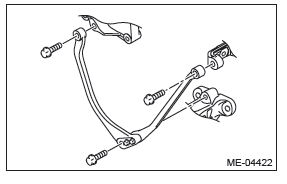
9) Remove the stopper rod.
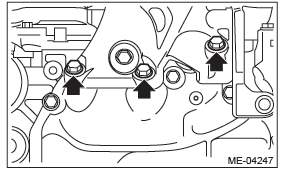
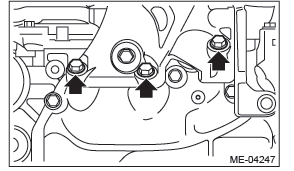
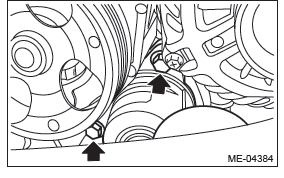
10) Remove the bolt and nut which secure engine mounting to the cradle.
11) Lift up the vehicle.
CAUTION: When lifting up the vehicle, raise up wire ropes at the same time.
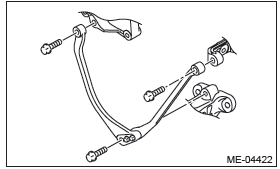
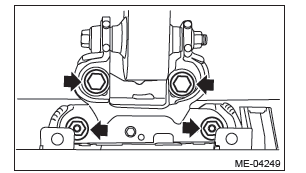
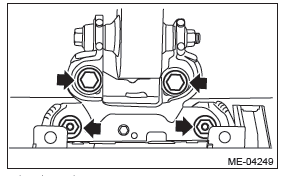
12) Remove the bolts which secure the engine mounting onto the engine, and remove the engine mounting.
B: INSTALLATION
1) Set the engine mounting, and tighten the bolts which hold engine mounting to the engine.
Tightening torque: 58 N*m (5.9 kgf-m, 42.8 ft-lb)
2) Lower the vehicle.
CAUTION: When lifting down the vehicle, lower wire ropes at the same time.
3) Attach the bolts and nuts which secure engine mounting to the cradle.
Tightening torque: 60 N*m (6.1 kgf-m, 44.3 ft-lb)
4) Install the stopper rod.
Tightening torque: 36 N*m (3.7 kgf-m, 26.6 ft-lb)
5) Remove the lifting device and wire ropes.
6) Lift up the vehicle.
7) Install the front exhaust pipe. <Ref. to EX(H4SO)-6, INSTALLATION, Front Exhaust Pipe.>
8) Install the under cover. <Ref. to EI-35, INSTALLATION, Front Under Cover.>
9) Lower the vehicle.
10) Install the radiator main fan motor assembly and radiator sub fan motor assembly. <Ref. to CO(H4SO)-24, INSTALLATION, Radiator Main Fan and Fan Motor.> <Ref. to CO(H4SO)-25, INSTALLATION, Radiator Sub Fan and Fan Motor.>
11) Connect the ground cable to battery.

12) Change the front hood damper mounting position from (B) to (A), and close the front hood.
Tightening torque: 20 N*m (2.0 kgf-m, 14.8 ft-lb)
C: DISASSEMBLY
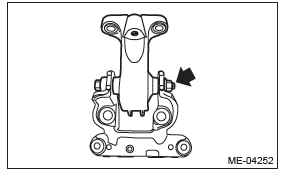
1) Remove the front cushion rubber from the engine mounting bracket.
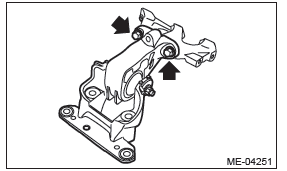
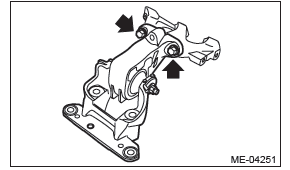
2) Remove the front cushion rubber from the front mounting bracket.
D: ASSEMBLY
1) Install the front cushion rubber to the front mounting bracket.
Tightening torque: 45 N*m (4.6 kgf-m, 33.2 ft-lb)

2) Install the front cushion rubber to the engine mounting bracket.
Tightening torque: 25 N*m (2.5 kgf-m, 18.4 ft-lb)
E: INSPECTION
Check that the engine mounting does not have deformation, cracks and any other damage.
Preparation for Overhaul
A: PROCEDURE
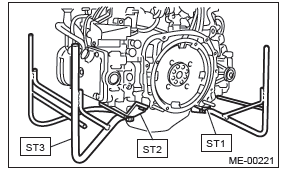
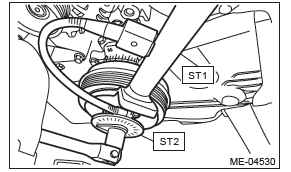
1) After removing the engine from vehicle body, attach the ST to the engine as shown in the figure.
ST1 498457000 ENGINE STAND ADAPTER
RH
ST2 498457100 ENGINE STAND ADAPTER
LH
ST3 499817100 ENGINE STAND
2) In this section the procedures described under each index are all connected and stated in order.
Engine overhaul will be completed when you go through all steps in the procedure.
Therefore, in this section, to conduct the particular procedure within the flow of a section, you need to go back and conduct the procedure described previously in order to do that particular procedure.
V-belt
A: REMOVAL
NOTE: When replacing a single part, perform the work with the engine assembly installed to body.
1. V-BELT
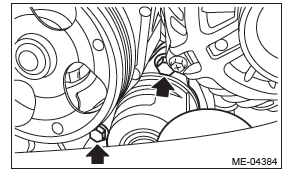
1) Remove the V-belt covers.
2) Remove the air intake duct. <Ref. to IN(H4SO)- 9, REMOVAL, Air Intake Duct.>
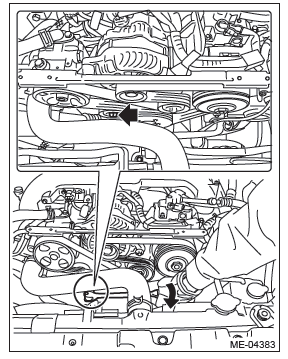
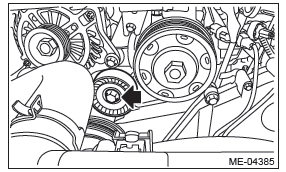
3) Attach the tool to the V-belt tensioner assembly, and rotate the tool clockwise to loosen and remove the V-belt.
2. V-BELT TENSIONER ASSEMBLY AND IDLER PULLEY
1) Remove the V-belts. <Ref. to ME(H4SO)-43, V-BELT, REMOVAL, V-belt.>
2) Remove the bolt securing the V-belt tensioner assembly to the power steering pump bracket, and remove the V-belt tensioner assembly.
3) Remove the bolt securing the idler pulley to the A/C compressor bracket, and remove the idler pulley.
B: INSTALLATION
1. V-BELT
Install in the reverse order of removal.
CAUTION:
- When reusing the V-belt, wipe off dust and water with cloth.
- Do not use the V-belt if there is any oil, grease or coolant on the belt.
- Be careful not to rub the V-belt end surface with bare hands; exposed core may cause injury.
- Wipe off any dust, oil and water on the groove of each pulley with cloth.
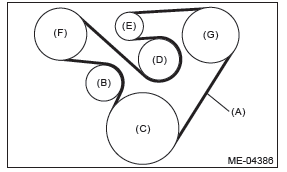
- V-belt
- V-belt tensioner ASSY
- Crank pulley
- Idler pulley
- Generator pulley
- Power steering pump pulley
- A/C compressor pulley
2. V-BELT TENSIONER ASSEMBLY AND IDLER PULLEY
Install in the reverse order of removal.
Tightening torque: 33 N*m (3.4 kgf-m, 24.3 ft-lb)
Tightening torque: 20 N*m (2.0 kgf-m, 14.8 ft-lb)
C: INSPECTION
1) Check the V-belt for cracks, tear or wear.
2) Remove the air intake duct. <Ref. to IN(H4SO)- 9, REMOVAL, Air Intake Duct.>
3) Check the V-belt tensioner assembly and idler pulley for deformation, cracks or other damages.
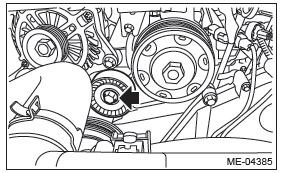
4) Check that the V-belt tension indicator (A) is within the limit (B).
Crank Pulley
A: REMOVAL
NOTE: When replacing a single part, perform the work with the engine assembly installed to body.
1) Remove the V-belts. <Ref. to ME(H4SO)-43, REMOVAL, V-belt.>
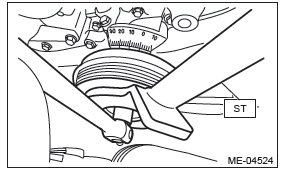
2) Use the ST to lock the crank pulley, and remove the crank pulley bolt.
ST 499977400 CRANK PULLEY WRENCH
(CVT MODEL)
ST 499977100 CRANK PULLEY WRENCH
(MT MODEL)
3) Remove the crank pulley.
B: INSTALLATION
1. METHOD WITHOUT ANGLE GAUGE
1) Clean the crankshaft thread using compressed air.
2) Install the crank pulley.
3) Apply engine oil to the crank pulley bolt seat and thread.
4) Tighten the crank pulley bolts.
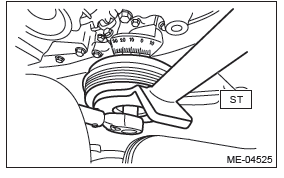
- Use the ST to lock the crank pulley, and temporarily tighten the crank pulley bolt.
ST 499977400 CRANK PULLEY WRENCH
(CVT MODEL)
ST 499977100 CRANK PULLEY WRENCH
(MT MODEL)
Tightening torque: 47 N*m (4.8 kgf-m, 34.7 ft-lb)
- Draw reference lines (A) and (B) using a marker to set the socket to the crank pulley bolt as shown in the figure.
NOTE: Set the socket onto the crank pulley bolt so that reference lines (A) and (B) is visible.
ST 499977400 CRANK PULLEY WRENCH
(CVT MODEL)
ST 499977100 CRANK PULLEY WRENCH
(MT MODEL)
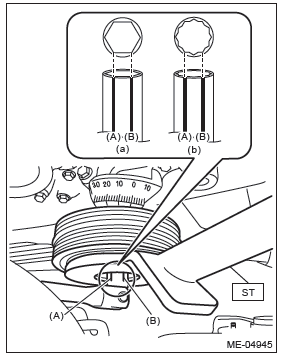
- When using 6-point socket
- When using 12-point socket
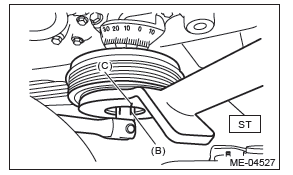
- Draw end line (C) on ST using a marker at the same position as reference line (B) drawn on the socket in step (2).
ST 499977400 CRANK PULLEY WRENCH
(CVT MODEL)
ST 499977100 CRANK PULLEY WRENCH
(MT MODEL)
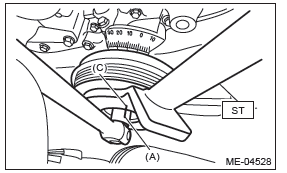
- Use the ST to lock the crank pulley, and tighten the crank pulley bolt to the angle where reference line (A) and end line (C) are aligned.
NOTE: It should be approx. 60º when reference line (A) and end line (C) are aligned.
ST 499977400 CRANK PULLEY WRENCH
(CVT MODEL)
ST 499977100 CRANK PULLEY WRENCH
(MT MODEL)
Tightening angle: 60º+-5º
5) Install the V-belts. <Ref. to ME(H4SO)-43, INSTALLATION, V-belt.>
2. METHOD WITH ANGLE GAUGE
1) Clean the crankshaft thread using compressed air.
2) Install the crank pulley.
3) Apply engine oil to the crank pulley bolt seat and thread.
4) Tighten the crank pulley bolts.
- Remove the radiator main fan motor assembly and radiator sub fan motor assembly. <Ref. to CO(H4SO)-24, REMOVAL, Radiator Main Fan and Fan Motor.> <Ref. to CO(H4SO)-25, REMOVAL, Radiator Sub Fan and Fan Motor.>
- Use the ST1 to lock the crank pulley, and temporarily tighten the crank pulley bolt.
ST1 499977400 CRANK PULLEY WRENCH
(CVT MODEL)
ST1 499977100 CRANK PULLEY WRENCH
(MT MODEL)
Tightening torque: 47 N*m (4.8 kgf-m, 34.7 ft-lb)
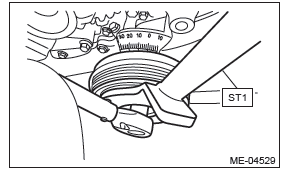
- Set the ST2, use the ST1 to lock the crank pulley, and tighten the crank pulley bolt to the specified angle.
NOTE: Attach the magnet used for securing the ST2 (ANGLE GAUGE) to ST1.
ST1 499977400 CRANK PULLEY WRENCH
(CVT MODEL)
ST1 499977100 CRANK PULLEY WRENCH
(MT MODEL)
ST2 18854AA000 ANGLE GAUGE
Tightening angle: 60º+-5º
- Install the radiator main fan motor assembly and radiator sub fan motor assembly. <Ref. to CO(H4SO)-24, INSTALLATION, Radiator Main Fan and Fan Motor.> <Ref. to CO(H4SO)-25, INSTALLATION, Radiator Sub Fan and Fan Motor.>
5) Install the V-belts. <Ref. to ME(H4SO)-43, INSTALLATION, V-belt.>
C: INSPECTION
Check that the crank pulley has no deformation, cracks or other damages.
READ NEXT:
 Timing Belt Cover
A: REMOVAL
NOTE:
When replacing a single part, perform the work with
the engine assembly installed to body.
1) Remove the crank pulley. <Ref. to ME(H4SO)-
45, REMOVAL, Crank Pulley.>
2) Remove
Cam Sprocket
A: REMOVAL
NOTE:
When replacing a single part, perform the work with
the engine assembly installed to body.
1) Remove the crank pulley. <Ref. to ME(H4SO)-
45, REMOVAL, Crank Pulley.>
2) Remove
Cylinder Head
A: REMOVAL
NOTE:
When replacing a single part, perform the work
with the engine assembly installed to body. Refer to
"Valve Clearance" for preparation procedures.
<Ref. to ME(H4SO)-29, Valve C
SEE MORE:
Front Lateral Link
A: REMOVAL
1) Lift up the vehicle, and then remove the rear wheels.
2) Remove the trailing link.
Remove the bracket, and remove the parking brake cable from the guide
(a).
Remove the bolts and nuts, and then remove the trailing link.
3) Remove the front lateral link.
Remove the snap pin (a
General Description of Automatic Transmission
A: SPECIFICATION
1. TORQUE CONVERTER CLUTCH
2. OIL PUMP
3. TRANSMISSION CONTROL ELEMENT
4. TRANSMISSION GEAR RATIO
5. PLANETARY GEAR AND PLATE
6. SELECTOR POSITION
7. HYDRAULIC CONTROL AND LUBRICATION
8. COOLING AND HARNESS
9. TRANSFER
10.FINAL REDUCTION GEAR
11.RECOMM
