Subaru Outback (BR): Front Door
A: REMOVAL
1) Disconnect the ground cable from battery.
2) Remove the front door trim. <Ref. to EI-60, FRONT DOOR, REMOVAL, Door Trim.>
3) Remove the outer mirror assembly. <Ref. to GW-28, REMOVAL, Outer Mirror Assembly.>
4) Remove the front door speaker assembly.
- Remove the screws.
- Disconnect the harness connector and remove the front speaker assembly.
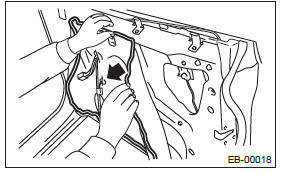
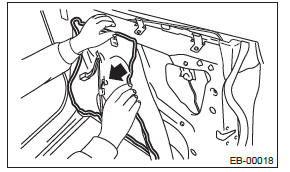
5) Remove the front sealing cover.
CAUTION:
- Carefully remove the butyl tape. Excessive force will easily break the cover.
- If the sealing cover gets broken, replace it with a new part.
- Remove the screw to remove the door trim bracket.
- Carefully remove the butyl tape to remove the sealing cover.
6) Remove the door sash and front door glass. <Ref. to GW-17, REMOVAL, Front Door Glass.>
7) Remove the front door regulator and motor. <Ref. to GW-19, REMOVAL, Front Regulator and Motor Assembly.>
8) Remove the front door latch assembly. <Ref. to SL-34, REMOVAL, Front Door Latch and Door Lock Actuator Assembly.>
9) Remove the front outer handle. <Ref. to SL-31, REMOVAL, Front Outer Handle.>
10) Remove the front door weather strip.
CAUTION: If the weather strip clip is removed with excessive force, the weather strip may be damaged. Be sure to use clip remover to remove.
11) Remove the bolts and nuts to remove the door checker.
12) Release the claws, and then remove the side sill cover-front INN.
CAUTION: Do not pull with excessive force. Doing so may damage the claws of the side sill cover INN.
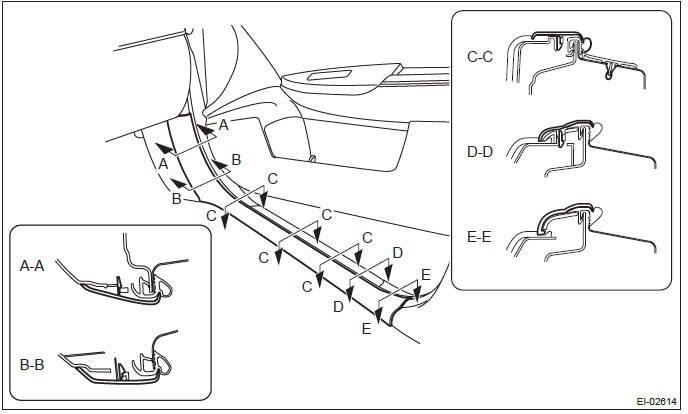
NOTE: To release the claws of the side sill cover INN, the following steps are recommended.
1. Take out the weather strip from under the side sill cover INN.
2. Turn over the floor mat and release the claw (C-C) by accessing from behind the side sill cover INN.
13) Remove the clip, and remove the side sill cover front.
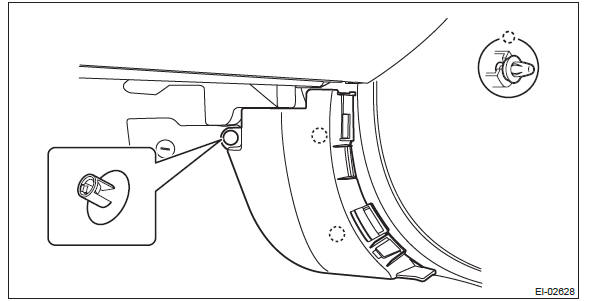
14) Disconnect the connector of door harness from body harness.
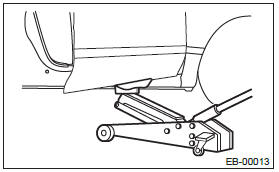
15) Before removing the door panel, make the following preparations.
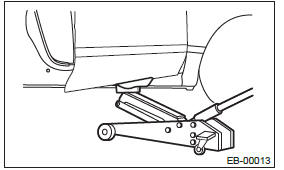
- Put a wooden block on a floor jack and place the jack under the front door.
- Support the door with a jack to protect it from damage.
CAUTION: Do not lift the door panel with a floor jack excessively. The door hinges may be damaged.
16) Remove the door-side bolts for upper and lower hinges to remove front door panel.
CAUTION: Door panels are heavy. When removing and installing them, always work in a team of two or more persons.

17) Remove the door hinge from vehicle.
B: INSTALLATION
1) Remove the fender cover lower from fender panel.
2) Apply grease to the sliding area of door hinges, and install the door hinge to vehicle.
3) Put a wooden block on jack and place the front door on that.
4) Temporarily install the front door to upper hinge and lower hinge after adjusting the height by jack.
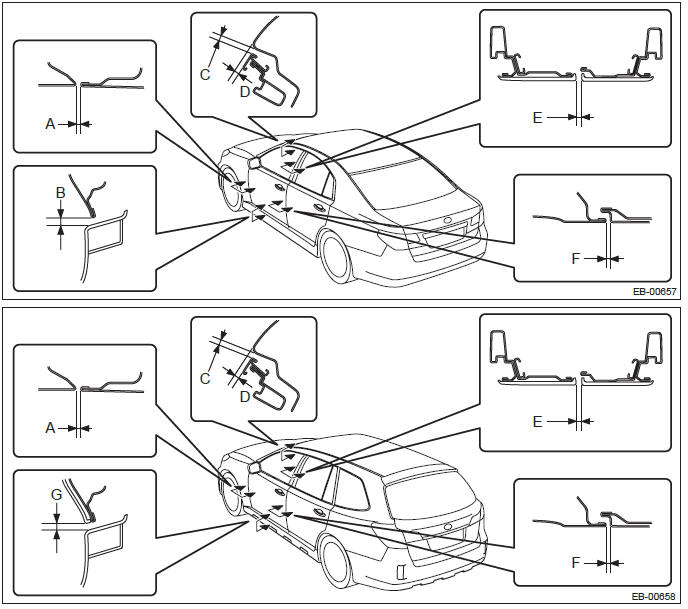
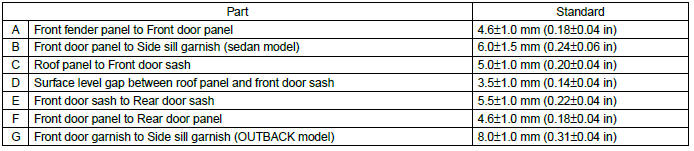
NOTE: When installing, make sure that a uniform clearance is created around the front door panel.
5) Adjust the clearance around the front door panel. <Ref. to EB-28, ADJUSTMENT, Front Door.>
6) Install the fender cover lower.
7) Tighten the bolts and nuts of door hinges and door checker.
Tightening torque: Refer to "COMPONENT" of "General Description". <Ref. to EB-4, FRONT DOOR, COMPONENT, General Description.>
8) Install door internal parts in the reverse order of removal.
9) Connect the door harness connector, and install the front pillar lower trim.
C: ADJUSTMENT
Adjust the clearance around the front door panel as follows.
NOTE: Common to sedan and OUTBACK models
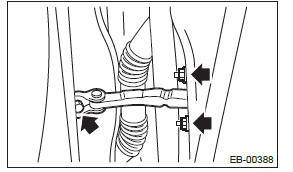
1) Adjust the vertical and horizontal positions of front door panel.
Preparation tool: ST: WRENCH (925610000)
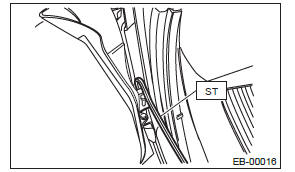
- Using ST, loosen the body side bolts of the upper and lower hinges.
- Adjust the vertical and horizontal clearance of front door panel.
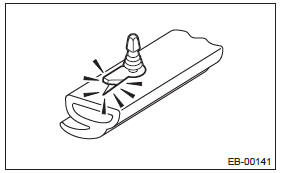
2) Adjust the surface level gap between front door panel and rear door.
CAUTION: Do not use an impact wrench. Welding area on the striker nut plate is easily broken.
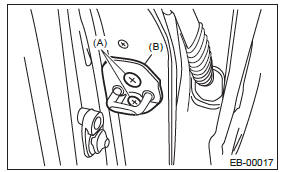
- Loosen the screws (A).
- Tap the striker (B) using a plastic hammer to adjust the surface level gap between rear end of front door panel and front end of rear door panel.
Front Sealing Cover
A: REMOVAL
1) Disconnect the ground cable from battery.
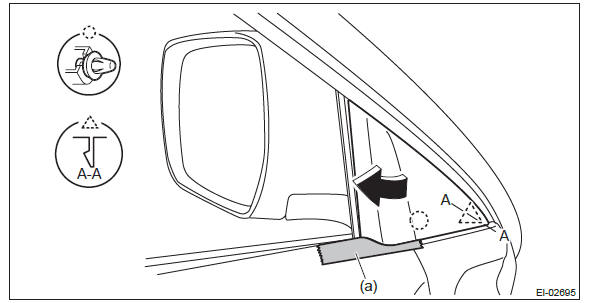
2) Remove the gusset cover.
- Attach the protective tape (a) to the door trim.
- Release the clips and claws, then detach the gusset cover.
3) Remove the door trim assembly.
- Open the cover and remove the screw.
- Remove the clips in the order of (A) to (J) and remove the door trim assembly from the door panel.
CAUTION: When removing the door trim, be sure to remove the clips in the correct order. Forcibly removing clips may damage the door panel assembly.
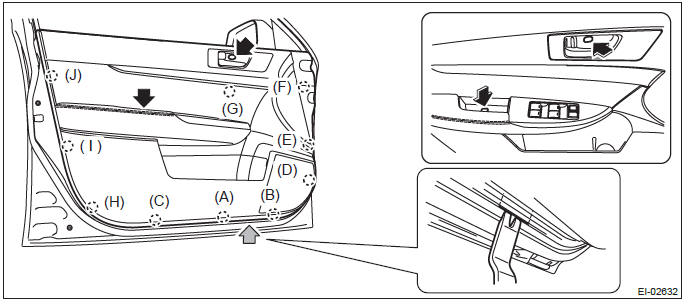
NOTE: Insert a plastic clip remover into the slit at the bottom of the door trim, to lift the door trim.
- Remove the cables (a) and (b) from the cable holder of inner remote.
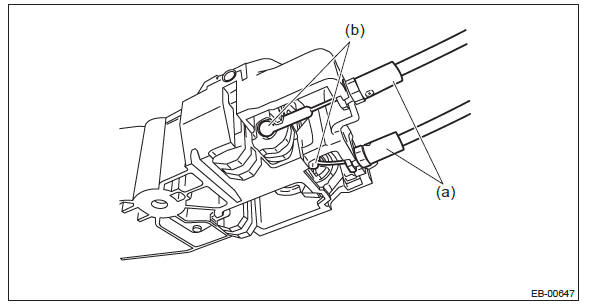
- Disconnect the harness connector and remove the door trim assembly.
4) Remove the sealing cover.
CAUTION:
- Carefully remove the butyl tape. Excessive force will easily break the cover.
- If the sealing cover gets broken, replace it with a new part.
- Remove the screw to remove the door trim bracket.
- Carefully remove the butyl tape to remove the sealing cover.
B: INSTALLATION
CAUTION:
- If the sealing cover gets broken, replace it with a new part.
- Apply a uniform bead of butyl tape.
- Attach the sealing cover, keeping it from becoming wrinkled.
- Breaks in the bead will allow water leakage and contamination.
1) Install each part in the reverse order of removal.
2) When replacing the sealing cover, use the butyl tape.
3) Press the butyl tape-applied area firmly to prevent any floating on surface.
Butyl tape: 3M8626 or equivalent
C: INSPECTION
If the sealing cover gets damaged, replace it with a new part.
READ NEXT:
 Rear Door
A: REMOVAL
1) Disconnect the ground cable from battery.
2) Remove the rear door trim. <Ref. to EI-61, REAR DOOR, REMOVAL, Door Trim.>
3) Remove the rear door speaker assembly.
Remove the scr
Door Sash Tape
A: REMOVAL
1. FRONT DOOR
1) Disconnect the ground cable from battery.
2) Remove the front door trim. <Ref. to EI-60, FRONT DOOR, REMOVAL, Door Trim.>
3) Remove the outer mirror assembly. <R
Trunk Lid
A: REMOVAL
1. TRUNK LID DAMPER STAY
1) Open the trunk lid.
2) Remove the trunk lid damper stay.
Float the lock pin using a flat tip screwdriver, etc. and slide it.
Remove the trunk lid damper stay
SEE MORE:
Remote Openers
A: REMOVAL
1. FRONT HOOD OPENER
1) Remove the opener lever.
Remove the cable.
Remove the nut, and detach the opener lever.
2) Remove the following parts and remove the cable clip and cable.
Front hood lock ASSY: <Ref. to SL-51, REMOVAL, Front Hood Lock
Assembly.>
Instrument panel low
Basic Diagnostic Procedure of HVAC System
A: PROCEDURE
NOTE: When the sunload sensor check is performed indoors or in the shade, it could be diagnosed as sensor having an open circuit. Always perform the inspection in direct sunlight.
General Description
A: CAUTION
1) Never connect the battery in reverse polarity.
Doing so may
