Subaru Outback (BR): Fuel (tank, pump, sensors)
A: PROCEDURE
1. RELEASING OF FUEL PRESSURE
WARNING: Place "NO OPEN FLAMES" signs near the working area.
CAUTION: Be careful not to spill fuel.
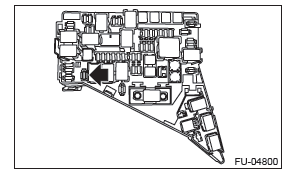
1) Remove the fuse of fuel pump from main fuse box.
2) Start the engine and run it until it stalls.
3) After the engine stalls, crank it for five more seconds.
4) Turn the ignition switch to OFF.
5) Install the fuse of fuel pump to the main fuse box.
2. DRAINING FUEL (WITH SUBARU SELECT MONITOR)
WARNING: Place "NO OPEN FLAMES" signs near the working area.
CAUTION: Be careful not to spill fuel.
NOTE:
- If the fuel pump cannot be driven, refer to the procedures for draining from the fuel filler hose.
- Be careful not to let the battery run-out.
1) Release the fuel pressure.
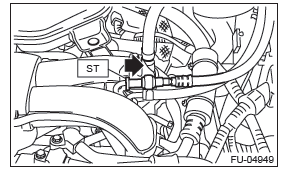
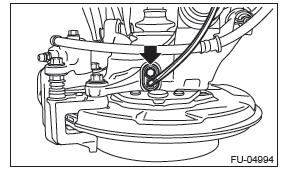
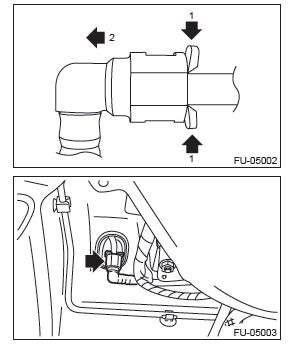
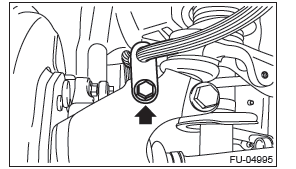
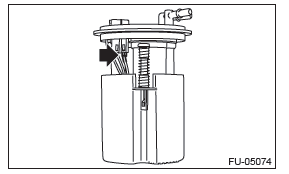
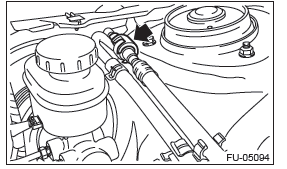
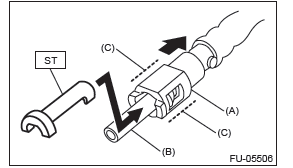
2) Attach ST to the fuel delivery pipe and push ST in the direction of arrow mark to disconnect the fuel delivery hose.
ST 42099AE000 QUICK CONNECTOR RELEASE
CAUTION:
- Be careful not to spill fuel.
- Catch the fuel from hoses using a container or cloth.
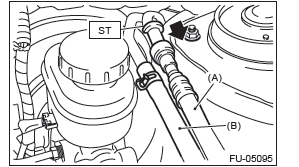
3) Connect ST to the fuel delivery hose.
ST 18471AA000 FUEL PIPE ADAPTER
4) Connect the gasoline proof hose to ST and put the end of the hose in the container.
5) Drive the fuel pump and drain the fuel using Subaru Select Monitor. (Refer to "PC application help for Subaru Select Monitor".)
CAUTION: Be careful not to spill fuel.
6) Install the related parts in the reverse order after draining the fuel.
3. DRAINING FUEL (THROUGH THE FUEL FILLER HOSE)
WARNING: Place "NO OPEN FLAMES" signs near the working area.
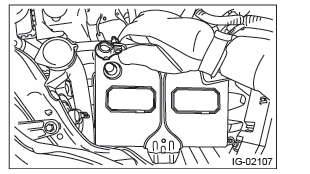
CAUTION:
- Be careful not to spill fuel.
- Fuel may remain in the fuel filler pipe. Draining the fuel from the fuel filler pipe through the fill opening using the gasoline proof pump and the gasoline proof hose (ø10 or less) before the operation.
1) Lift up the vehicle.
2) Remove the rear exhaust pipe and muffler.
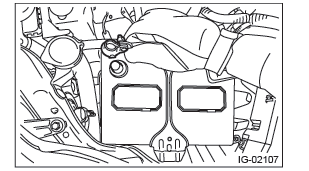
3) Open the fuel filler lid and remove the fuel filler cap.
4) Drain the fuel from the fuel filler pipe through the filler opening using the gasoline proof pump and the gasoline proof hose (ø10 or less).
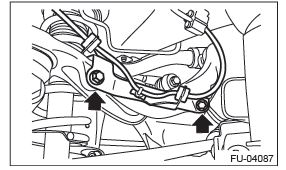
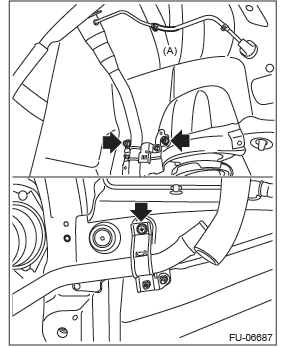
5) Disconnect the fuel filler hoses from the fuel filler pipe.
CAUTION:
- Be careful not to spill fuel.
- Catch the fuel from hoses using a container or cloth.

6) Set the container under the vehicle and insert the gasoline proof hose (ø10 or less) into the fuel filler hose to drain the fuel.
CAUTION: Be careful not to spill fuel.
7) Install the related parts in the reverse order after draining the fuel.
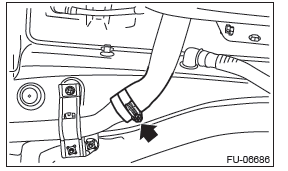
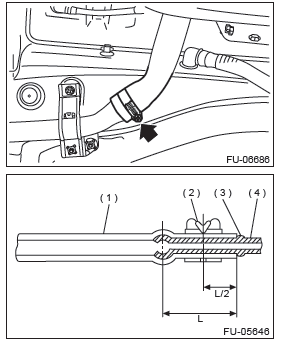
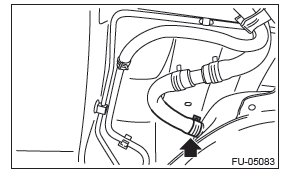
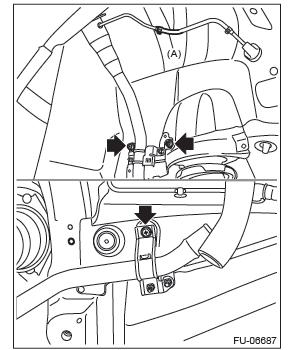
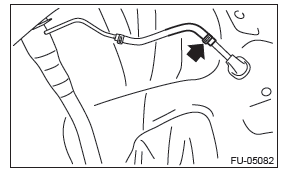
NOTE: Correctly insert the fuel filler hose to the spool, and then install the clamp as shown.
Tightening torque: 2.5 N*m (0.3 kgf-m, 1.8 ft-lb)
- Fuel filler hose
- Clamp
- Spool
- Fuel filler pipe
Fuel Tank
A: REMOVAL
WARNING: Place "NO OPEN FLAMES" signs near the working area.
CAUTION: Be careful not to spill fuel.
1) Release the fuel pressure.
2) Drain fuel.
3) Disconnect the ground cable from battery.
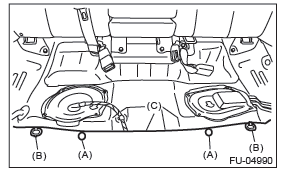
4) Remove the rear seat cushion.
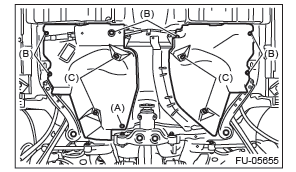
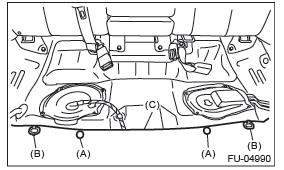
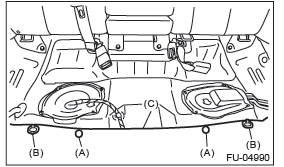
5) Remove the clips (A) and seat cushion hooks (B), and turn over the floor mat (C).
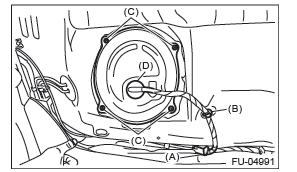
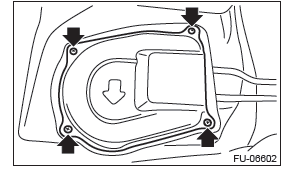
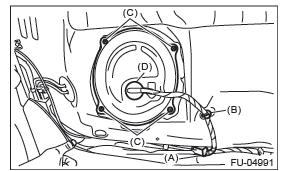
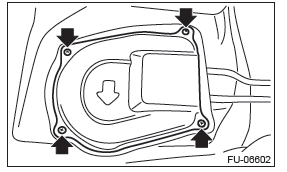
6) Remove the service hole cover of fuel pump.
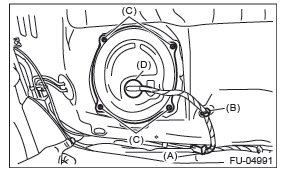
- Disconnect the fuel cord connector (A), and remove the clip (B).
- Remove the screw (C).
- Push the grommet (D) down and remove the service hole cover.
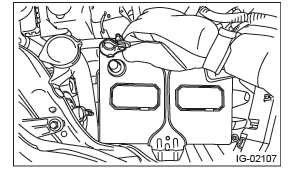
7) Remove the service hole cover of fuel sub level sensor.
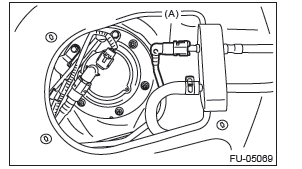
8) Disconnect the quick connector on the fuel delivery tube (A).
9) Remove the rear wheels.
10) Lift up the vehicle.
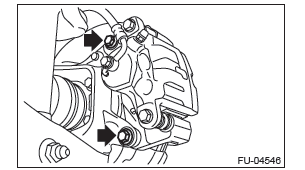
11) Remove the rear ABS wheel speed sensor from the rear housing.
12) Remove the rear ABS wheel speed sensor harness bracket from the upper arm.
13) Remove the rear brake hose bracket from rear housing.
14) Remove the rear disc brake assembly and tie it to the body side of the vehicle.
15) Remove the parking brake cable from parking brake assembly.
16) Remove the rear exhaust pipe and muffler.
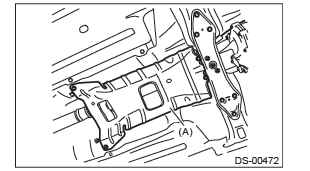
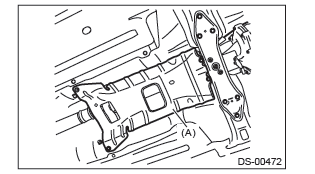
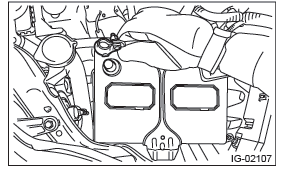
17) Remove the heat shield cover (A).
18) Remove the propeller shaft.
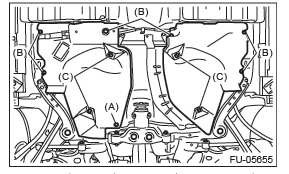
19) Remove the clip (A) securing the fuel tank protector and heat shield cover.
20) Remove the bolts (B) and nuts (C) securing the fuel tank protector, and remove the fuel tank protector.
21) Remove the bolts and nuts securing the heat shield cover and remove the heat shield cover.
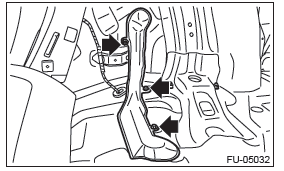
22) Remove the rear suspension assembly.
WARNING: A helper is required to perform this work.
- Support the rear differential with the transmission jack.
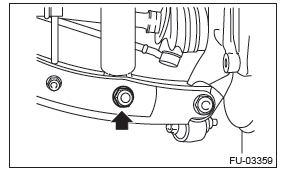
- Remove the bolt and nut which secures rear shock absorber to rear suspension arm.
- Remove the bolts which secure the rear suspension assembly to the body.
- Remove the rear suspension assembly.
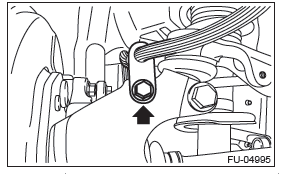
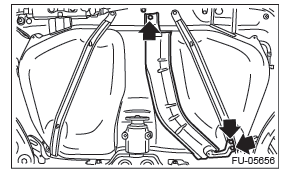
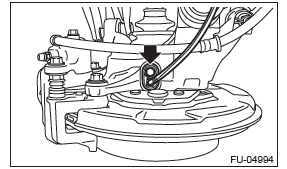
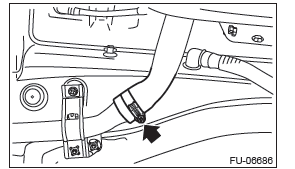
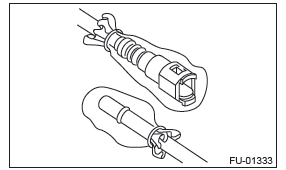
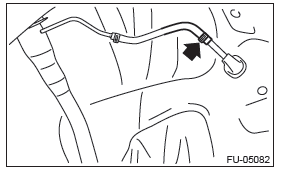
23) Disconnect the air vent hose from the fuel tank.
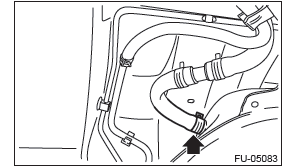
24) Disconnect the quick connector of the circulate tube from evaporation pipe.
NOTE: Disconnect the quick connector as shown in the figure.
25) Disconnect the fuel filler hose from the fuel filler pipe assembly.
26) Support the fuel tank with a transmission jack, remove the fuel tank band, and remove the fuel tank from the vehicle.
WARNING:
- A helper is required to perform this work.
- Fuel may remain in the fuel tank. This will cause the left and right sides to be unbalanced.
Be careful not to drop the fuel tank.
B: INSTALLATION
1) Support the fuel tank with a transmission jack, set the fuel tank and the fuel tank band in place, and temporarily tighten the bolts of the fuel tank band.
WARNING: A helper is required to perform this work.
2) Correctly insert the fuel filler hose to the spool, and then install the clamp as shown.
Tightening torque: 2.5 N*m (0.3 kgf-m, 1.8 ft-lb)
- Hose
- Clamp
- Spool
- Pipe
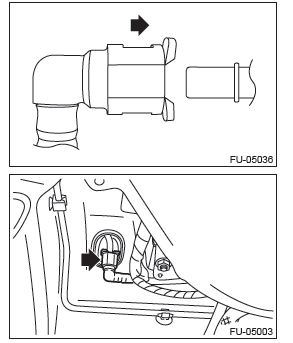
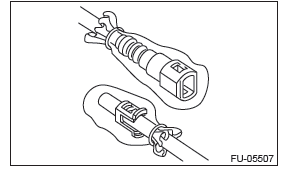
3) Connect the quick connector of the circulate tube to the evaporation pipe as shown in the figure.
CAUTION:
- Check that there is no damage or dust on the quick connector. If necessary, clean the seal surface of the pipe.
- Make sure that the quick connector is securely connected.
4) Connect the air vent hose to fuel tank.
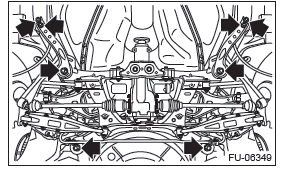
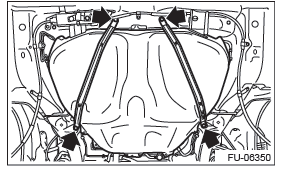
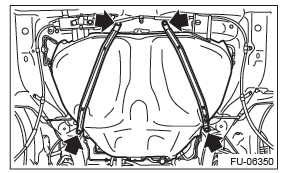
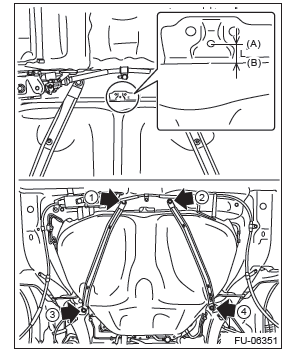
5) Move the fuel tank so that the distance between the center of the positioning hole for the body (A) and the front end of the fuel tank flange (B) becomes L, and tighten the bolts of the fuel tank bands in the sequence shown in the figure.
CAUTION: To prevent the fuel tank from damage, after tightening the bolts of the fuel tank bands, make sure that the distance between the center of the positioning hole for the body (A) and the front end of the fuel tank flange (B) is L.
Distance L: Center of the positioning hole for the body (A) - Front end of the fuel tank flange (B)
14.5 mm (0.571 in) or less
Tightening torque: 33 N*m (3.4 kgf-m, 24.3 ft-lb)
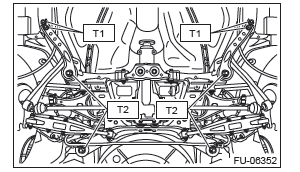
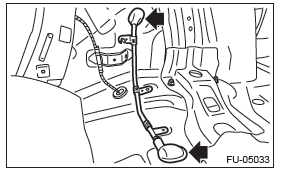
6) Install the rear suspension assembly.
WARNING: A helper is required to perform this work.
- Support the rear differential with the transmission jack.
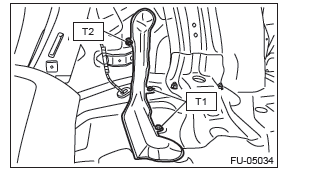
- Support the rear suspension assembly and install the rear suspension assembly to the body.
Tightening torque:
T1: 70 N*m (7.1 kgf-m, 51.6 ft-lb)
T2: 200 N*m (20.4 kgf-m, 147.5 ft-lb)
- Install the rear shock absorber to the rear suspension arm.
NOTE: Use a new self-locking nut.
Tightening torque: 120 N*m (12.2 kgf-m, 88.5 ft-lb)
7) Install the heat shield cover.
Tightening torque: 18 N*m (1.8 kgf-m, 13.3 ft-lb)
8) Install the bolts (B) and nuts (C) securing the fuel tank protector and install the clip (A) securing the fuel tank protector and heat shield cover.
NOTE: Use a new self-locking nut.
Tightening torque:
Nut (C): 9 N*m (0.9 kgf-m, 6.6 ft-lb)
Bolt (B): 18 N*m (1.8 kgf-m, 13.3 ft-lb)
9) Install the propeller shaft.
10) Install the heat shield cover (A).
Tightening torque: 18 N*m (1.8 kgf-m, 13.3 ft-lb)
11) Install the rear exhaust pipe and muffler.
12) Lower the vehicle.
13) Connect the parking brake cable to the parking brake assembly.
14) Install the rear disc brake assembly.
Tightening torque: 66 N*m (6.7 kgf-m, 48.7 ft-lb)
15) Install the rear brake hose bracket to the rear housing.
Tightening torque: 33 N*m (3.4 kgf-m, 24.3 ft-lb)
16) Install the rear ABS wheel speed sensor harness bracket to the upper arm.
NOTE: Prevent the harness identification (line) from being twisted when installing.
Tightening torque: 7.5 N*m (0.8 kgf-m, 5.5 ft-lb)
17) Attach the rear ABS wheel speed sensor to the rear housing.
NOTE: Prevent the harness identification (line) from being twisted when installing.
Tightening torque: 7.5 N*m (0.8 kgf-m, 5.5 ft-lb)
18) Install the rear wheels.
Tightening torque: 120 N*m (12.2 kgf-m, 88.5 ft-lb)
19) Connect the quick connector of the fuel delivery tube (A).
20) Install the service hole cover of fuel sub level sensor.
21) Attach the service hole cover of the fuel pump, and attach the connector and clip.
- Connector
- Clip
- Screw
- Grommet
22) Set the floor mat (C), and install clips (A) and seat cushion hooks (B).
23) Install the rear seat cushion.
24) Connect the battery ground terminal.
25) Inspect the wheel alignment and adjust if necessary.
C: INSPECTION
1) Check that the fuel tank and fuel pipe have no deformation, cracks and other damages.
2) Check that the fuel hose has no cracks, damage or loose part.
Fuel Filler Pipe
A: REMOVAL
WARNING: Place "NO OPEN FLAMES" signs near the working area.
CAUTION: Be careful not to spill fuel.
1) Release the fuel pressure.
2) Drain fuel.
3) Disconnect the ground cable from battery.
4) Open the fuel filler lid, and remove the filler cap.
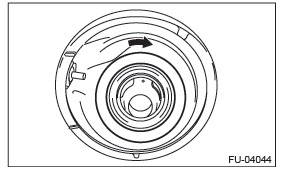
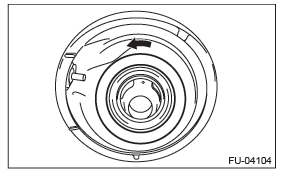
5) Turn the fuel filler pipe protector in the direction of the arrow to unlock and remove it.
6) Remove the rear wheel RH.
7) Lift up the vehicle.
8) Remove the rear mud guard RH.
9) Remove the rear sub frame.
10) Disconnect the fuel filler hose from the fuel filler pipe assembly.
11) Disconnect the evaporation hose (A) from fuel filler pipe assembly and remove the bolts and nuts securing the fuel filler pipe assembly to the vehicle body.
12) Remove the fuel filler pipe assembly from the underside of the vehicle.
B: INSTALLATION
1) Open the fuel filler lid.
2) Insert the fuel filler pipe assembly into the rubber saucer from inside of the rear fender.
3) Install the fuel filler pipe assembly to the vehicle body and connect the evaporation hose (A) to the fuel filler pipe assembly.
Tightening torque: 7.5 N*m (0.8 kgf-m, 5.5 ft-lb)
4) Align the cutout on the fuel filler pipe protector and the protrusion of the neck holder and insert them all the way, and then turn the fuel filler pipe protector in the direction of the arrow until it is locked.
5) Correctly insert the fuel filler hose to the spool, and then install the clamp as shown.
Tightening torque: 2.5 N*m (0.3 kgf-m, 1.8 ft-lb)
- Hose
- Clamp
- Spool
- Pipe
6) Install the rear sub frame.
7) Install the rear mud guard RH.
8) Lower the vehicle.
9) Install the rear wheel RH.
Tightening torque: 120 N*m (12.2 kgf-m, 88.5 ft-lb)
10) Connect the battery ground terminal.
11) Inspect the wheel alignment and adjust if necessary.
C: DISASSEMBLY
Remove the fuel filler pipe bracket from the fuel filler pipe.
D: ASSEMBLY
Install the fuel filler pipe bracket to the fuel filler pipe.
Tightening torque: 7.35 N*m (0.7 kgf-m, 5.4 ft-lb)
E: INSPECTION
1) Check that the fuel filler pipe does not have deformation, cracks or other damages.
2) Check that the fuel hose has no cracks, damage or loose part.
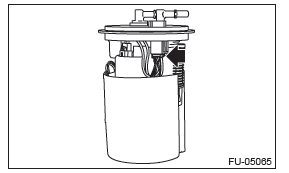
Fuel Pump
A: REMOVAL
WARNING: Place "NO OPEN FLAMES" signs near the working area.
CAUTION:
- Be careful not to spill fuel.
- If the fuel gauge indicates that two thirds or more of the fuel is remaining, be sure to drain fuel before starting work to avoid the fuel to spill.
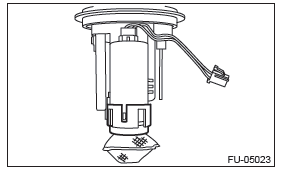
NOTE: Fuel pump assembly consists of fuel pump, fuel filter, fuel chamber and fuel level sensor.
1) Release the fuel pressure.
2) Drain fuel.
3) Disconnect the ground cable from battery.
4) Remove the rear seat cushion.
5) Remove the clips (A) and seat cushion hooks (B), and turn over the floor mat (C).
6) Remove the service hole cover.
- Disconnect the fuel cord connector (A), and remove the clip (B).
- Remove the screw (C).
- Push the grommet (D) down and remove the service hole cover.
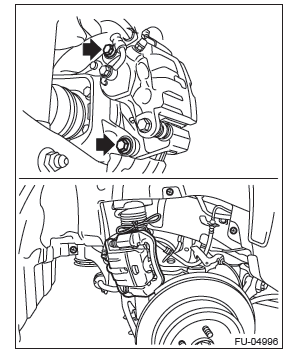
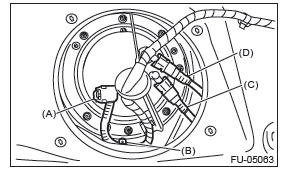
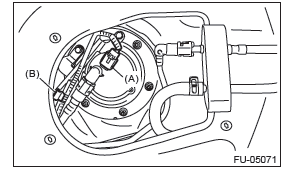
7) Disconnect the connector (A) from fuel pump, and remove the clip (B) securing the harness.
8) Disconnect the quick connector of fuel delivery tube (C) and fuel sub delivery tube (D).
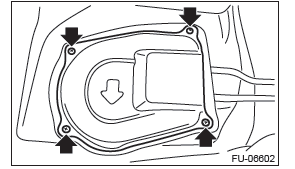
9) Remove the nuts securing the fuel pump upper plate to the fuel tank and remove the fuel pump upper plate.
10) Remove the fuel pump assembly from the fuel tank.
B: INSTALLATION
Install in the reverse order of removal while being careful of the following.
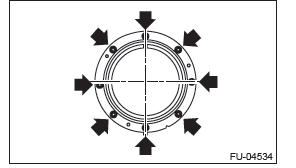
- Make sure the sealing portion is free from fuel or foreign matter before installation.
- Align protrusion (A) of the gasket to the position shown in the figure.
- Insert the protrusion (B) of gasket to the fuel pump upper plate. (3 places)
- Align the protrusion (C) of fuel pump assembly with the cutout on the fuel pump upper plate.
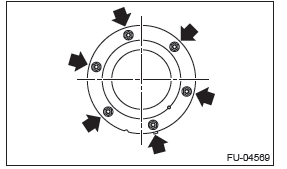
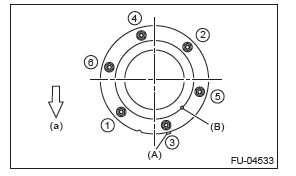
- Tighten the nuts to the specified torque in the order as shown in the figure.
NOTE: Use a new gasket.
Tightening torque: 4.4 N*m (0.4 kgf-m, 3.2 ft-lb)
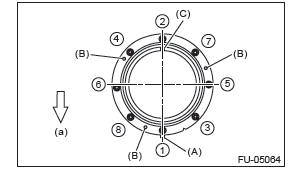
- Front side of vehicle
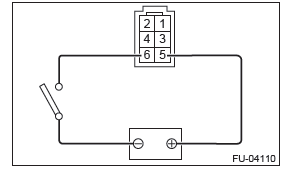
C: INSPECTION
1) Check that the fuel pump has no deformation, cracks or other damages.
2) Connect the battery positive terminal to terminal No. 5 and the battery ground terminal to terminal No. 6, and inspect the fuel pump operation.
WARNING:
- Wipe off fuel completely.
- Keep the battery as far apart from fuel pump as possible.
- Do not run the fuel pump for a long time under non-load condition.
Fuel Level Sensor
A: REMOVAL
WARNING: Place "NO OPEN FLAMES" signs near the working area.
CAUTION:
- Be careful not to spill fuel.
- If the fuel gauge indicates that two thirds or more of the fuel is remaining, be sure to drain fuel before starting work to avoid the fuel to spill.
NOTE: The fuel level sensor is built in fuel pump assembly.
1) Remove the fuel pump assembly.
2) Disconnect the fuel level sensor connector.
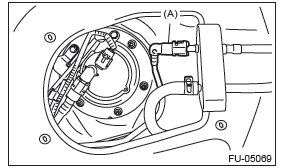
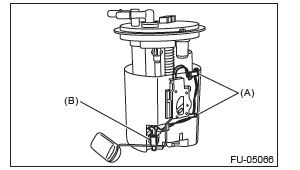
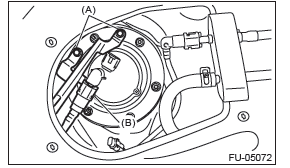
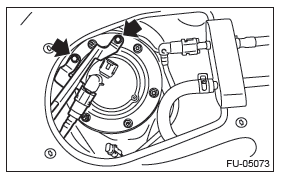
3) Remove the harness from the hooks (A) on the fuel chamber assembly and remove the fuel temperature sensor (B) from fuel chamber assembly.
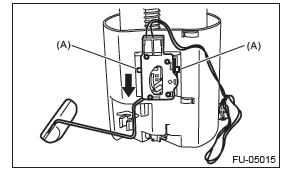
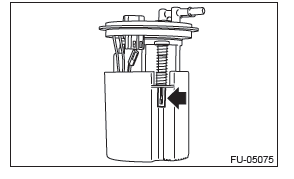
4) Press two claws (A) of the fuel level sensor, and slide the fuel level sensor in the direction of the arrow to remove the fuel level sensor.
B: INSTALLATION
Install in the reverse order of removal.
C: INSPECTION
1) Check that the fuel level sensor has no damage.
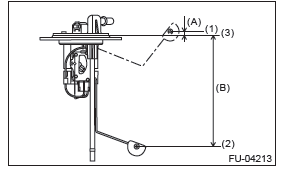
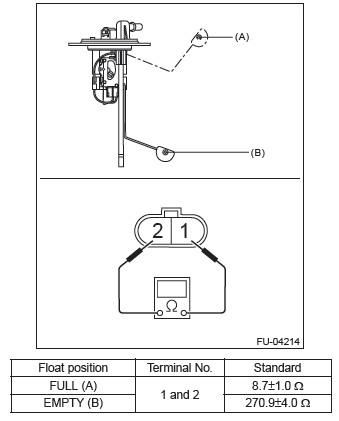
2) Measure the fuel level sensor float position.
NOTE: When inspecting the fuel level sensor, perform the work with the sensor installed to the fuel pump.
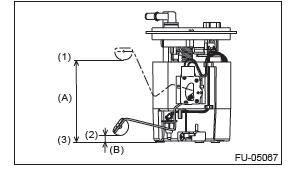
- FULL
- EMPTY
- Fuel tank seating surface
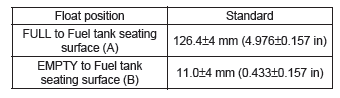
3) Measure the resistance between fuel level sensor terminals.
Fuel Sub Level Sensor
A: REMOVAL
WARNING: Place "NO OPEN FLAMES" signs near the working area.
CAUTION:
- Be careful not to spill fuel.
- If the fuel gauge indicates that two thirds or more of the fuel is remaining, be sure to drain fuel before starting work to avoid the fuel to spill.
1) Release the fuel pressure.
2) Drain fuel.
3) Disconnect the ground cable from battery.
4) Remove the rear seat cushion.
5) Remove the service hole cover.
6) Disconnect the connector (A) from fuel sub level sensor, and remove the clip (B) securing the fuel cord from fuel sub level sensor protector.
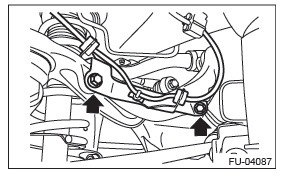
7) Remove the bolts (A) securing the fuel sub level sensor protector to the fuel sub level sensor upper plate, and remove the fuel sub level sensor protector.
8) Disconnect the quick connector on the fuel sub delivery tube (B).
9) Remove the nuts securing the fuel sub level sensor upper plate to the fuel tank and remove the fuel sub level sensor upper plate.
10) Remove the fuel sub level sensor from the fuel tank.
B: INSTALLATION
Install in the reverse order of removal while being careful of the following.
- Make sure the sealing portion is free from fuel or foreign matter before installation.
- Align protrusion (A) of the gasket to the position shown in the figure.
- Align protrusion (B) of the fuel sub level sensor to the cutout in the fuel sub level sensor upper plate.
- After tightening the bolts to the specified torque in the order indicated in the figure, install the fuel sub level sensor protector.
NOTE: Use a new gasket.
Tightening torque: 4.4 N*m (0.4 kgf-m, 3.2 ft-lb)
- Front side of vehicle
C: INSPECTION
1) Check that the fuel sub level sensor has no damage.
2) Measure the fuel sub level sensor float position.
- FULL
- EMPTY
- Datum points

3) Measure the resistance between fuel sub level sensor terminals.
Fuel Filter
A: REMOVAL
WARNING: Place "NO OPEN FLAMES" signs near the working area.
CAUTION:
- Be careful not to spill fuel.
- If the fuel gauge indicates that two thirds or more of the fuel is remaining, be sure to drain fuel before starting work to avoid the fuel to spill.
- Be careful not to drop or apply any impact to the fuel pump during work. This may deteriorate its performance.
NOTE: The fuel filter is built in fuel pump assembly.
1) Remove the fuel pump assembly.
2) Remove the fuel level sensor and fuel temperature sensor.
3) Disconnect the connector from the fuel filter assembly.
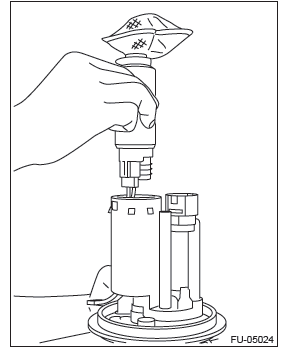
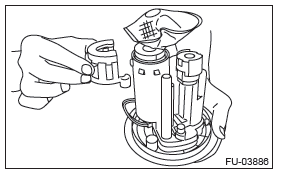
4) Remove the claw connecting the fuel filter assembly and fuel chamber assembly in order to separate the fuel filter assembly and fuel chamber assembly.
5) Remove the fuel pump holder from the fuel filter assembly.
6) Remove the fuel pump from the fuel filter assembly.
B: INSTALLATION
1) Assemble the gasket spacer (A) and support rubber cushion (B) to the fuel pump, and install the fuel pump to the fuel filter assembly.
NOTE:
- Use a new gasket spacer.
- Use a new support rubber cushion.
- Apply gasoline to the surface of gasket spacer and support rubber cushion.

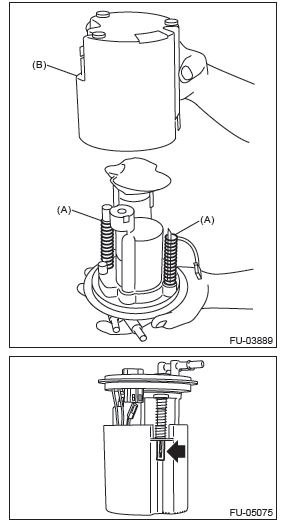
2) Install the fuel pump holder to the fuel filter assembly.
3) Install the pump module spring (A) to fuel filter assembly, and install the fuel chamber assembly (B).
NOTE:
- Use a new fuel chamber assembly.
- Check that the claw connecting the fuel filter assembly and fuel chamber assembly is securely fastened.
4) Connect the fuel pump connector.
5) Install the fuel level sensor and fuel temperature sensor.
6) Inspect the fuel level sensor.
7) Install the fuel pump assembly.
Fuel Delivery and Evaporation Lines
A: REMOVAL
WARNING: Place "NO OPEN FLAMES" signs near the working area.
CAUTION: Be careful not to spill fuel.
1) Release the fuel pressure.
2) Open the fuel filler lid and remove the fuel filler cap.
3) Remove the floor mat.
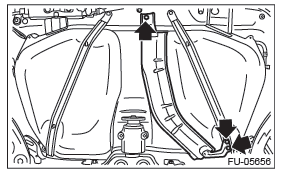
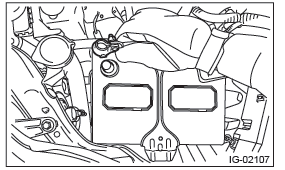
4) In the engine compartment, disconnect the fuel delivery hoses (A) and evaporation hose (B).
CAUTION:
- Be careful not to spill fuel.
- Catch the fuel from hoses using a container or cloth.
- Remove the connect check cover from the fuel delivery hose.
- Set the ST to the fuel pipe.
ST 42099AE000 QUICK CONNECTOR RELEASE
- Disconnect the quick connector of the fuel delivery hose by pushing the ST in the direction of the arrow.
- Remove the clip and disconnect the evaporation hose from the fuel pipe.
5) Remove the fuel tank.
6) Remove the rear mud guard LH.
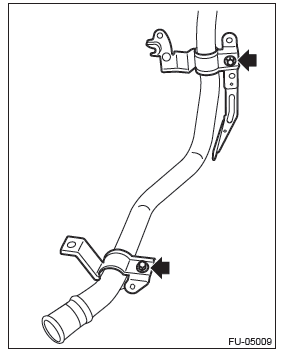
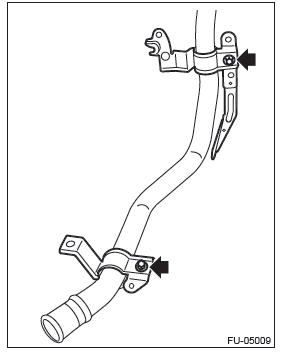
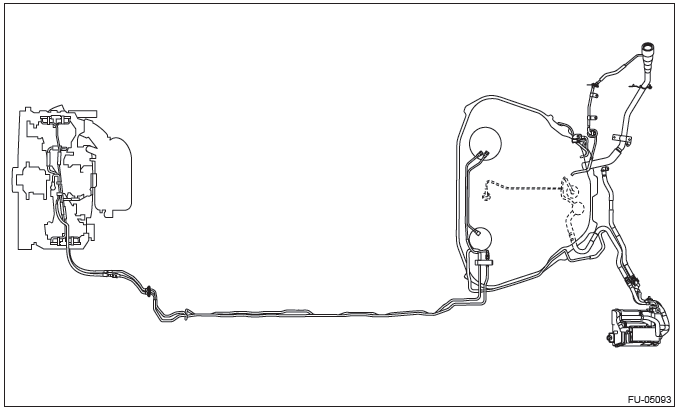
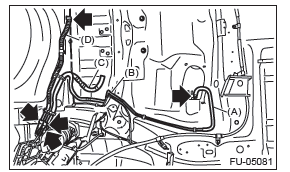
7) Remove the purge hose (A), purge pipe (B), air vent hose (C) and drain tube assembly (D).
NOTE: Disconnect the quick connector as shown in the figure.
- Air vent hose (C), drain tube ASSY (D)
- Purge pipe (B)
8) Remove the fuel pipe assembly from vehicle.
9) Disconnect the quick connector, and remove the fuel delivery tube and fuel sub delivery tube from the fuel tank.
- When using ST
1. Attach ST to the pipe and push ST in the direction of arrow mark to disconnect the quick connector.
ST 42099AE000 QUICK CONNECTOR RELEASE
CAUTION:
- Be careful not to spill fuel.
- Catch the fuel from hoses using a container or cloth.
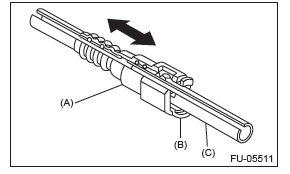
- To disconnect the connector, hold (C) shown in the figure and pull in axial direction.
- If the connector and pipe are sticking to each other, push and pull the connector with ST pushed, and then pull the connector after it starts moving freely.
- When disconnecting the connector, do not bend or twist the tube forcibly. If the tube is bent, replace with a new part.
NOTE: Clean the pipe and quick connector, if they are covered with dust.
- Quick connector
- Pipe
- Connector holding position
2. To prevent from damaging or entering foreign matter, wrap the pipes and quick connectors with plastic bag etc.
CAUTION: When reusing the retainer, do not disconnect the retainer from the connector.
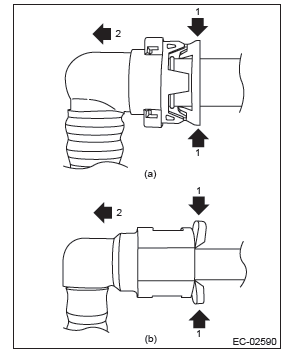
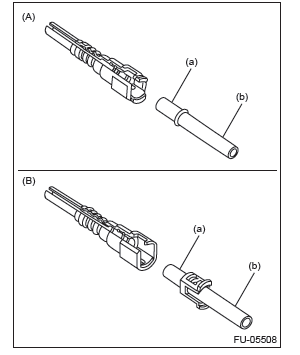
- When not using ST
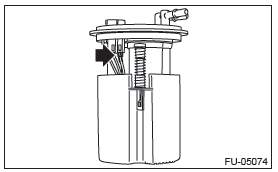
1. Push the retainer in the direction of the arrow, disconnect the quick connector from pipe.
CAUTION:
- Be careful not to spill fuel.
- Catch the fuel from hoses using a container or cloth.
- To disconnect the connector, hold (D) shown in the figure and pull in axial direction.
- If the connector and pipe are sticking to each other, push and pull the connector with the retainer pushed in the direction of the arrow, and then pull the connector after it starts moving freely.
- When disconnecting the connector, do not bend or twist the tube forcibly. If the tube is bent, replace with a new part.
NOTE: Clean the pipe and quick connector, if they are covered with dust.
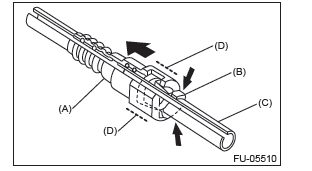
- Quick connector
- Retainer
- Pipe
- Connector holding position
2. To prevent from damaging or entering foreign matter, wrap the pipes and quick connectors with plastic bag etc.
CAUTION: When reusing the retainer, do not disconnect the retainer from the pipe.
10) Remove the evaporation pipe.
- Remove the rear mud guard RH.
- Remove the evaporation hose.
- Remove the trunk side trim panel assembly - side on the RH side.
- Remove the evaporation pipe protector.
- Remove the evaporation pipe from vehicle.
B: INSTALLATION
Install in the reverse order of removal while being careful of the following.
1. INSTALLATION OF EVAPORATION PIPE
1) Install the evaporation pipe to the vehicle.

2) Install the evaporation pipe protector.
Tightening torque:
T1: 1 N*m (0.1 kgf-m, 0.7 ft-lb)
T2: 7.5 N*m (0.7 kgf-m, 5.4 ft-lb)
3) Install the trunk side trim panel assembly - side on RH side.
4) Install the evaporation hose.
5) Install the rear mud guard RH.
2. CONNECTING THE FUEL LINE QUICK CONNECTOR
CAUTION:
- Make sure there are no damage or dust on connections. If necessary, clean seal surface of pipe.
- When removed using ST
- When removed without using ST
- Seal surface
- Pipe
- When reusing the retainer, make sure that neither scratches nor deformation exist on the retainer. If it is faulty, use a new part.
1) Connect the quick connector to pipe.
CAUTION:
- Make sure that the quick connector is securely connected.
- Quick connector
- Retainer
- Pipe
- Make sure the two retainer pawls are engaged in their mating positions in the quick connector.
- Be sure to inspect tubes and their connections for any leakage of fuel.
- To connect the connector, hold (d) shown in the figure and push in axial direction.
- When connecting the connector, do not bend or twist the tube forcibly. If the tube is bent, replace with a new part.
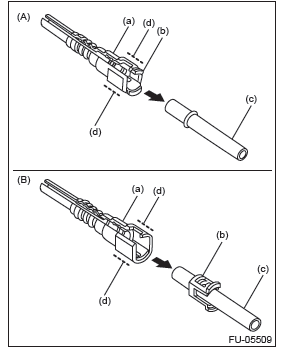
- When removed using ST
- When removed without using ST
- Quick connector
- Retainer
- Pipe
- Connector holding position
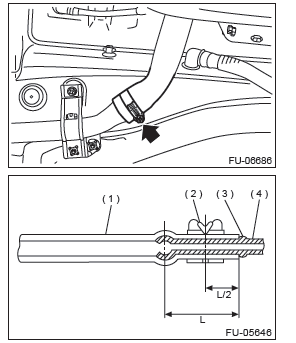
3. EVAPORATION HOSE CONNECTION
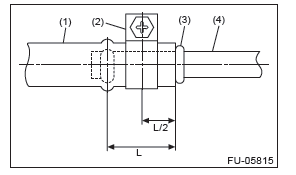
Connect the evaporation hose to the pipe with an overlap of 15 to 20 mm (0.59 to 0.79 in).
L = 17.5+-2.5 mm (0.689+-0.098 in)
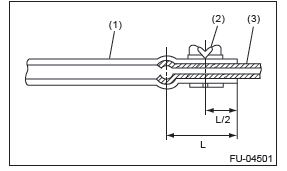
- Hose
- Clip
- Pipe
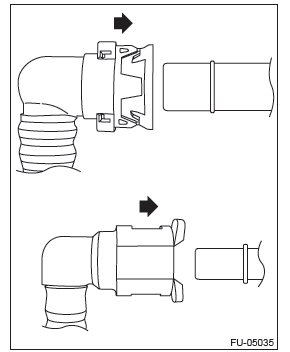
4. CONNECTING THE EVAPORATION LINE QUICK CONNECTOR
CAUTION:
- Make sure there are no damage or dust on connections. If necessary, clean the seal surface of the pipe.
- Make sure that the quick connector is securely connected.
Connect the quick connector as shown in the figure.
C: INSPECTION
1) Check that the fuel pipe has no deformation, cracks or other damages.
2) Check that the hose and tube have no cracks, damage or loose part.
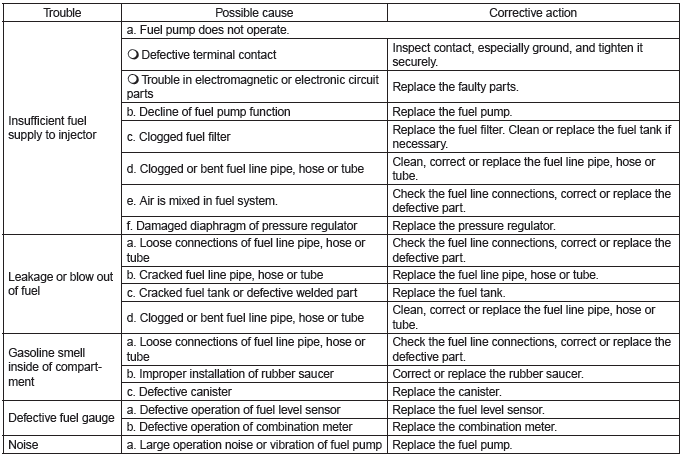
Fuel System Trouble in General
A: INSPECTION
NOTE:
- When the vehicle is left unattended for an extended period of time, water may accumulate in the fuel tank.
Fill fuel fully to prevent the problem.
- In snow-covered areas, mountainous areas, skiing areas, etc. where ambient temperatures drop to 0ºC (32ºF) or less throughout the winter season, use a water removing agent in the fuel system to prevent freezing fuel system and accumulating water.
- When water is accumulated in fuel filter, fill the water removing agent in the fuel tank.
- Before using water removing agent, follow the cautions noted on the bottle.
READ NEXT:
 Emission Control (Aux. Emission Control Devices)
General Description
A: CAUTION
Wear appropriate work clothing, including a cap, protective goggles and
protective shoes when performing
any work.
Remove contamination including dirt and corrosio
Intake (Induction)
General Description
A: COMPONENT
Air intake duct
Clip
Resonator chamber
Air cleaner case (front)
Spacer
Cushion
Air cleaner element
Air cleaner case (rear)
Clip
Clamp
Cover
Clip
Air int
SEE MORE:
Tire rotation
Vehicles equipped with 4 non-unidirectional tires
1) Front
Vehicles equipped with unidirectional tires
1) Front
Tire wear varies from wheel to wheel. To maximize the life of each tire and ensure
that the tires wear uniformly, it is best to rotate the tires every 7,500 miles
(12,000 km).
Disarming the system
Briefly press the “” button (for
less than 2 seconds) on the remote transmitter. The driver’s door will unlock, an
electronic chirp will sound twice, the turn signal lights will flash twice and the
security indicator light will turn off.
To unlock all other doors and the rear gate (Outb
