Subaru Outback (BR): Relay and Fuse, Power Window System
A: LOCATION
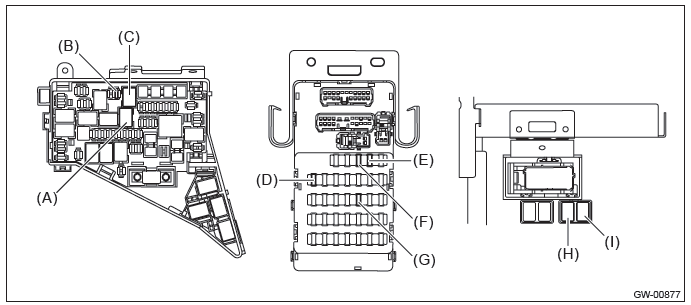
NOTE: For other related fuses, refer to the wiring diagram. <Ref. to WI-15, Power Supply Circuit.>
B: INSPECTION
1. CHECK FUSE.
1) Remove the fuse and check visually.
2) If the fuse is blown out, replace the fuse.
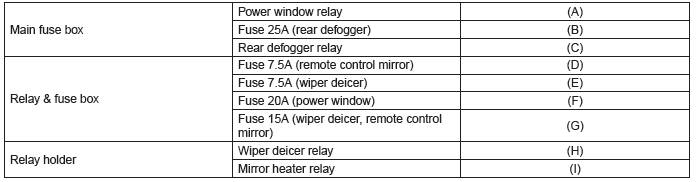
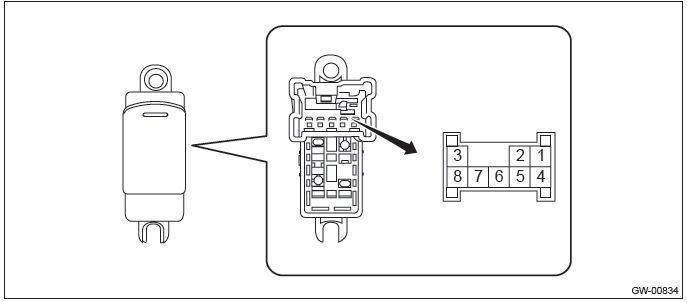
2. CHECK RELAY
1) Check the resistance between relay terminals.
2) Replace the relay if the inspection result is not within the standard value.
Power Window System
A: WIRING DIAGRAM
Refer to "Power Window System" in the wiring diagram. <Ref. to WI-200, WIRING DIAGRAM, Power Window System.>
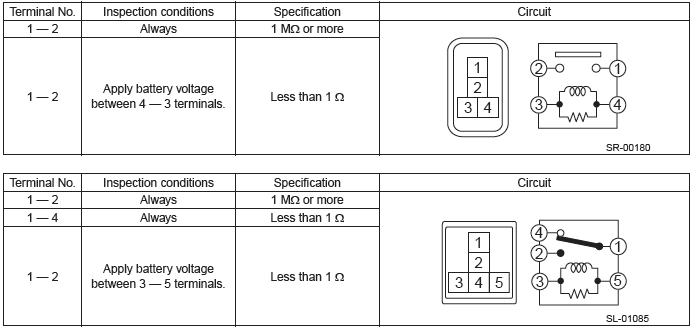
B: INSPECTION
C: OPERATION
1. RESET OPERATION A
1) Sit in the driver's seat and close the door.
2) Turn the ignition switch to ON.
3) Operate the power window main switch to open the window glass halfway.
4) Operate the power window main switch to "UP" direction to fully close the driver's side window glass.
5) While the window glass is fully closed, hold down the power window switch to "UP" direction for one second.
6) Operate the power window main switch to "AUTO DOWN" direction to check whether the window fully opens properly.
NOTE: If the window does not fully open properly, repeat steps 1) to 6).
2. RESET OPERATION B
1) Sit in the driver's seat and close the door.
2) Turn the ignition switch to ON.
3) Perform "AUTO UP" operation for the driver's side window glass, by fully pulling up the power window main switch to cause the reverse operation (in reverse operation, the window is repeatedly fully closed and then reversed to open it slightly.) 10 times in row.
4) Check that the "AUTO UP" does not operate.
5) Perform reset operation A.
6) Check that the window operates properly by operating the "AUTO UP" and "AUTO DOWN" switch.
NOTE: If the window does not fully open/close properly, repeat steps 1) to 6).
D: NOTE
For operation procedures of each component of the power window system, refer to the respective sections.
- Power window control switch: <Ref. to GW-12, Power Window Control Switch.>
- Front door glass: <Ref. to GW-17, Front Door Glass.>
- Front regulator and motor assembly: <Ref. to GW-19, Front Regulator and Motor Assembly.>
- Rear door glass: <Ref. to GW-34, Rear Door Glass.>
- Rear regulator and motor assembly: <Ref. to GW-36, Rear Regulator and Motor Assembly.>
Power Window Control Switch
A: REMOVAL
1. MAIN SWITCH
1) Remove the front door trim. <Ref. to EI-60, FRONT DOOR, REMOVAL, Door Trim.>
2) Remove the power window switch panel.
CAUTION: Do not damage the door trim with the switch panel.
- Insert a sheet of protective paper (a) between switch panel and door trim.
- Remove the screws and disconnect the connector.
- Disconnect the claws and then remove the power window switch panel.
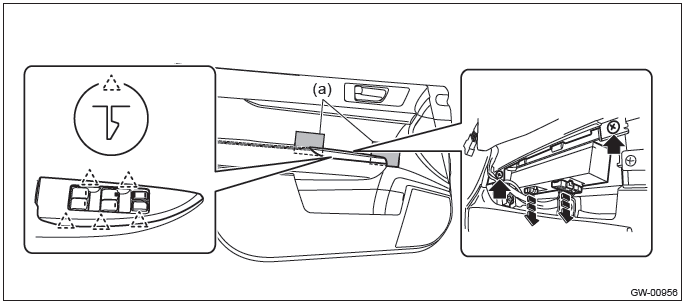
- Remove the screws and remove the power window main switch.

2. SUB-SWITCH
1) Remove the rear door trim. <Ref. to EI-61, REAR DOOR, REMOVAL, Door Trim.>
2) Remove the power window switch panel.
CAUTION: Do not damage the door trim with the switch panel.
- Insert a sheet of protective paper (a) between switch panel and door trim.
- Remove the screws and disconnect the connector.
- Disconnect the claws and then remove the power window switch panel.
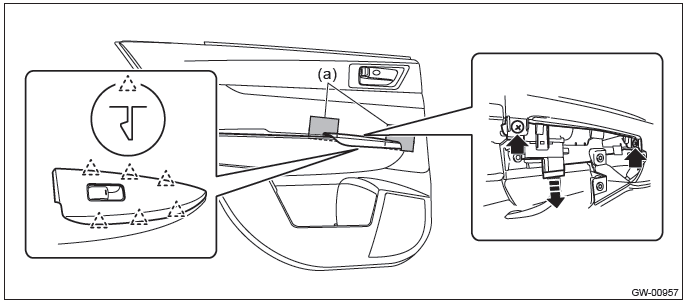
3) Disconnect the claws and then remove the power window sub-switch.
B: INSTALLATION
CAUTION:
- After installation of main switch, always perform the initial setting. (model with driver's side AUTO UP function)
Failure to do so may cause the improper activation of auto-reverse operation for pinching hazard prevention. - Use protective paper to avoid damage to the door trim.
1) Install each part in the reverse order of removal.
2) Perform initial setting operation (reset operation A). <Ref. to GW-10, RESET OPERATION A, OPERATION, Power Window System.>
C: INSPECTION
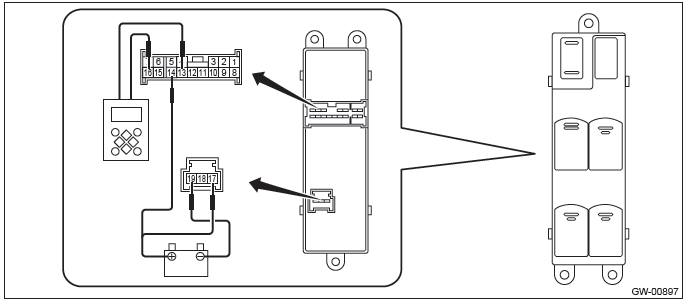
1. MAIN SWITCH
- Driver's seat
CAUTION: Since the driver's side power window switch is controlled by CPU, do not check continuity for switch alone with the circuit tester. Performing continuity check with circuit tester may damage the driver's side power window switch circuit.
Check output from the power window main switch to driver's side motor using the oscilloscope function in the Subaru Select Monitor.
1) Remove the power window main switch.
2) Connect the battery and the Subaru Select Monitor to the power window main switch terminal.
CAUTION: Never mix up the terminals when connecting the power window main switch connector and battery.
If connected to a wrong terminal, the power window main switch may be damaged.
NOTE:
- When the battery is connected to the power window main switch terminal, the letters "AUTO" on the driver's side knob illuminates.
- For detailed procedures, refer to "Subaru Select Monitor Operation Manual".
3) Operate the main switch and check the output.
NOTE: Since output time during window UP operation is extremely short, it cannot be checked without using a measuring instrument such as oscilloscope. Output is constantly produced while the switch is operated for window DOWN operation.
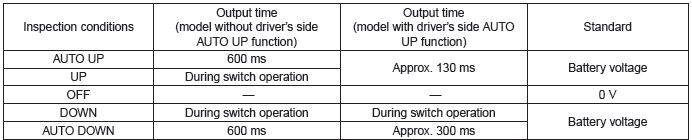
4) Replace the power window main switch if the inspection result is not within the standard value.
- Except for driver's seat
1) Check the resistance between main switch terminals.
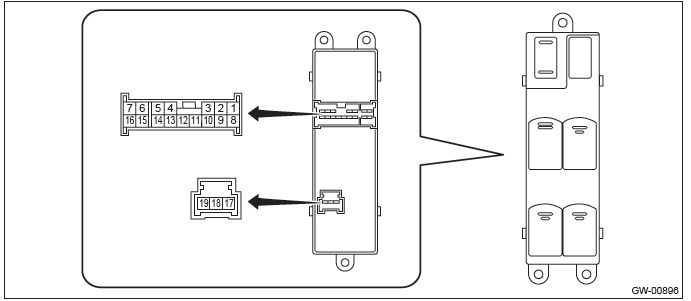
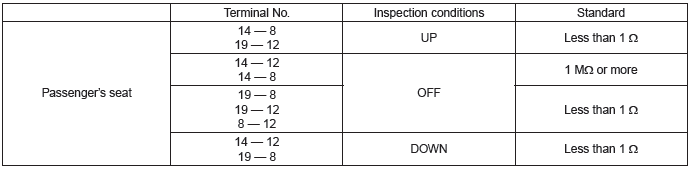
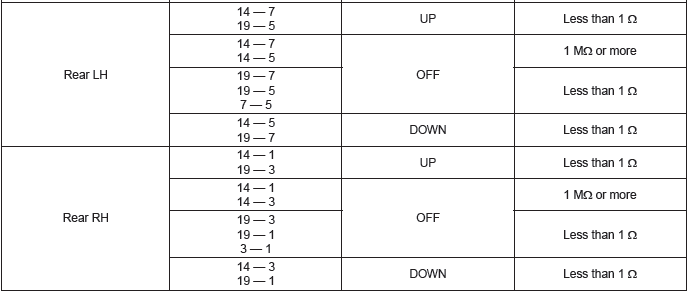
2) Replace the main switch if the inspection result is not within the standard value.
2. SUB-SWITCH
1) Remove the sub switch.
2) Check the resistance between sub switch terminals.

3) Replace the sub switch if the inspection result is not within the standard value.
READ NEXT:
 Front Door Glass
A: REMOVAL
1) Remove the front door trim. <Ref. to EI-60, FRONT DOOR, REMOVAL, Door
Trim.>
2) Remove the sealing cover.
CAUTION:
Carefully remove the butyl tape. Excessive force will easily
Scalp Cap
A: REPLACEMENT
1. MODEL WITHOUT ELECTRIC RETRACTABLE MIRROR
CAUTION:
When removing the mirror, be careful not to damage the back surface
of mirror with a flat tip screwdriver.
When installing the
Outer Mirror Assembly
A: REMOVAL
1) Remove the front door trim. <Ref. to EI-60, FRONT DOOR, REMOVAL, Door
Trim.>
2) Remove the outer mirror assembly.
Disconnect the connector.
Remove the bolts to remove outer mi
SEE MORE:
Front seats
WARNING
● Never adjust the seat while driving to avoid the possibility of loss of vehicle
control and of personal injury.
● Before adjusting the seat, make sure the hands and feet of rear seat passengers
or cargo are clear of the adjusting mechanism.
● After adjusting the se
Keyless Entry System
A: WIRING DIAGRAM
Refer to "Keyless Entry System" in the wiring diagram. <Ref. to WI-181,
WIRING DIAGRAM, Keyless Entry
System.>
B: ELECTRICAL SPECIFICATION
1. KEYLESS ENTRY CONTROL MODULE
Model without tire pressure monitoring system
Model with tire pressure monitoring system
2. BOD
