Subaru Outback (BR): Transmission Gear Oil
A: INSPECTION
1) Park the vehicle on a level surface.
2) Turn the ignition switch to OFF, and wait until the engine cools.
3) Remove the collector cover. (turbo model)
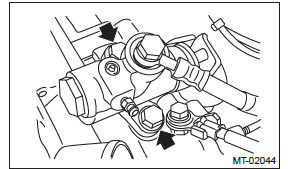
4) Remove the oil level gauge and wipe it clean.
5) Reinsert the oil level gauge all the way. Be sure that the oil level gauge is correctly inserted in the proper direction.
6) Pull out the oil level gauge again, and check the oil level. If it is below the lower level, add oil through the oil level gauge hole to bring the level up to the upper level.
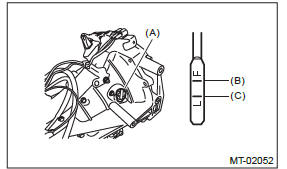
- Oil level gauge
- Upper level
- Lower level
B: REPLACEMENT
1) Pull out the oil level gauge.
2) Lift up the vehicle.
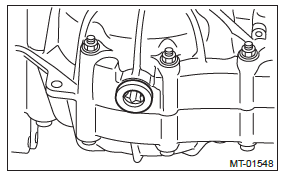
3) Using the TORX bit T70, remove the drain plug, and drain the transmission gear oil completely.
CAUTION:
- Immediately after the vehicle has been running or after idling for a long time, the transmission gear oil will be hot. Be careful not to receive burns.
- Be careful not to spill the transmission gear oil on the exhaust pipe, to prevent emission of smoke or causing a fire. If gear oil is spilt, wipe it off completely.
4) Tighten the drain plug using TORX bit T70.
NOTE: Use a new gasket.
Tightening torque:
44 N*m (4.5 kgf-m, 32.5 ft-lb) (Aluminum gasket
silver)
70 N*m (7.1 kgf-m, 51.6 ft-lb) (Copper gasket
brown)
70 N*m (7.1 kgf-m, 51.6 ft-lb) (Metal gasket
black)
5) Lower the vehicle.
6) Pour gear oil through the oil level gauge hole.
Recommended gear oil: GL-5 (75W-90) or equivalent
Gear oil capacity:
3.7  (3.9
US qt, 3.3 Imp qt)
(3.9
US qt, 3.3 Imp qt)
7) Measure the transmission gear oil amount, and check that it is within the specification.
8) Install the collector cover. (turbo model)
Manual Transmission Assembly
A: REMOVAL
1) Set the vehicle on a lift.
2) Remove the front wheels.
3) Open the front hood completely.
4) Remove the collector cover. (turbo model)
5) Remove the air intake duct. <Ref. to IN(H4SO)- 9, REMOVAL, Air Intake Duct.> <Ref. to IN(H4DOTC)-12, REMOVAL, Air Intake Duct.>
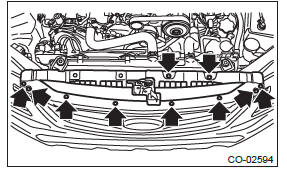
6) Remove the 10 clips and detach the grille bracket.
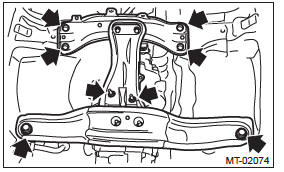
7) Disconnect the ground cable from battery.
8) Remove the air intake boot assembly. (non-turbo model) <Ref. to IN(H4SO)-8, REMOVAL, Air Intake Boot.>
9) Remove the intercooler and the intercooler stay.
(turbo model) <Ref. to IN(H4DOTC)-17, REMOVAL, Intercooler.>
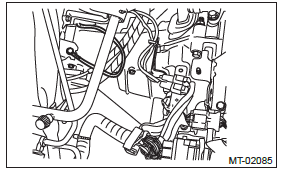
10) Disconnect the engine harness connector.
- Non-turbo model
- Turbo model
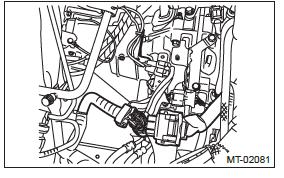
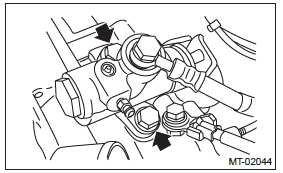
11) Disconnect the connector back-up light switch & neutral position switch.
- Non-turbo model
- Neutral position switch connector (Brown)
- Back-up light switch connector (Gray)
- Turbo model
- Neutral position switch connector (Brown)
- Back-up light switch connector (Gray)
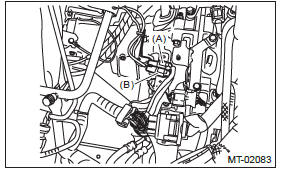
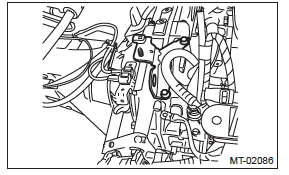
12) Disconnect the transmission radio ground terminal.
- Non-turbo model
- Turbo model
13) Remove the throttle body. (non-turbo model) <Ref. to FU(H4SO)-15, REMOVAL, Throttle Body.>
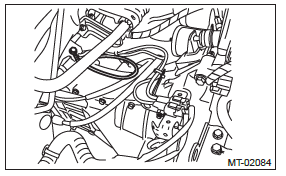
14) Remove the starter. <Ref. to SC(H4SO)-9, REMOVAL, Starter.>
15) Remove the operating cylinder from the transmission, and suspend on a wire.
16) Lift up the vehicle.
17) Remove the front under cover. <Ref. to EI-35, REMOVAL, Front Under Cover.>
18) Drain transmission gear oil completely. <Ref. to 6MT-24, REPLACEMENT, Transmission Gear Oil.>
19) Remove the front, center and rear exhaust pipes. (non-turbo model) <Ref. to EX(H4SO)-5, REMOVAL, Front Exhaust Pipe.> <Ref. to EX(H4SO)-8, REMOVAL, Center Exhaust Pipe.>
<Ref. to EX(H4SO)-9, REMOVAL, Rear Exhaust Pipe.>
20) Remove the center and rear exhaust pipes.
(turbo model) <Ref. to EX(H4DOTC)-12, REMOVAL, Center Exhaust Pipe.> <Ref. to EX(H4DOTC)- 15, REMOVAL, Rear Exhaust Pipe.>
CAUTION: When removing the exhaust pipes, make sure that each exhaust pipe does not drop off.
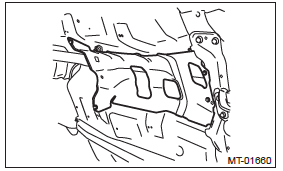
21) Remove the heat shield cover.
22) Remove the steering shaft universal joint.
<Ref. to PS-21, REMOVAL, Universal Joint.>
23) Remove the propeller shaft. <Ref. to DS-10, REMOVAL, Propeller Shaft.>
24) Remove the MT gear shift cable and MT gear select cable from MT gear shift lever. <Ref. to CS- 57, REMOVAL, MT Gear Shift Lever.>
CAUTION:
- Do not bend MT gear shift cable and MT gear select cable at a sharp angle.
- Disconnect the MT gear shift cable and MT gear select cable at the MT gear shift lever side.
- Always use new MT gear select cable if the cable is removed from selector lever COMPL of transmission side.
25) Disconnect the stabilizer link from the front arm. <Ref. to FS-29, REMOVAL, Front Stabilizer.>
26) Remove the bolt securing the ball joint of the front arm to the housing, then separate the front arms and the housing. <Ref. to FS-32, REMOVAL, Front Ball Joint.>
27) Separate the front drive shafts on both sides from the transmission. <Ref. to DS-48, REMOVAL, Front Drive Shaft.>
28) Lower the vehicle.
29) Remove the engine hanger rear, and install the engine hanger rear for turbo model. (non-turbo model)
Tightening torque: 16 N*m (1.6 kgf-m, 11.8 ft-lb)
Part No. 10004AA180 Engine hanger rear
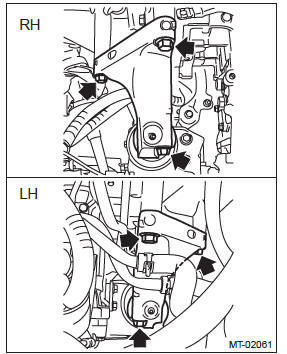
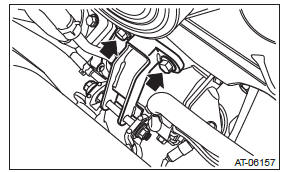
30) Remove the nuts connecting the engine mounting and the transmission main mounting bracket.
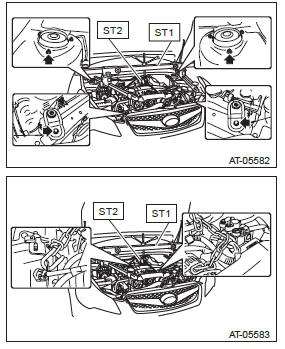
31) Set the ST on the vehicle.
CAUTION:
- Set the chain so that it does not contact the sensors.
- Set the arms of ST (ENGINE HANGER) at the locations shown in the figure.
ST1 99099AJ000 ENGINE HANGER
ST2 99099AJ010 CHAIN BALANCER
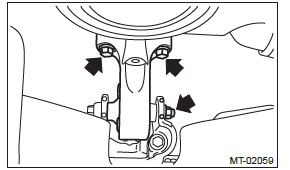
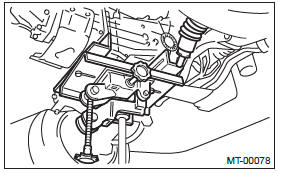
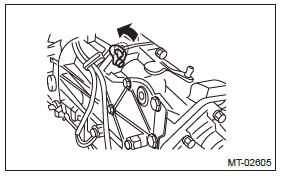
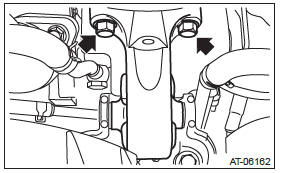
32) Remove the stopper rod.

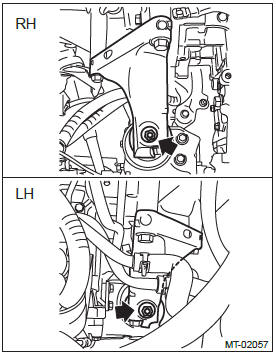
33) Lift the engine slightly and remove the bolts of front cushion rubber.
34) Remove the nut and bolt of the front cushion rubber, then remove the front cushion rubber.
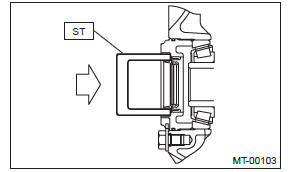
35) Temporarily attach ST by using two bolts.
ST 41099AJ000 SPECIAL TOOL H4
36) Lift up the engine unit high enough to install the bolt and nut to vehicle.
CAUTION:
- Do not lift up higher than enough level to install the ST to avoid damage to the hoses and pipes inside the engine room.
- Do not tighten the bolts and nuts excessively, or the engine mounting bracket may be deformed.
NOTE: If it is difficult to pull out the stud bolt from transmission mounting bracket, slightly shake the engine unit while lifting up.
37) Tighten the mounting bolts on the engine side.
Tightening torque: 25 N*m (2.6 kgf-m, 18.4 ft-lb)

38) Remove the ST (ENGINE HANGER).
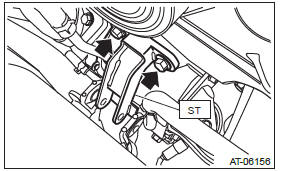
39) Remove the transmission main mounting bracket.
NOTE: First, remove the transmission mounting bracket on the right side of vehicle, and then tilt the engine unit to remove the left transmission mounting bracket.
40) Remove the two mounting bolts on the upper side of the transmission.
41) Set the ST (ENGINE HANGER) again to loosen the chain sling.
42) Lift up the vehicle.
43) Place the transmission jack under the transmission.
CAUTION: Always support the transmission case with a transmission jack.
44) Remove the bolts and nuts which hold lower side of transmission to engine.
45) Remove the front crossmember and rear crossmember from the vehicle.
46) Lower the transmission rear end (dust cover rear end).
CAUTION: When lowering the transmission rear end, be careful not to let the converter case and steering mechanical parts contact each other.
NOTE: Lower the transmission rear end by approx. 80 mm (3.1 in) (reference).
47) Rotate the handle of ST (ENGINE HANGER) to apply tension to the chain sling.
48) Remove the transmission assembly.
NOTE:
- Move the transmission jack towards the rear until the main shaft is withdrawn from the clutch disc.
- Remove it while moving the transmission jack up and down so that the engine and transmission remain directly aligned.
49) Remove the transmission cushion rubber.
B: INSTALLATION
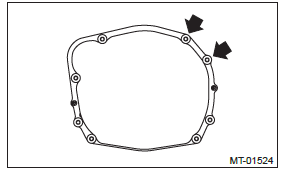
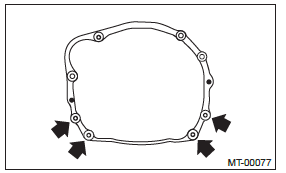
1) Replace the differential side retainer oil seal.
<Ref. to 6MT-36, REPLACEMENT, Differential Side Retainer Oil Seal.>
NOTE: Be sure to replace the differential side retainer oil seal after removing the front drive shaft.
ST 18675AA000 DIFFERENTIAL SIDE OIL SEAL INSTALLER
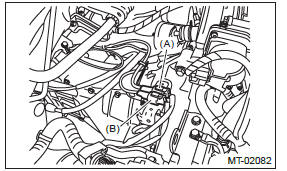
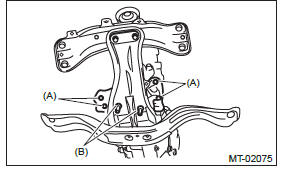
2) Install the transmission cushion rubber to the transmission assembly, and tighten bolt (A).
3) Install the transmission cushion rubber to the center crossmember, and tighten the nut (B).
Tightening torque:
Bolt (A)
35 N*m (3.6 kgf-m, 25.8 ft-lb)
Nut (B)
35 N*m (3.6 kgf-m, 25.8 ft-lb)
4) Tap the transmission hanger in the rear side of transmission with a rubber hammer to bend it until it is in close contact with the transmission case.
CAUTION: Do not apply excessive load or impact to the transmission case.
5) Install the transmission onto the engine.
CAUTION: This operation requires at least two persons.
NOTE: Keep the engine level.
- Lift up the transmission gradually using a transmission jack.
- Engage at the spline section.
NOTE: Be careful not to hit the main shaft against the clutch housing cover.
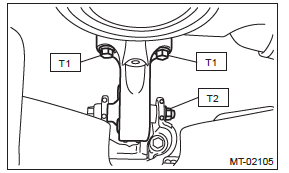
6) Temporarily tighten the bolts and nuts which hold lower side of transmission to engine.
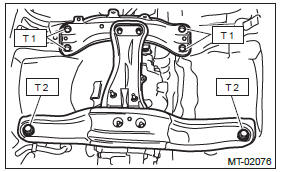
7) Install the front crossmember and rear crossmember.
Tightening torque:
T1: 75 N*m (7.6 kgf-m, 55.3 ft-lb)
T2: 140 N*m (14.3 kgf-m, 103.3 ft-lb)
8) Take out the transmission jack.
9) Tighten the bolts and nuts which hold the lower side of transmission to the engine.
Tightening torque: 50 N*m (5.1 kgf-m, 36.9 ft-lb)
10) Lower the vehicle.
11) Install the two mounting bolts on the upper side of the transmission.
Tightening torque: 50 N*m (5.1 kgf-m, 36.9 ft-lb)
12) Remove the ST (ENGINE HANGER).
13) Install the transmission main mounting bracket.
NOTE: Incline the engine, and install the transmission main mounting bracket for the left side of the vehicle first.
Tightening torque: 75 N*m (7.6 kgf-m, 55.3 ft-lb)
14) Attach the ST (ENGINE HANGER) again.
15) Remove the bolts from ST (SPECIAL TOOL H4).
16) Remove the bolt and nut to remove ST (SPECIAL TOOL H4).
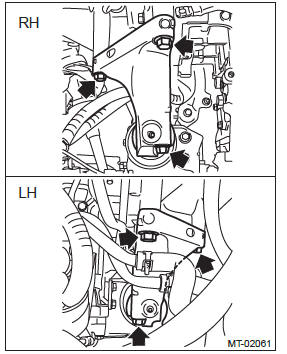
17) Temporarily attach the front cushion rubber with bolts.
18) Install the bolt and nut to the front cushion rubber.
19) Tighten the bolts and nuts of front cushion rubber.
NOTE: Always start tightening from the bolts on the engine side.
Tightening torque:
T1: 25 N*m (2.5 kgf-m, 18.4 ft-lb)
T2: 45 N*m (4.6 kgf-m, 33.2 ft-lb)
20) Remove the ST (ENGINE HANGER) from the vehicle.
21) Install the stopper rod.
Tightening torque: 36 N*m (3.7 kgf-m, 26.6 ft-lb)

22) Tighten the nuts connecting the engine mount and the transmission main mounting bracket.
Tightening torque: 45 N*m (4.6 kgf-m, 33.2 ft-lb)
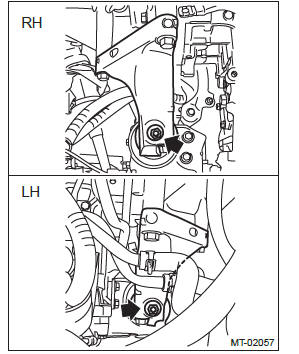
23) Remove the engine hanger rear for turbo model and install the engine hanger rear for non-turbo model. (non-turbo model)
Tightening torque: 16 N*m (1.6 kgf-m, 11.8 ft-lb)
24) Install the starter. <Ref. to SC(H4SO)-10, INSTALLATION, Starter.>
25) Install the operating cylinder.
Tightening torque: 37 N*m (3.8 kgf-m, 27.3 ft-lb)
26) Lift up the vehicle.
27) Install the front drive shaft into the transmission.
<Ref. to DS-49, INSTALLATION, Front Drive Shaft.>
28) Insert the front arm ball joint into the housing lower part. <Ref. to FS-33, INSTALLATION, Front Ball Joint.>
29) Attach the stabilizer link to the front arm. <Ref. to FS-31, INSTALLATION, Front Stabilizer.>
30) Install the MT gear shift cable and MT gear select cable to MT gear shift lever. <Ref. to CS-60, INSTALLATION, MT Gear Shift Lever.>
CAUTION:
- Do not bend MT gear shift cable and MT gear select cable at a sharp angle.
- Always use new MT gear select cable if the cable is removed from selector lever COMPL of transmission side.
31) Install the propeller shaft. <Ref. to DS-11, INSTALLATION, Propeller Shaft.>
32) Install the steering shaft universal joint. <Ref. to PS-22, INSTALLATION, Universal Joint.>
33) Install the heat shield cover. <Ref. to EI-168, INSTALLATION, Heat Shield Cover.>
34) Install the front, center and rear exhaust pipe. (non-turbo model) <Ref. to EX(H4SO)-6, INSTALLATION, Front Exhaust Pipe.> <Ref. to EX(H4SO)- 8, INSTALLATION, Center Exhaust Pipe.> <Ref. to EX(H4SO)-9, INSTALLATION, Rear Exhaust Pipe.>
35) Install the center and rear exhaust pipe. (turbo model) <Ref. to EX(H4DOTC)-13, INSTALLATION, Center Exhaust Pipe.> <Ref. to EX(H4DOTC)-15, INSTALLATION, Rear Exhaust Pipe.>
36) Install the front under cover. <Ref. to EI-35, INSTALLATION, Front Under Cover.>
37) Lower the vehicle.
38) Install the throttle body. (non-turbo model) <Ref. to SC(H4SO)-10, INSTALLATION, Starter.>
39) Connect the following connectors.
- Transmission radio ground terminal
Tightening torque: 13 N*m (1.3 kgf-m, 9.6 ft-lb)
- Neutral position switch connector (Brown)
- Back-up light switch connector (Gray)
- Engine harness connectors
40) Fill transmission gear oil through the transmission oil level gauge hole. <Ref. to 6MT-24, Transmission Gear Oil.>
41) Install the air intake boot assembly. (non-turbo model) <Ref. to IN(H4SO)-8, INSTALLATION, Air Intake Boot.>
42) Install the intercooler and the intercooler stay. (turbo model) <Ref. to IN(H4DOTC)-18, INSTALLATION, Intercooler.>
43) Attach the grille bracket.
44) Install the air intake duct. <Ref. to IN(H4SO)-9, INSTALLATION, Air Intake Duct.> <Ref. to IN(H4DOTC)-12, INSTALLATION, Air Intake Duct.>
45) Install the collector cover. (turbo model) 46) Install the front wheels.
47) Connect the battery ground terminal.
READ NEXT:
 Manual Transmission Mounting System
A: REMOVAL
1. CROSSMEMBER AND CUSHION RUBBER
1) Disconnect the ground cable from battery.
2) Lift up the vehicle.
3) Remove the front under cover. <Ref. to EI-35, REMOVAL, Front Under Cover.>
Oil Seal
A: INSPECTION
Check for transmission gear oil leaks at oil seal area.
If there is an oil leak, replace the oil seal with
new one and check the propeller shaft.
B: REPLACEMENT
1) Remove the collector
Switches and Harness in Manual Transmission
A: REMOVAL
1. BACK-UP LIGHT AND NEUTRAL POSITION SWITCH
1) Disconnect the ground cable from battery.
2) Remove the collector cover. (turbo model)
3) Remove the air intake boot assembly. (non-turbo
SEE MORE:
Adverse safety consequences of overloading on handling and stopping and on tires
Overloading could affect vehicle handling, stopping distance, vehicle and tire
as shown in the following. This could lead to an accident and possibly result in
severe personal injury.
● Vehicle stability will deteriorate.
● Heavy and/or high-mounted loads could increase the risk of
Drive Cycle
A: PROCEDURE
It is necessary to perform the drive cycle listed below if DTC is not found
in the Inspection Mode. It is possible
to complete diagnosis of the DTC by performing the indicated drive cycle. After
the repair for the DTC, perform
a necessary drive cycle and make sure the function recover
