Subaru Outback (BR): Intermediate Case
A: REMOVAL
1) Remove the transmission assembly from vehicle body. <Ref. to CVT-55, REMOVAL, Automatic Transmission Assembly.>
2) Remove the extension case. <Ref. to CVT-138, REMOVAL, Extension Case.>
3) Remove the rear drive shaft. <Ref. to CVT-141, REMOVAL, Rear Drive Shaft.>
4) Remove the transfer clutch assembly. <Ref. to CVT-146, REMOVAL, Transfer Clutch.>
5) Remove the transfer reduction driven gear assembly. <Ref. to CVT-158, REMOVAL, Transfer Reduction Driven Gear.>
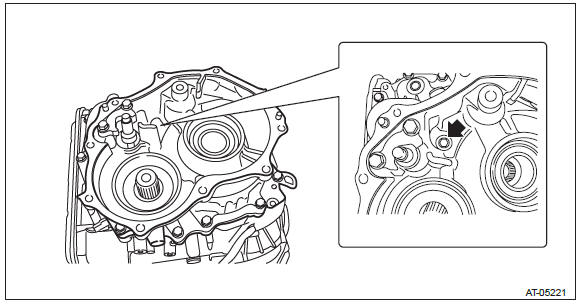
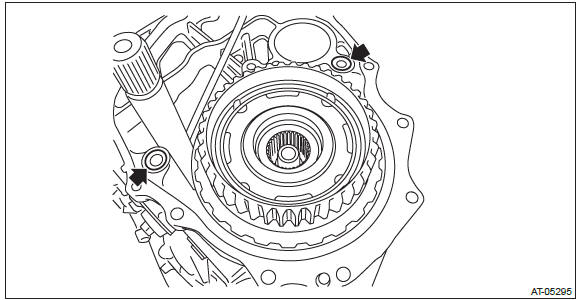
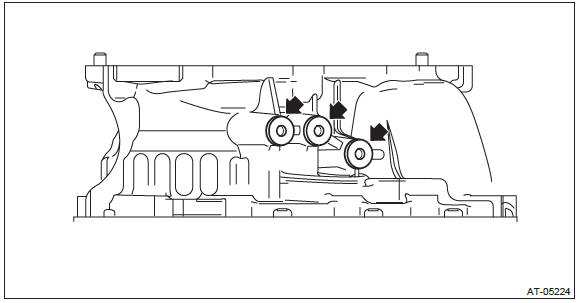
6) Remove the intermediate case.
NOTE:
- The total number of intermediate case mounting bolts is 14.
- Inside the transmission is a single bolt (arrowed).
7) Remove the CVTF filter.
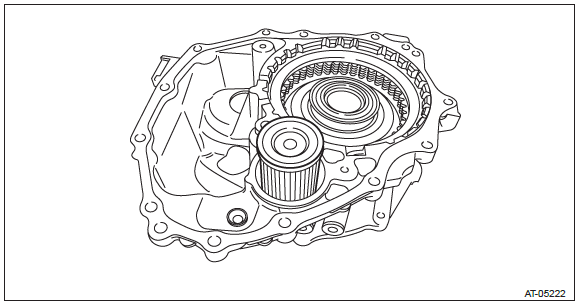
8) Remove the O-ring from the transmission case.
B: INSTALLATION
1) Clean the mating surface of intermediate case and transmission case.
2) Face the O-ring side of the CVTF filter to the intermediate case side, and install the CVTF filter.
NOTE: Apply CVTF to the O-ring.
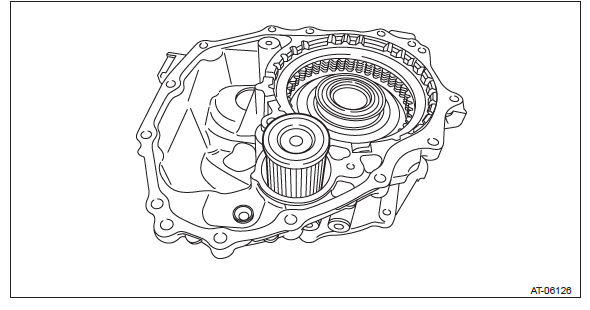
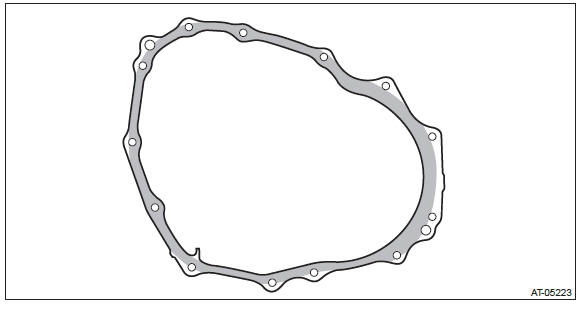
3) Install the O-ring to the transmission case.
NOTE:
- Use new O-rings.
- Apply CVTF to the O-ring.
4) Apply liquid gasket to intermediate case seamlessly.
Liquid gasket: THREE BOND 1215 (Part No. 004403007) or equivalent
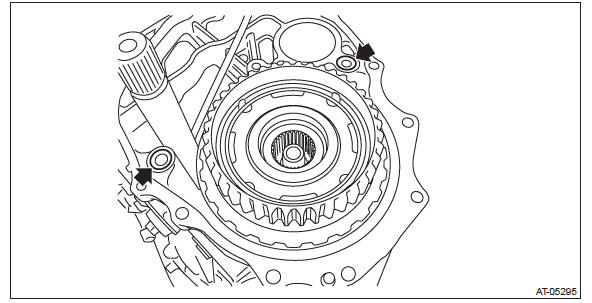
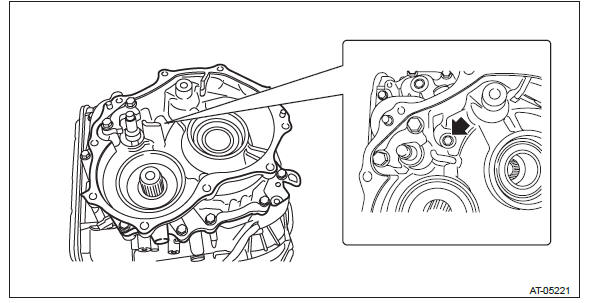
5) Install the intermediate case and the transmission hanger to the transmission case.
NOTE: Make sure to install the arrowed bolt.
Tightening torque: 25 N*m (2.5 kgf-m, 18.4 ft-lb)
6) Install the transfer reduction driven gear assembly. <Ref. to CVT-158, INSTALLATION, Transfer Reduction Driven Gear.>
7) Install the transfer clutch assembly. <Ref. to CVT-147, INSTALLATION, Transfer Clutch.>
8) Install the rear drive shaft. <Ref. to CVT-141, INSTALLATION, Rear Drive Shaft.>
9) Install the extension case. <Ref. to CVT-138, INSTALLATION, Extension Case.>
10) Install the transmission to vehicle. <Ref. to CVT-70, INSTALLATION, Automatic Transmission Assembly.>
C: DISASSEMBLY
1) Remove the CVTF filler plug.
2) Remove all plugs from intermediate case.
3) Remove the reverse brake assembly. <Ref. to CVT-171, DISASSEMBLY, Reverse Brake Assembly.>
D: ASSEMBLY
1) Install the reverse brake. <Ref. to CVT-174, ASSEMBLY, Reverse Brake Assembly.>
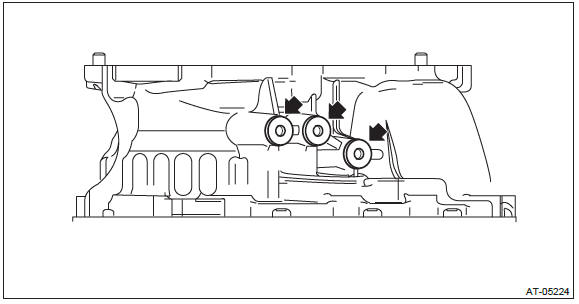
2) install all plugs to intermediate case.
Tightening torque: 25 N*m (2.5 kgf-m, 18.4 ft-lb)
NOTE: Use new O-rings.
3) Install the CVTF filler plug.
NOTE: Replace the gasket of CVTF filler plug with a new part after installing the transmission assembly to vehicle and adjusting CVTF fluid.
E: INSPECTION
- Check the intermediate case for fissures, cracks or damage.
- Check for leakage of CVTF from the connections between intermediate case and transmission case, and between intermediate case and extension case.
CVTF Filter
A: REMOVAL
NOTE:
- Although CVTF filter is a maintenance-free part, replace it if a large quantity of wear debris and metal particles are found in CVTF and CVTF filter.
- For removal of CVTF filter, refer to "Intermediate Case". <Ref. to CVT-165, REMOVAL, Intermediate Case.>
B: INSTALLATION
NOTE: For removal of CVTF filter, refer to "Intermediate Case". <Ref. to CVT-166, INSTALLATION, Intermediate Case.>
C: INSPECTION
- Check if a large quantity of wear debris or metal particles are in CVTF and CVTF filter.
- Check for broken part or damaged O-ring.
READ NEXT:
 Reverse Brake Assembly
A: REMOVAL
NOTE:
For removal of reverse brake assembly, refer to "Intermediate Case". <Ref. to
CVT-165, REMOVAL, Intermediate
Case.>
B: INSTALLATION
NOTE:
For removal of reverse brake assembly,
Forward Clutch Assembly
A: REMOVAL
1) Remove the transmission from the vehicle. <Ref. to CVT-55, REMOVAL,
Automatic Transmission Assembly.>
2) Remove the extension case. <Ref. to CVT-138, REMOVAL, Extension Case.&
Reduction Driven Gear
A: REMOVAL
1) Remove the transmission from the vehicle. <Ref. to CVT-55, REMOVAL,
Automatic Transmission Assembly.>
2) Remove the extension case. <Ref. to CVT-138, REMOVAL, Extension Case.&
SEE MORE:
Engine low oil level warning light
The engine low oil level warning light illuminates when the ignition switch is
turned to the “ON” position and turns off after approximately 2 seconds.
This light also illuminates when the engine oil level decreases to the lower
limit. The illuminating conditions and remaining oil level a
Outer Mirror Assembly
A: REMOVAL
1) Remove the front door trim. <Ref. to EI-60, FRONT DOOR, REMOVAL, Door
Trim.>
2) Remove the outer mirror assembly.
Disconnect the connector.
Remove the bolts to remove outer mirror assembly.
B: INSTALLATION
Install each part in the reverse order of removal.
Tightening torqu
