Subaru Outback (BR): MT Gear Shift Lever
A: REMOVAL
1) Disconnect the ground cable from battery.
2) Lift up the vehicle.
3) Remove the center exhaust pipe and rear exhaust pipe. (non-turbo model) <Ref. to EX(H4SO)-8, REMOVAL, Center Exhaust Pipe.> <Ref. to EX(H4SO)-9, REMOVAL, Rear Exhaust Pipe.>
4) Remove the center exhaust pipe (rear) and rear exhaust pipe. (turbo model) <Ref. to EX(H4DOTC)-12, REMOVAL, Center Exhaust Pipe.> <Ref. to EX(H4DOTC)-15, REMOVAL, Rear Exhaust Pipe.>
5) Remove the heat shield cover.
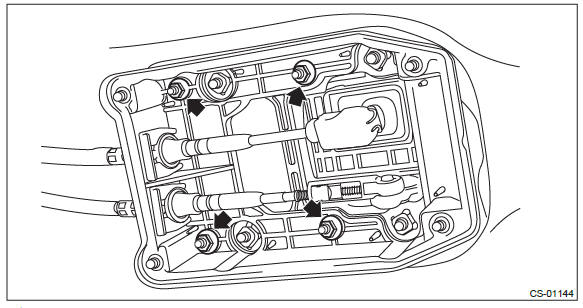
6) Remove the plate cable assembly.
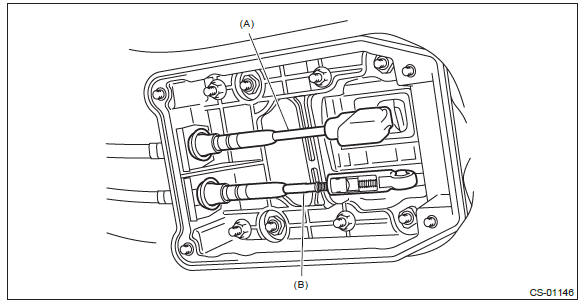
7) Remove the spring at the MT gear shift cable by expanding it and pulling down, and remove the MT gear shift cable from the gear shift lever assembly.
CAUTION: Be careful not to deform the cable inner.
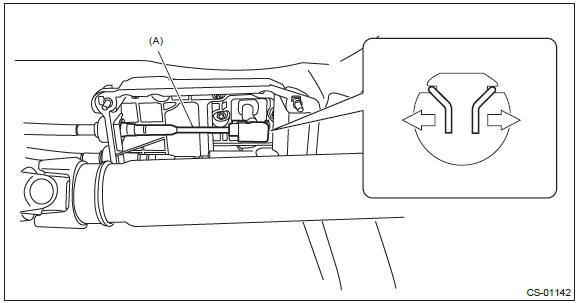
- MT gear shift cable
8) Remove the MT gear select cable from the gear shift lever assembly by pulling it in the direction of arrow in the figure.
CAUTION: Be careful not to deform the cable inner.
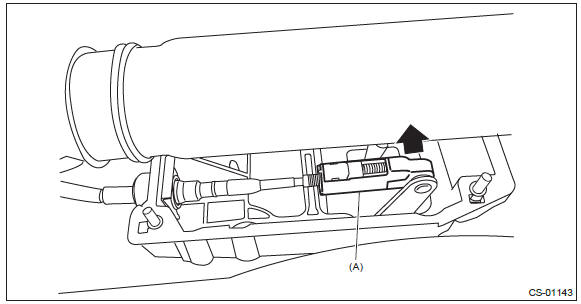
- MT gear select cable
9) Remove the cover cable assembly.
10) Lower the vehicle.
11) Remove the gear shift knob.
12) Remove the console front cover assembly and console box. <Ref. to EI-73, REMOVAL, Console Box.>
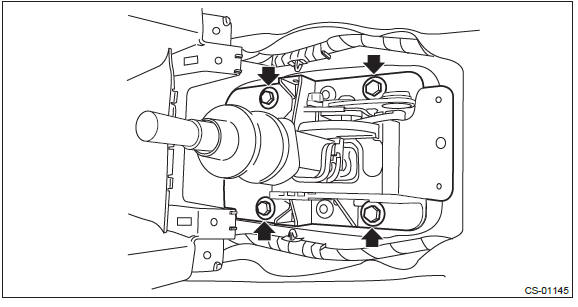
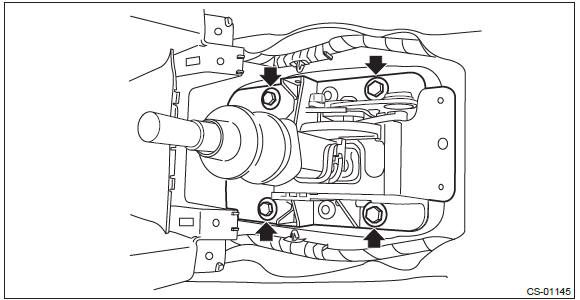
13) Remove the bolts, and then remove the gear shift lever assembly from the vehicle.
NOTE: The MT gear shift lever cannot be disassembled.
B: INSTALLATION
1) Install the gear shift lever assembly.
Tightening torque: 18 N*m (1.8 kgf-m, 13.3 ft-lb)
2) Lift up the vehicle.
3) Install the cover cable assembly.
Tightening torque: 7.5 N*m (0.8 kgf-m, 5.5 ft-lb)
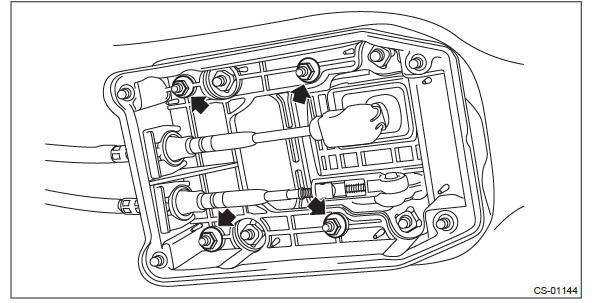
4) Connect the MT gear shift cable and MT gear select cable.
CAUTION:
- Be careful not to deform the cable inner.
- Do not twist the cable inner excessively.
- MT gear shift cable
- MT gear select cable
5) Install the plate cable assembly.
Tightening torque: 7.5 N*m (0.8 kgf-m, 5.5 ft-lb)
6) Install the heat shield cover.
Tightening torque: 18 N*m (1.8 kgf-m, 13.3 ft-lb)

7) Install the center exhaust pipe and rear exhaust pipe. (non-turbo model) <Ref. to EX(H4SO)-8, INSTALLATION, Center Exhaust Pipe.> <Ref. to EX(H4SO)-9, INSTALLATION, Rear Exhaust Pipe.>
8) Install the center exhaust pipe (rear) and rear exhaust pipe. (turbo model) <Ref. to EX(H4DOTC)-13, INSTALLATION, Center Exhaust Pipe.> <Ref. to EX(H4DOTC)-15, INSTALLATION, Rear Exhaust Pipe.>
9) Lower the vehicle.
10) Install the console front cover assembly and the console box. <Ref. to EI-75, INSTALLATION, Console Box.>
11) Install the gear shift knob.
12) Make sure the gears can be shifted accurately into each gear. Adjust the MT gear select cable, if the gears cannot be shifted correctly. <Ref. to CS-95, ADJUSTMENT, MT Gear Select Cable.>
C: INSPECTION
1) Check for any deformed, damaged or worn part. Repair or replace as necessary compare the removed parts with new parts to check if there are damages or not.
2) Check that the lever cannot be moved to the reverse position unless the slider is pulled up.
3) Check that the lever can be moved to the reverse position when the slider is pulled up to maximum.
4) Check that the shift lever returns to the initial position when it is moved to "N" from the condition in 3).

READ NEXT:
 MT Gear Shift Cable
A: REMOVAL
1) Disconnect the ground cable from battery.
2) Lift up the vehicle.
3) Remove the center exhaust pipe and rear exhaust pipe. (non-turbo model) <Ref.
to EX(H4SO)-8, REMOVAL,
Center Ex
MT Gear Select Cable
A: REMOVAL
CAUTION:
Always use new MT gear select cable if the cable is removed from selector lever
COMPL of transmission
side.
1) Disconnect the ground cable from battery.
2) Remove the ten clips
SEE MORE:
Oil Pump Cover removal
A: REMOVAL
1) Remove the transmission assembly from the vehicle.
<Ref. to 5AT-37, REMOVAL, Automatic Transmission Assembly.>
2) Pull out the torque converter assembly. <Ref. to 5AT-63, REMOVAL, Torque Converter Assembly.>
3) Remove the transmission harness connector from stay.
4) Re
Odometer
This meter displays the odometer when the ignition switch is in the “ON” position.
The odometer shows the total distance that the vehicle has been driven.
If you press the trip knob when the ignition switch is in the “LOCK” or “Acc”
position, the odometer/trip meter will light up.
