Subaru Outback (BR): Roof Trim
A: REMOVAL
1. SEDAN MODEL
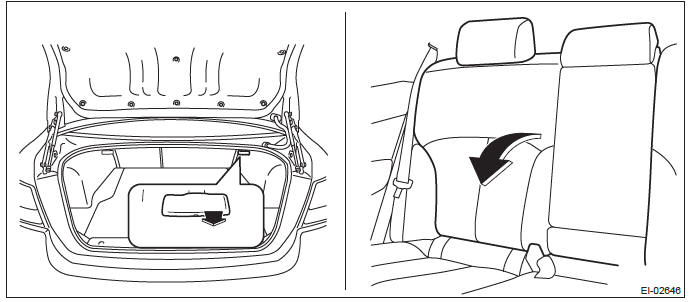
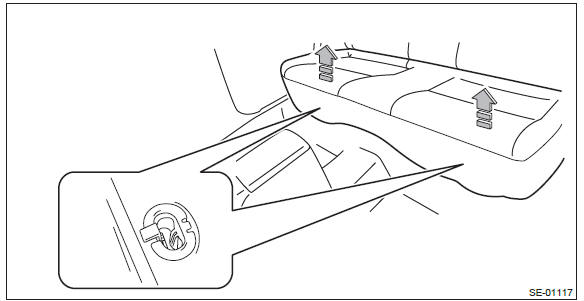
1) Remove the rear seat cushion assembly.
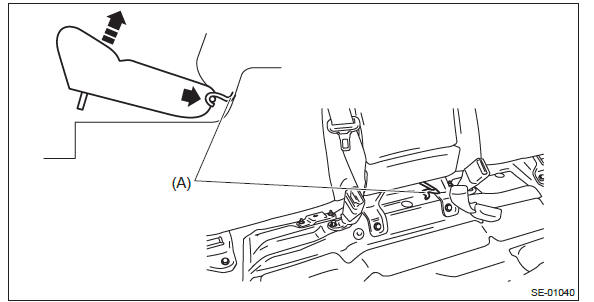
- Pull up the seat cushion and release the hook.
CAUTION: If the hook is disconnected from the vehicle body, replace the hook with the new part to prevent the decline of the fixed force of the seat.
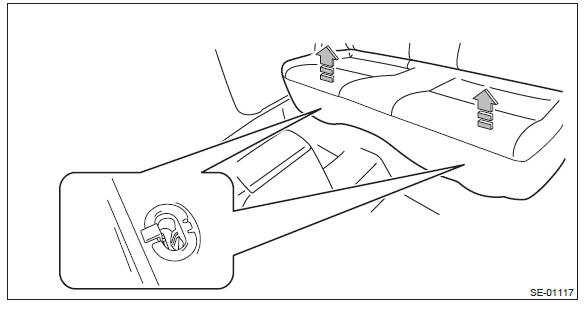
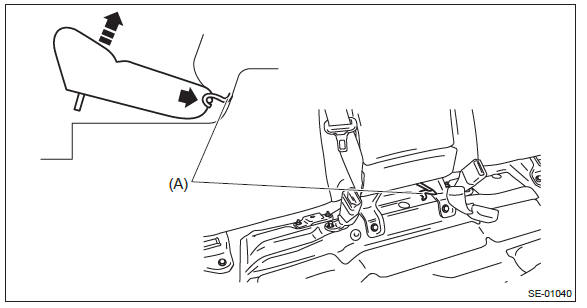
- Remove the hook (A) by pushing it back while lifting the front side of the seat cushion, and remove the seat cushion.
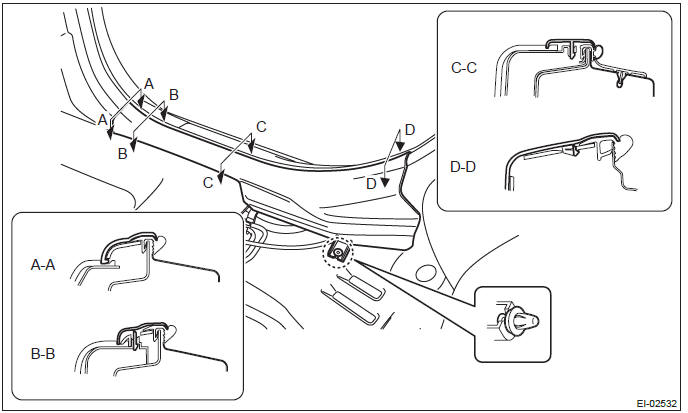
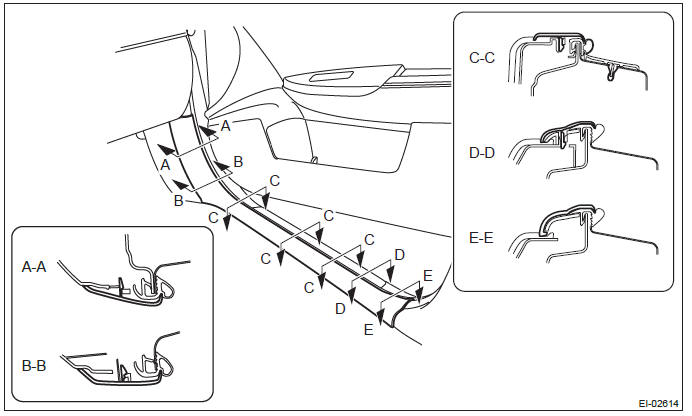
2) Release the clips and claws, and remove the side sill covers - rear INN on the left and right sides.
CAUTION: Do not pull with excessive force. Doing so may damage the claws of the side sill cover INN.
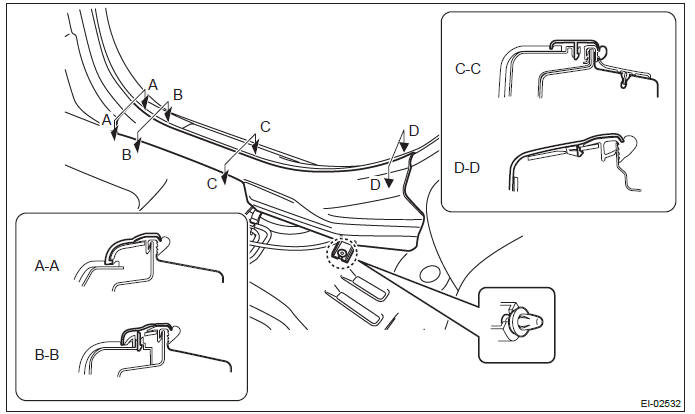
NOTE: To release the claws of the side sill cover INN, the following steps are recommended.
1. Take out the weather strip from under the side sill cover INN.
2. Turn over the floor mat and release the claw (C-C and D-D) by accessing from behind the side sill cover INN.
3) Release the claws, and then remove the side sill cover - front INN on the left and right sides.
CAUTION: Do not pull with excessive force. Doing so may damage the claws of the side sill cover INN.
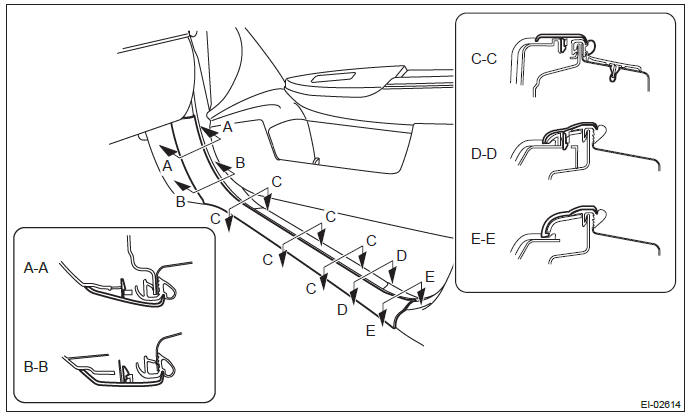
NOTE: To release the claws of the side sill cover INN, the following steps are recommended.
1. Take out the weather strip from under the side sill cover INN.
2. Turn over the floor mat and release the claw (C-C) by accessing from behind the side sill cover INN.
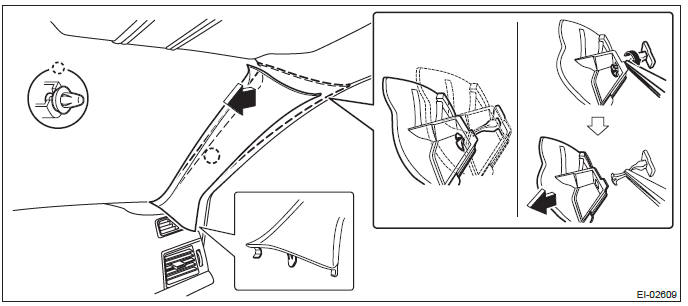
4) Remove the left and right center pillar trim LWR.
- Release the clip by pulling the center pillar trim LWR toward you.
- Expand the claws of center pillar trim LWR outward and remove it from the center pillar trim UPR.
CAUTION: Do not expand the center pillar trim LWR excessively. Doing so may damage the trim.
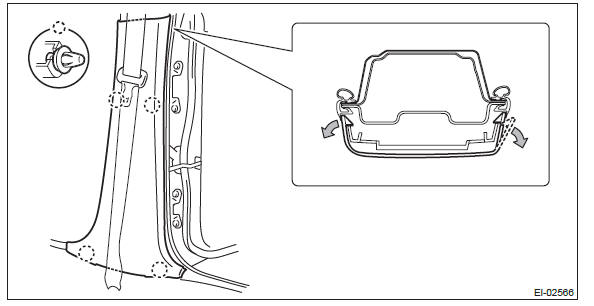
NOTE: First release the claw located to the rear of the vehicle.
5) Disconnect the ground cable from battery and wait for at least 60 seconds before starting work.
CAUTION: The airbag system is fitted with a backup power supply. After disconnecting the battery ground cable, the airbag may operate if you do not wait for 60 seconds before starting the service of airbag system.
NOTE: For the power seat, adjust the front seat position before removing the battery ground.
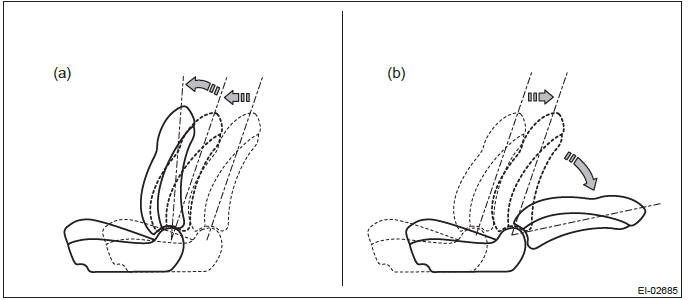
6) Adjust the front seat position.
- Remove the driver's seat and passenger's seat headrests.
NOTE: For models with headrest monitor, remove the headrest in the following procedures.
1. Fold the backrest all the way backward, and then remove the headrest.
2. Place the headrest on the seating face.
3. Return the backrest to the original position.
- Tilt the driver's seat backrest forward and move the seat to the front most position. (a)
- Tilt the passenger's seat backrest rearward and move the seat to the rearmost position. (b)
7) Cover the following areas to protect from damage.
- Steering wheel
- Instrument panel surface
- Glove box surface
8) Remove the console front cover assembly.
- MT model
1. Remove the shift knob.
2. Release the clips and claws, then pull up the console front cover assembly.
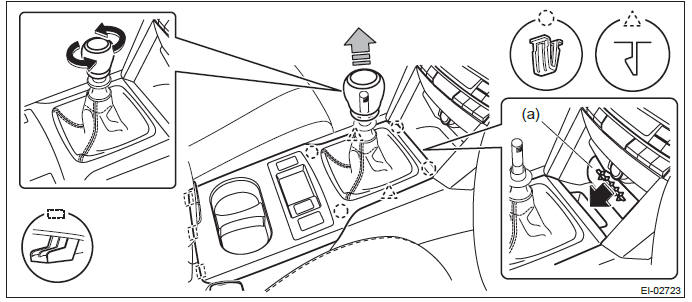
NOTE: Turn over the front center pocket mat (a) and pull up the console front cover from the slit.
3. Disconnect the harness connector and remove the console front cover assembly.
- AT model
1. Remove the select lever knob.
- Lower the cover grip AT.
- Remove the clamp grip pin, then remove the select lever knob.
2. Release the clips and claws, then pull up the console front cover assembly.
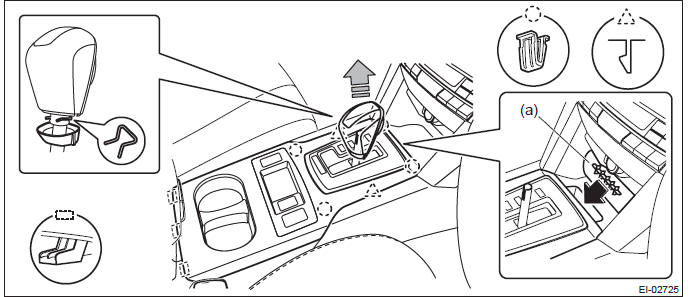
NOTE: Turn over the front center pocket mat (a) and pull up the console front cover from the slit.
3. Disconnect the harness connector and remove the console front cover assembly.
9) Remove the left and right console front side cover assembly.
- Remove the screws and release the clips (A) to (D) in order.
- Remove the console front side cover assembly by pulling it up.
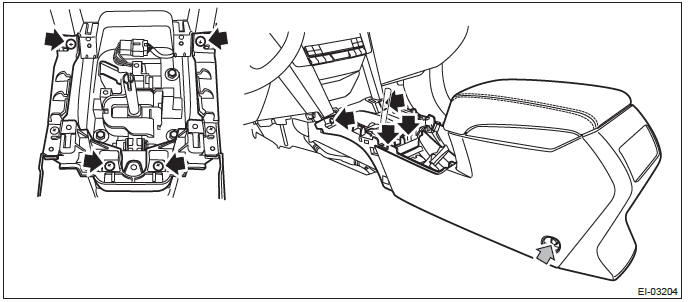
10) Remove the console box assembly.
- Move the seat, and remove the bolts after detaching the left and right caps.
NOTE: For a model with power seat, connect the battery ground cable and move the seat. Then, disconnect the battery ground cable again and wait for 60 seconds at least before restarting the work.
- Remove the screws, disconnect the harness connector and remove the console box assembly.
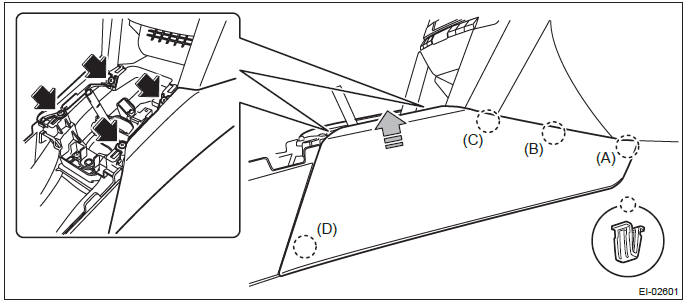
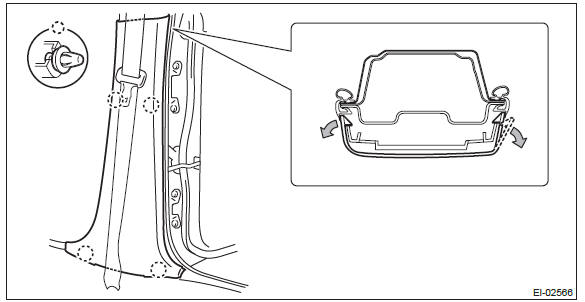
11) Remove the left and right rear quarter trim LWR.
- Remove the backrest side pad.
- Remove the screws.
Preparation tool: Stubby screwdriver
- Turn over the bottom end of the backrest side pad in the forward direction so that the claws are released.
- Remove the backrest side pad by pulling it up.
- Pull the release lever in the trunk room, and then tilt the backrest forward.
- Release the clips of the trunk trim panel assembly - side.
- Remove the clips, and remove the rear quarter trim LWR.
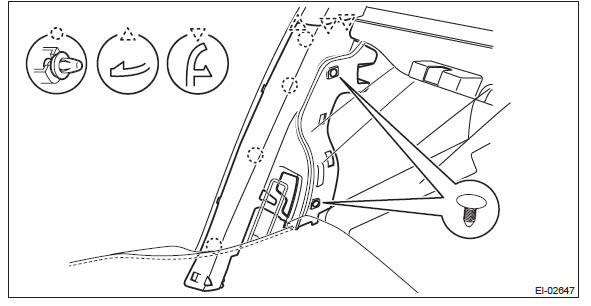
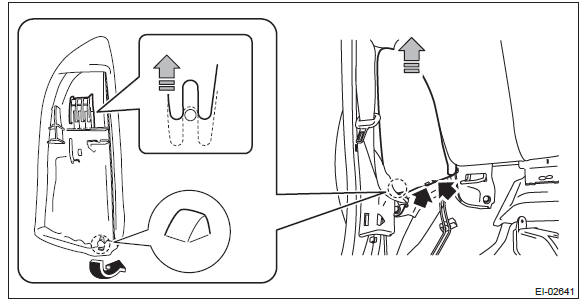
12) Remove the left and right rear quarter trim UPR.
- Remove the lower anchor bolt of the outer belt assembly.
- Release the clips, and remove the rear quarter trim UPR.
- Pull out the seat belt and remove the rear quarter trim UPR.
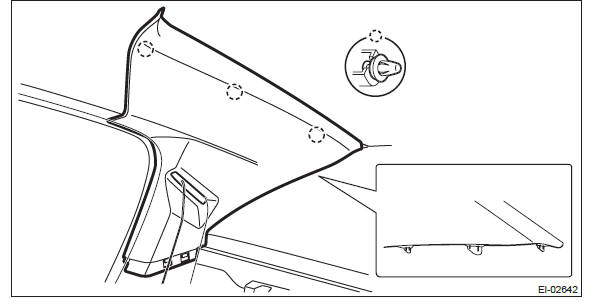
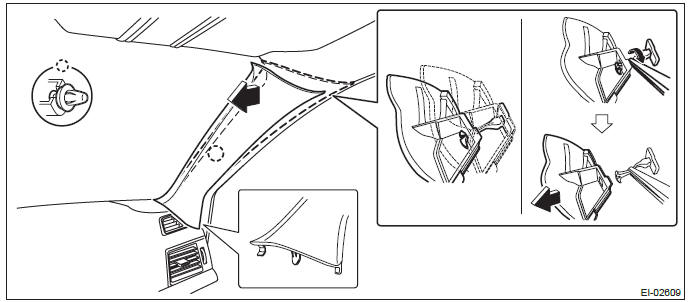
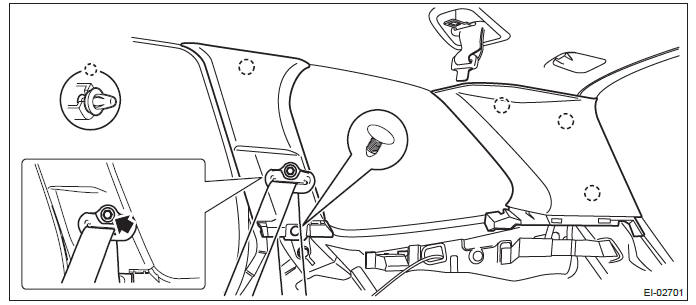
13) Remove the left and right front pillar trims.
- Pull the upper part of the front pillar trim towards the center of the vehicle.
- Insert long-nose pliers into the top part of the trim, grip the clip with the pliers and twist 90º in that position.
CAUTION: Be careful not to damage the pillar trim surface and curtain airbag module when inserting the pliers.
- Holding the clip twisted as in the previous step, remove the front pillar trim from the clip.
- Remove the clip and the front pillar trim.
14) Remove the center pillar trim UPR.
- Remove the seat belt lower anchor bolt.
NOTE: On passenger's side, disconnect the connector of the seat belt tension sensor.
- Release the clip by pulling the center pillar trim UPR toward you.
- Remove the center pillar trim UPR by lowering the entire trim.
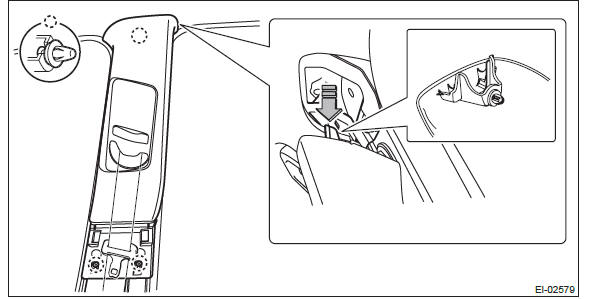
- Pull out the seat belt and remove the center pillar trim UPR.
15) Remove the rear door trim assembly on driver's side.
- Open the cover and remove the screw.
- Remove the clips in the order of (A) to (H) and remove the door trim from the door panel.
CAUTION: When removing the door trim, be sure to remove the clips in the correct order. Forcibly removing clips may damage the door panel assembly.
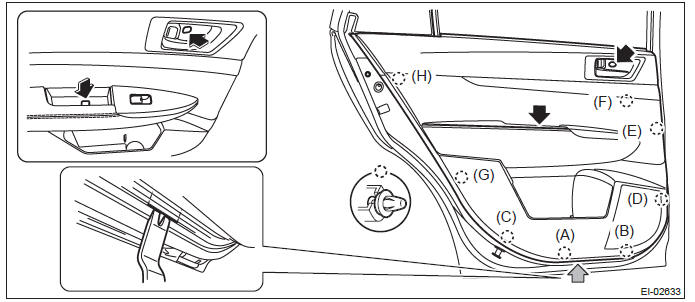
NOTE: Insert a plastic clip remover into the slit at the bottom of the door trim, to lift the door trim.
- Remove the cables (a) and (b) from the cable holder of inner remote.
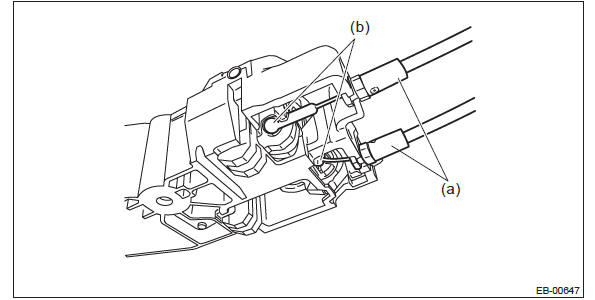
- Disconnect the harness connector and remove the door trim.
16) Remove the rear speaker assembly on driver's side.
- Remove the screws.
- Disconnect the harness connector and remove the rear door speaker.
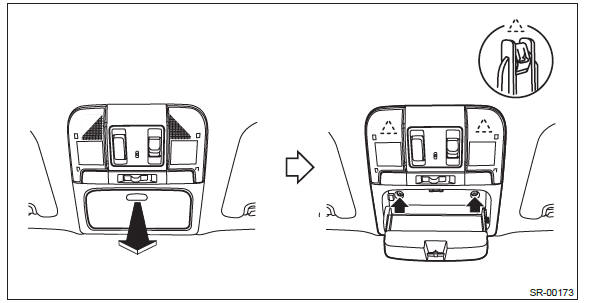
17) Remove the overhead console assembly.
- Push and open the rear end of the overhead console lid, and remove the screws.
- Disconnect the connector and remove the overhead console assembly.
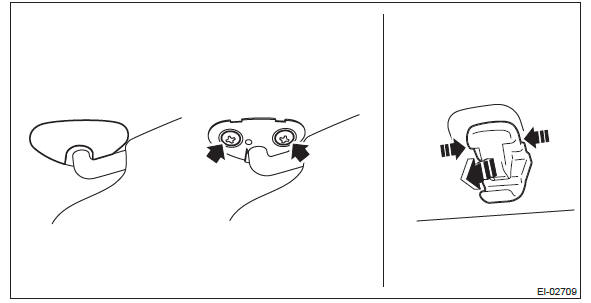
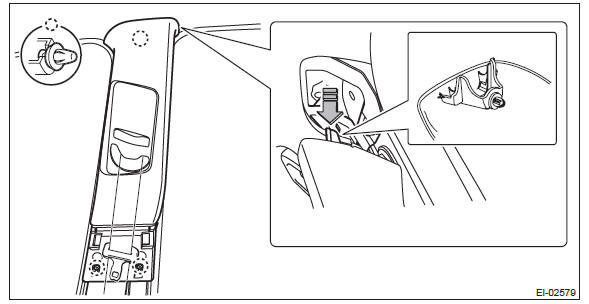
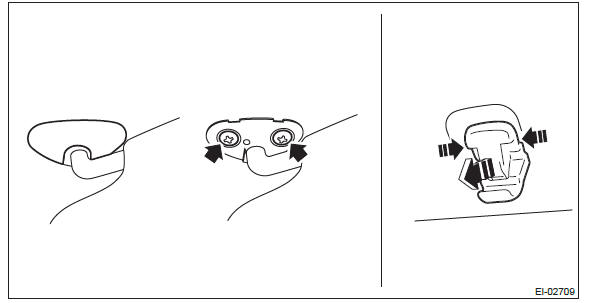
18) Remove the left and right sun visor assembly.
- Remove the cover, loosen the screws, and remove the sun visor assembly.
- Press the both sides of the sun visor hook using a flat tip screwdriver.
- Remove the sun visor hook by pulling toward you.
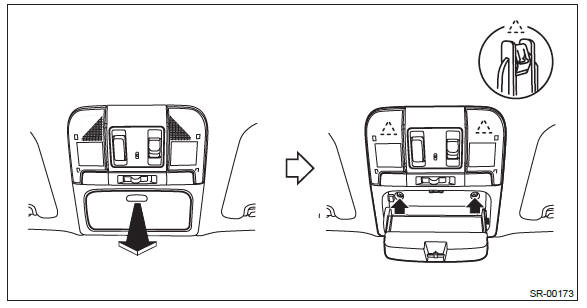
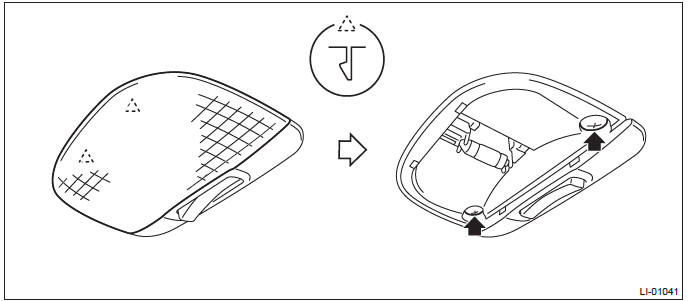
19) Remove the room light assembly.
- Release the claws and remove the cover.
- Remove the two screws.
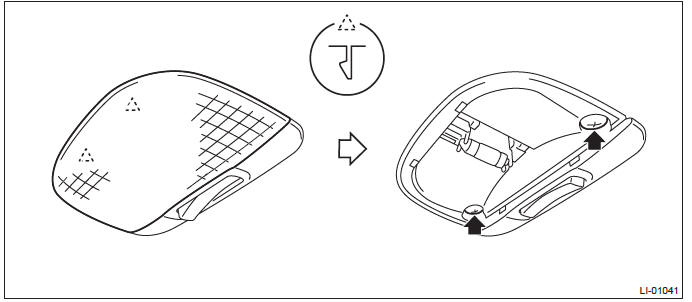
- Disconnect the connector and remove the room light assembly.
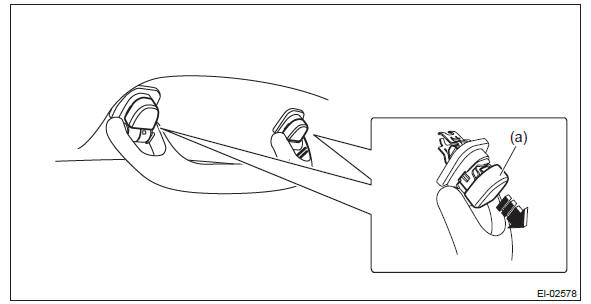
20) Remove all assist grip assembly.
- Remove the cap (a).
- Pull the assist grip toward you (to the vehicle center) and remove the metal clip from the bracket.
21) Remove the sun roof garnish. (model with sunroof)
22) Disconnect the roof harness connector at the front pillar RH.
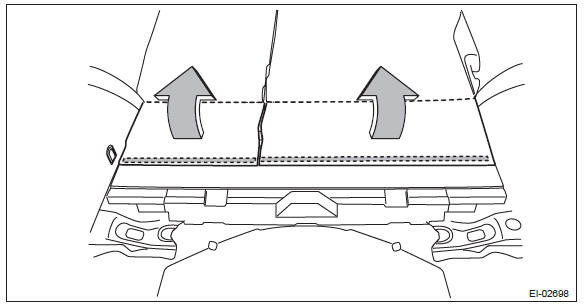
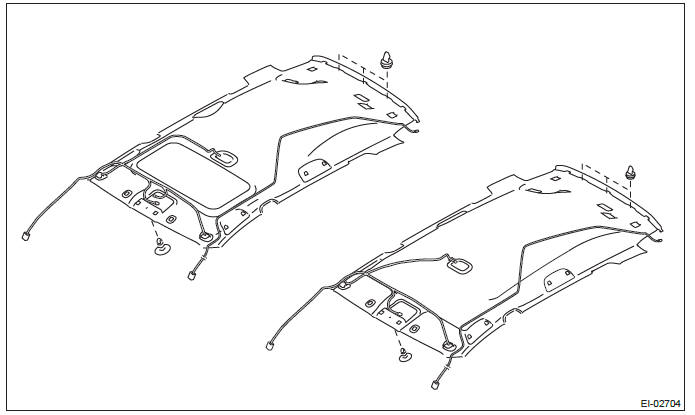
23) Remove the roof trim assembly.
- Remove the clips, and then remove the roof trim.
- Remove the feeder cord and roof cord from the roof trim.
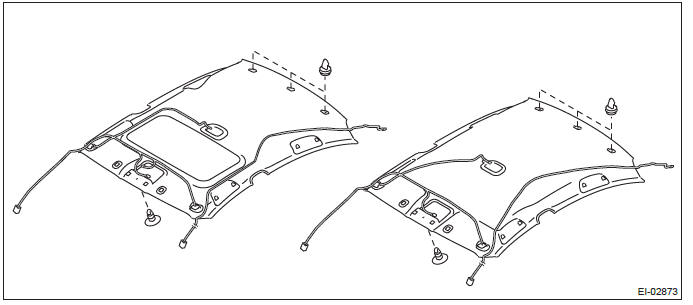
- Take out the roof trim assembly from inside the vehicle.
- Align the center pillar (A) of roof trim with a corner (B) of the driver's seat and turn the roof trim obliquely.
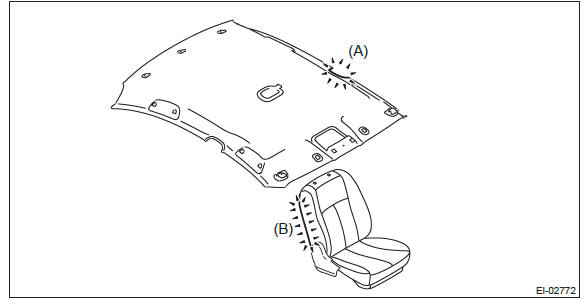
- While holding the roof trim assembly in the condition in step a), take it out from the driver's side rear door opening.
2. OUTBACK MODEL
1) Disconnect the ground cable from battery and wait for at least 60 seconds before starting work.
CAUTION: The airbag system is fitted with a backup power supply. After disconnecting the battery ground cable, the airbag may operate if you do not wait for 60 seconds before starting the service of airbag system.
2) Remove the rear seat cushion assembly.
- Pull up the seat cushion and release the hook.
CAUTION: If the hook is disconnected from the vehicle body, replace the hook with the new part to prevent the decline of the fixed force of the seat.
- Remove the hook (A) by pushing it back while lifting the front side of the seat cushion, and remove the seat cushion.
3) Release the clips and claws, and then remove the left and right side sill covers-rear INN.
CAUTION: Do not pull with excessive force. Doing so may damage the claws of the side sill cover INN.
NOTE: To release the claws of the side sill cover INN, the following steps are recommended.
1. Take out the weather strip from under the side sill cover INN.
2. Turn over the floor mat and release the claw (C-C and D-D) by accessing from behind the side sill cover INN.
4) Tilt the backrest forward and release the clips of the backrest backside mat.
5) Remove the left and right backrest side pad assembly. (On the side where airbag sensor is removed)
- Disconnect the backrest cable and reclining lever cable.
- Remove the screws and remove the reclining lever assembly by pulling it downward.
Preparation tool: Stubby screwdriver
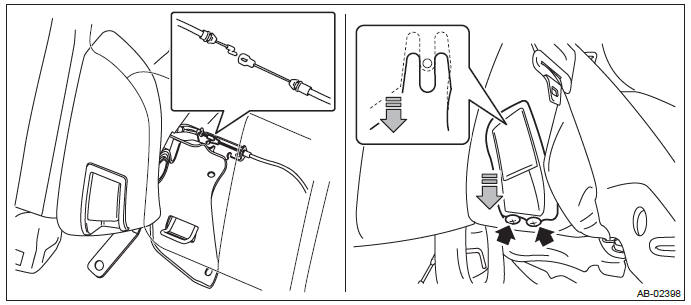
- Turn over the bottom end of the backrest side pad in the forward direction so that the claws are released.
- Remove the backrest side pad by pulling it up.

6) Remove the clips, and remove the luggage floor box and rear floor edge cover.
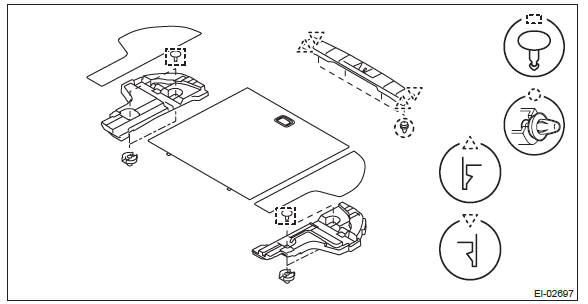
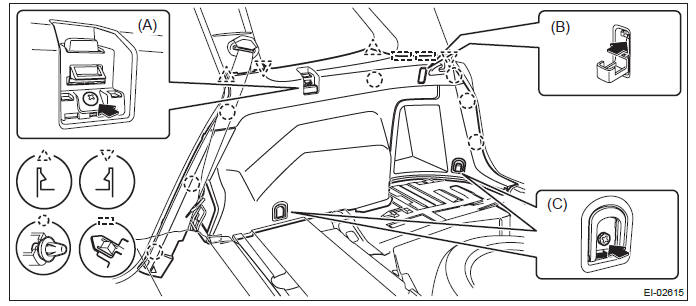
7) Remove the left and right rear quarter trim LWR.
- Remove the caps, screws, and bolts. (A), (C)
- Take out the hook and remove the screw inside. (B)
- Remove the clips, and remove the rear quarter trim LWR.
8) Remove the left and right rear quarter trim UPR.
- Open the cap and remove the bolt to remove the seat belt anchor.
- Remove the clips, and remove the rear quarter trim UPR-front.
- Remove the clips, and remove the rear quarter trim UPR-rear.
9) Remove the left and right front pillar trims.
- Pull the upper part of the front pillar trim towards the center of the vehicle.
- Insert long-nose pliers into the top part of the trim, grip the clip with the pliers and twist 90º in that position.
CAUTION: Be careful not to damage the pillar trim surface and curtain airbag module when inserting the pliers.
- Holding the clip twisted as in the previous step, remove the front pillar trim from the clip.
- Remove the clip and the front pillar trim.
10) Release the claws, and then remove the left and right side sill cover-front INN.
CAUTION: Do not pull with excessive force. Doing so may damage the claws of the side sill cover INN.
NOTE: To release the claws of the side sill cover INN, the following steps are recommended.
1. Take out the weather strip from under the side sill cover INN.
2. Turn over the floor mat and release the claw (C-C) by accessing from behind the side sill cover INN.
11) Remove the left and right center pillar trim LWR.
- Release the clip by pulling the center pillar trim LWR toward you.
- Expand the claws of center pillar trim LWR outward and remove it from the center pillar trim UPR.
CAUTION: Do not expand the center pillar trim LWR excessively. Doing so may damage the trim.
NOTE: First release the claw located to the rear of the vehicle.
12) Remove the center pillar trim UPR.
- Remove the seat belt lower anchor bolt.
- Release the clip by pulling the center pillar trim UPR toward you.
- Remove the center pillar trim UPR by lowering the entire trim.
- Pull out the seat belt and remove the center pillar trim UPR.
13) Remove the overhead console assembly.
- Push and open the rear end of the overhead console lid, and remove the screws.
- Disconnect the connector and remove the overhead console assembly.
14) Remove the left and right sun visor assembly.
- Remove the cover, loosen the screws, and remove the sun visor assembly.
- Press the both sides of the sun visor hook using a flat tip screwdriver.
- Remove the sun visor hook by pulling toward you.
15) Remove the room light assembly.
- Release the claws and remove the cover.
- Remove the two screws.
- Disconnect the connector and remove the room light assembly.
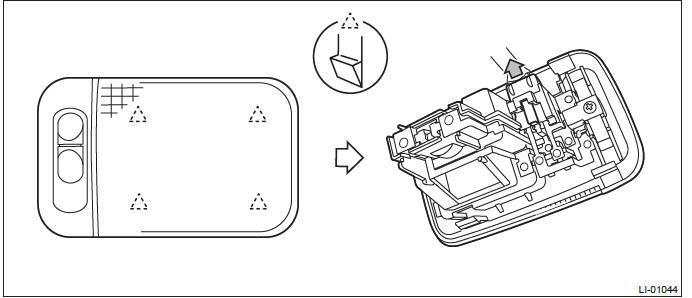
16) Remove the luggage light.
- Release the claws and remove the luggage room light main body.
- Disconnect the connector and remove the luggage room light.
17) Remove all assist grip assembly.
- Remove the cap (a).
- Pull the assist grip toward you (to the vehicle center) and remove the metal clip from the bracket.
18) Remove the sun roof garnish. (model with sunroof)
19) Disconnect the roof harness connector at the front pillar RH.
20) Remove the roof trim assembly.
- Release the clips and remove the feeder cord and roof cord from the roof trim.
- Take out the roof trim assembly from the rear gate opening to outside.
B: INSTALLATION
1) Attach the feeder cord and roof cord to the roof trim.
CAUTION: Route each cord carefully. The cord may interfere, thus preventing normal deployment of the curtain airbag when necessary.
Tape:
Item number: 86359SC000/TAPE
NOTE: Use the tape (service parts) by cutting into 80 mm × 50 mm (3.2 in × 2.0 in).
- Sedan model
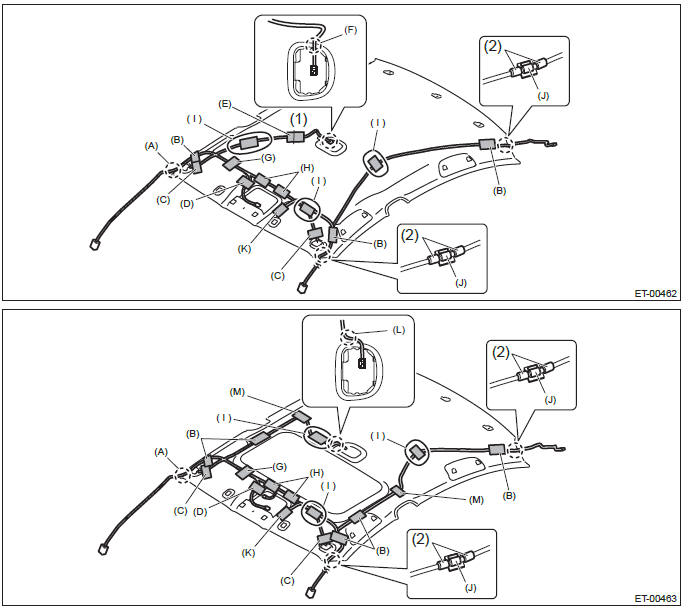
- Mark-off line
- Polyurethane tape
- Align the marking (white) center of cord with the clamp to secure.
- Affix with tape while avoiding the assist grip surface.
- Adjust the excess cord to 60+-10 mm (2.4+-0.4 in) from the hole edge, and affix with tape.
- Affix right after the cord branching point with tape.
- Affix with tape while aligning with the mark-off line.
- Place the marking (white) cord center to adjust the excess.
- Align with the center of sun visor, and affix with tape.
- Affix the rear left and right of the hole with tape.
- Adjust the excess cord at (I) position and affix with tape.
- Place the clamp between the polyurethane tapes (2) to secure.
- Affix the prewire connector with tape.
- Pass the marking (white) of cord under the clamp.
- Affix the cord at the pad rear end with tape.
- OUTBACK model
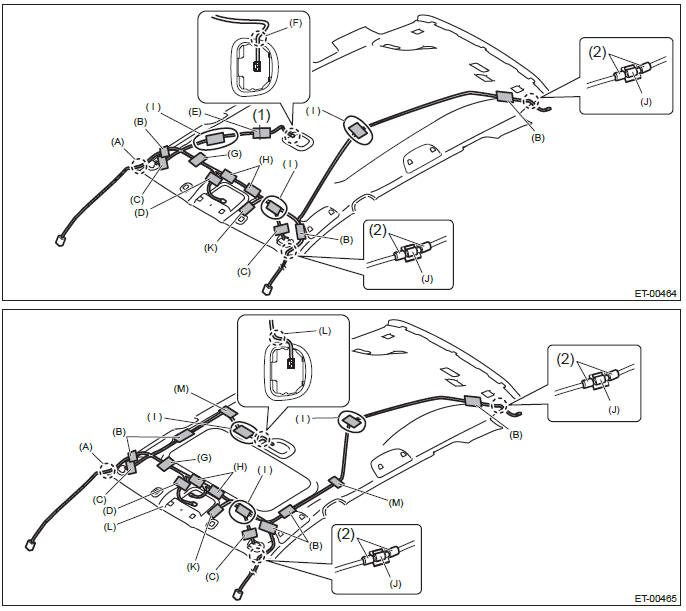
- Mark-off line
- Polyurethane tape
- Align the marking (white) center of cord with the clamp to secure.
- Affix with tape while avoiding the assist grip surface.
- Adjust the excess cord to 60+-10 mm (2.4+-0.4 in) from the hole edge, and affix with tape.
- Affix right after the cord branching point with tape.
- Affix with tape while aligning with the mark-off line.
- Place the marking (white) cord center to adjust the excess.
- Align with the center of sun visor, and affix with tape.
- Affix the rear left and right of the hole with tape.
- Adjust the excess cord at (I) position and affix with tape.
- Place the clamp between the polyurethane tapes (2) to secure.
- Affix the prewire connector with tape.
- Pass the marking (white) of cord under the clamp.
- Affix the cord at the pad rear end with tape.
2) Install each part in the reverse order of removal.
CAUTION: If the hook is disconnected from the vehicle body, replace the hook with the new part to prevent the decline of the fixed force of the seat.
Floor Mat
A: REMOVAL
1) Remove the front seat assembly. <Ref. to SE-10, REMOVAL, Front Seat.>
2) Remove the rear seat cushion assembly. <Ref. to SE-34, REMOVAL, Rear Seat.>
3) Remove the console box assembly. <Ref. to EI-73, REMOVAL, Console Box.>
4) Remove the console front side cover. <Ref. to EI-70, CONSOLE FRONT COVER, REMOVAL, Center Console.>
5) Remove the lower inner trim. <Ref. to EI-96, REMOVAL, Lower Inner Trim.>
6) Take out the floor mat from the vehicle.
- Remove the clips from the floor mat.
- Remove the mat hook on both sides.
- Take out the floor mat after folding down.
B: INSTALLATION
Install each part in the reverse order of removal.
NOTE: Secure the mat firmly with hook and clip.
Trunk Lid Garnish
A: REMOVAL
1) Remove the trunk lid trim.
- Remove the trunk handle.
- Remove the clips and the trunk lid trim.
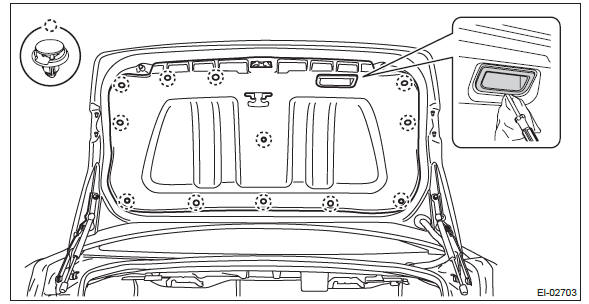
2) Remove the trunk lid garnish.
- Remove the nuts.
- Remove the clips and the trunk lid garnish.
B: INSTALLATION
Install each part in the reverse order of removal.
Tightening torque: 4.5 N*m (0.46 kgf-m, 3.3 ft-lb)
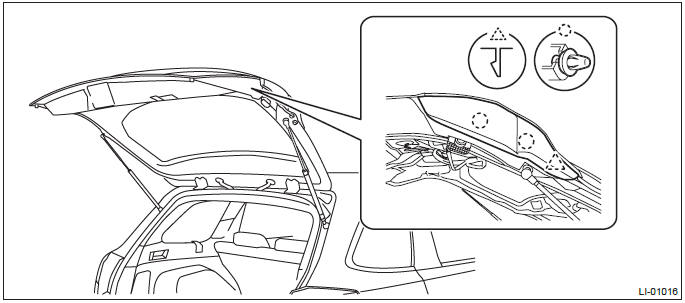
Rear Gate Garnish
A: REMOVAL
1) Disconnect the ground cable from battery.
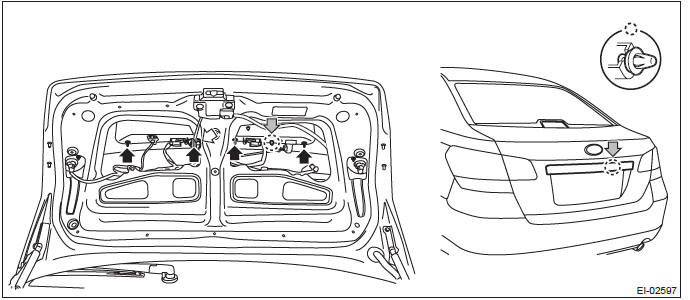
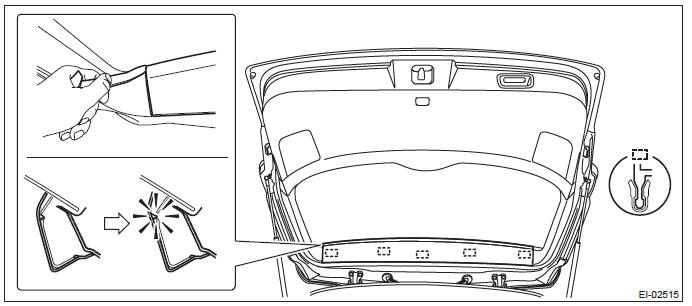
2) Remove the rear gate trim.
- Remove the rear gate upper trim.
- Remove the claws on the trim edge.
- Disconnect the claws in the center of trim, and remove the rear gate upper trim.
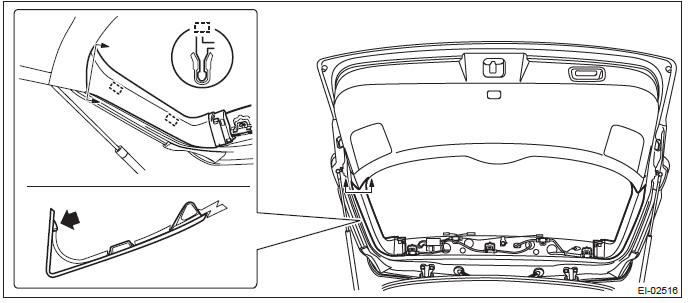
- Remove the rear gate pillar trim.
- Release the claws.
- Remove the claws on the bottom of trim, and remove the rear gate pillar trim.
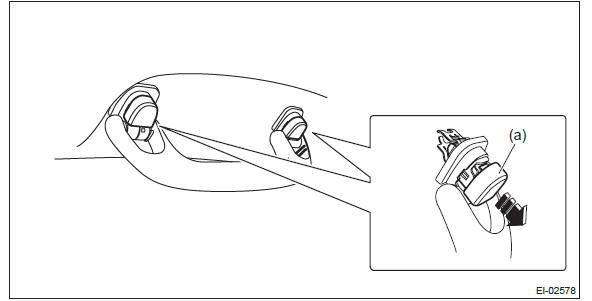
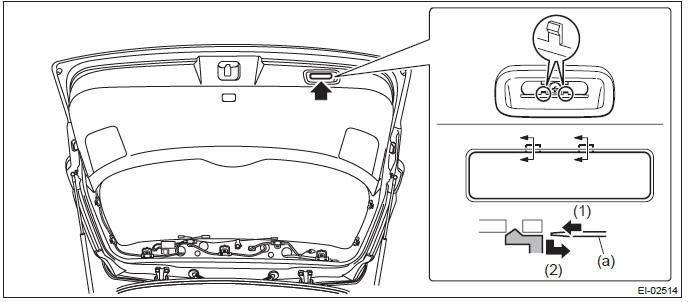
- Remove the hand grip of rear gate.
CAUTION:
- Be careful not to scratch the trim.
- To protect the trim from damage, attach a protective tape to the tool in use.
- Insert a precision screwdriver (a).
- With the screwdriver inserted, push it down to release the claw and pull it toward you.
- Remove the screws and detach the hand grip.
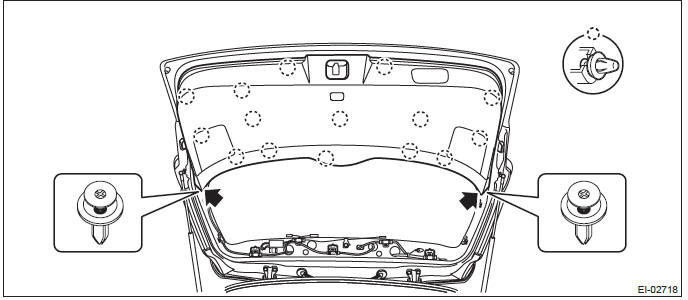
- Remove the rear gate lower trim.
- Remove the clips on both ends.
- Release the clips and remove the rear gate lower trim.
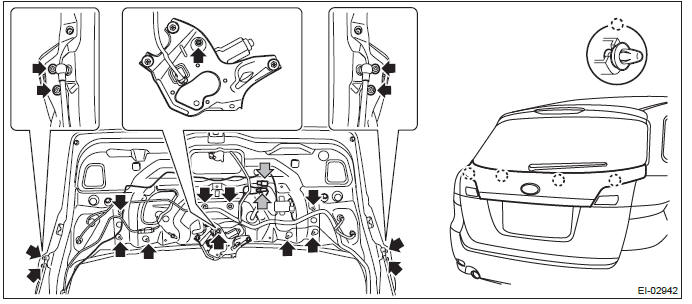
3) Remove the rear gate garnish.
- Release the clips and claws, then detach the rear finisher light side cover.
- Disconnect the harness connector of license plate light assembly.
- Remove the nuts.
- Remove the clips, and remove the rear gate garnish.
B: INSTALLATION
CAUTION: Make sure that the harness grommet is installed securely.
Incomplete installation causes water leak.
Install each part in the reverse order of removal.
Tightening torque
Rear gate garnish: 4.5 N*m (0.46 kgf-m, 3.3 ft-lb)
Heat Shield Cover
A: REMOVAL
1. FRONT HEAT SHIELD COVER
1) Remove the rear exhaust pipe and muffler.
- Rear exhaust pipe
- H4 turbo model: <Ref. to EX(H4DOTC)-15, REMOVAL, Rear Exhaust Pipe.>
- H4 non-turbo model: <Ref. to EX(H4SO)-9, REMOVAL, Rear Exhaust Pipe.>
- H6 model: <Ref. to EX(H6DO)-8, REMOVAL, Rear Exhaust Pipe.>
- Muffler
- H4 turbo model: <Ref. to EX(H4DOTC)-17, REMOVAL, Muffler.>
- H4 non-turbo model: <Ref. to EX(H4SO)-11, REMOVAL, Muffler.>
- H6 model: <Ref. to EX(H6DO)-10, REMOVAL, Muffler.>
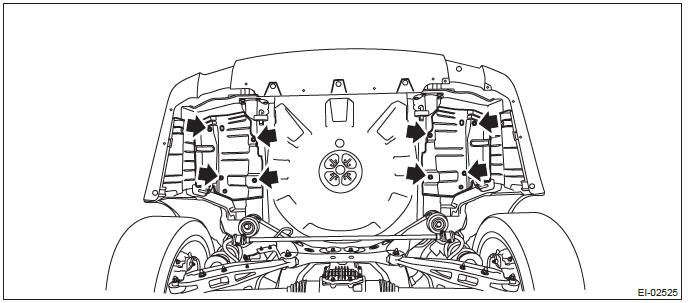
2) Remove the four bolts to remove the front heat shield cover.
2. CENTER HEAT SHIELD COVER
1) Remove the rear exhaust pipe and muffler.
- Rear exhaust pipe
- H4 turbo model: <Ref. to EX(H4DOTC)-15, REMOVAL, Rear Exhaust Pipe.>
- H4 non-turbo model: <Ref. to EX(H4SO)-9, REMOVAL, Rear Exhaust Pipe.>
- H6 model: <Ref. to EX(H6DO)-8, REMOVAL, Rear Exhaust Pipe.>
- Muffler
- H4 turbo model: <Ref. to EX(H4DOTC)-17, REMOVAL, Muffler.>
- H4 non-turbo model: <Ref. to EX(H4SO)-11, REMOVAL, Muffler.>
- H6 model: <Ref. to EX(H6DO)-10, REMOVAL, Muffler.>
2) Remove the propeller shaft. (Turbo model only) <Ref. to DS-10, REMOVAL, Propeller Shaft.>
3) Remove the bolt (A), nut (B) and clip (C) to remove center heat shield cover.
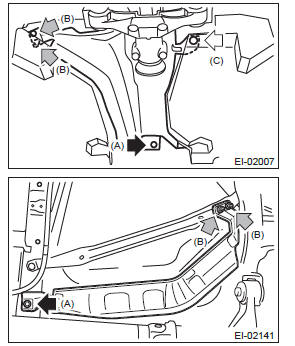
3. REAR HEAT SHIELD COVER
1) Remove the muffler.
- H4 turbo model <Ref. to EX(H4DOTC)-17, REMOVAL, Muffler.>
- H4 non-turbo model <Ref. to EX(H4SO)-11, REMOVAL, Muffler.>
- H6 model <Ref. to EX(H6DO)-10, REMOVAL, Muffler.>
2) Remove the bolts, and remove the rear heat shield cover.
B: INSTALLATION
Install each part in the reverse order of removal.
Tightening torque:
Refer to "COMPONENT" of "General Description". <Ref. to EI-25, HEAT SHIELD
COVER, COMPONENT,
General Description.>
Ornament
A: INSTALLATION
1. LETTER MARK
Adhere the letter mark according to the following measurements.
- Sedan model
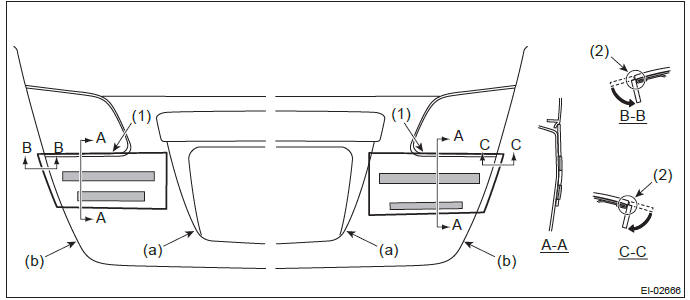
- Character line
- Trunk lid panel end
- Align the top end of application tape to the radius start of the rear finisher light.
- Align the slit of application tape to the end of trunk lid panel and break off the application tape.
- OUTBACK model
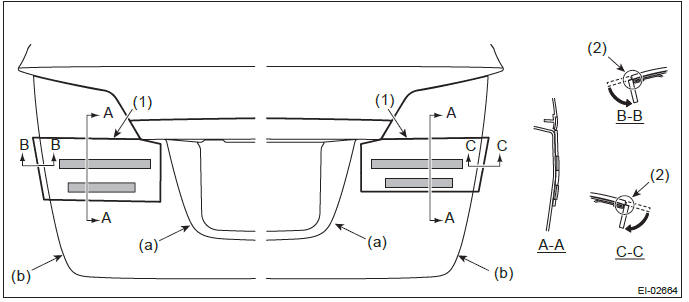
- Character line
- End of rear gate panel
- Align the top end of application tape to the bottom of the rear finisher light.
- Align the slit of application tape to the end of rear ate panel and break off the application tape.
READ NEXT:
 General Description of Exterior Body Panels
A: SPECIFICATION
Refer to Body Repair Manual for the dimensions of the body.
B: COMPONENT
1. FRONT HOOD
Insulator
Front hood panel ASSY
Front grille seal ASSY
Front hood sea
Front Hood
A: REMOVAL
1. FRONT HOOD INSULATOR
Release the clips to remove the front hood insulator.
CAUTION:
Do not reuse any clips damaged during removal. The damaged clip cannot fix the
insulator securely.
T
SEE MORE:
DTC P2229, P2610, U0073, U0101, U0122, U0140, U0402, U0416, U0422
EA:DTC P2229 BAROMETRIC PRESSURE CIRCUIT HIGH
DTC DETECTING CONDITION:
Immediately at fault recognition
GENERAL DESCRIPTION <Ref. to GD(H4SO)-240, DTC P2229 BAROMETRIC PRESSURE
CIRCUIT
HIGH, Diagnostic Trouble Code (DTC) Detecting Criteria.>
CAUTION:
After servicing or replacing faulty
Auto-dimming function
The auto-dimming function is an anti-glare capability which automatically reduces
glare coming from headlights of vehicles behind you.
By pressing the power button, the autodimming function is toggled on or off.
When the auto-dimming function is on, the function indicator will illuminate
in gr
